Introduction
Microsoft 365 Purview allows you to create and publish retention labels that you can apply to data in SharePoint, OneDrive, Teams and Exchange. These labels ensure that data is retained for a required period of time. They define if content should be locked as a record in the meantime and if it should be deleted after the retention period has ended. This is especially useful for data that is not actively used, but still needs to be kept for legal or compliance reasons. In this blog post series I dive a little deeper into how to programmatically manage Purview retention labels and apply them to SharePoint content.
Series overview
- Part 1: Managing and applying Purview retention labels using code
- Part 2: Working with Purview event-based retention using code
- Part 3: Finding and fixing incorrectly applied Purview retention labels
- Part 4: Implications of applying Purview retention labels to folders
- Part 5: Automating Purview data retention using Azure Functions (This blog)
Table of contents
Scenario
Say you want to automatically apply retention labels to SharePoint content based on a set of business rules. You could of course, use the autolabelling features of Microsoft 365 Purview. These are really powerful, but essentially boil down to labels being applied based on search queries. There are scenario’s when you need a more extended setup. For example: you may want to check if all required metadata on a document is filled before applying a label. Or you might have some business rules in place that require you to validate some conditions to be true before applying the label. In these cases, you can build your own automation solution.
I’ll focus in this blog post on how to do this using Azure Functions. But it can equally easy be done using an Azure Automation Runbook, an Azure Logic App or a Power Automate flow. I’ll just cover the basics, as the specific implementation will depend on your scenario. I’ll build it as a PowerShell function. But you could also take the other route and go all .NET. Just read up on my last few blog posts and it will be easy to link the points together.
The setup is as follows:

How to set it up
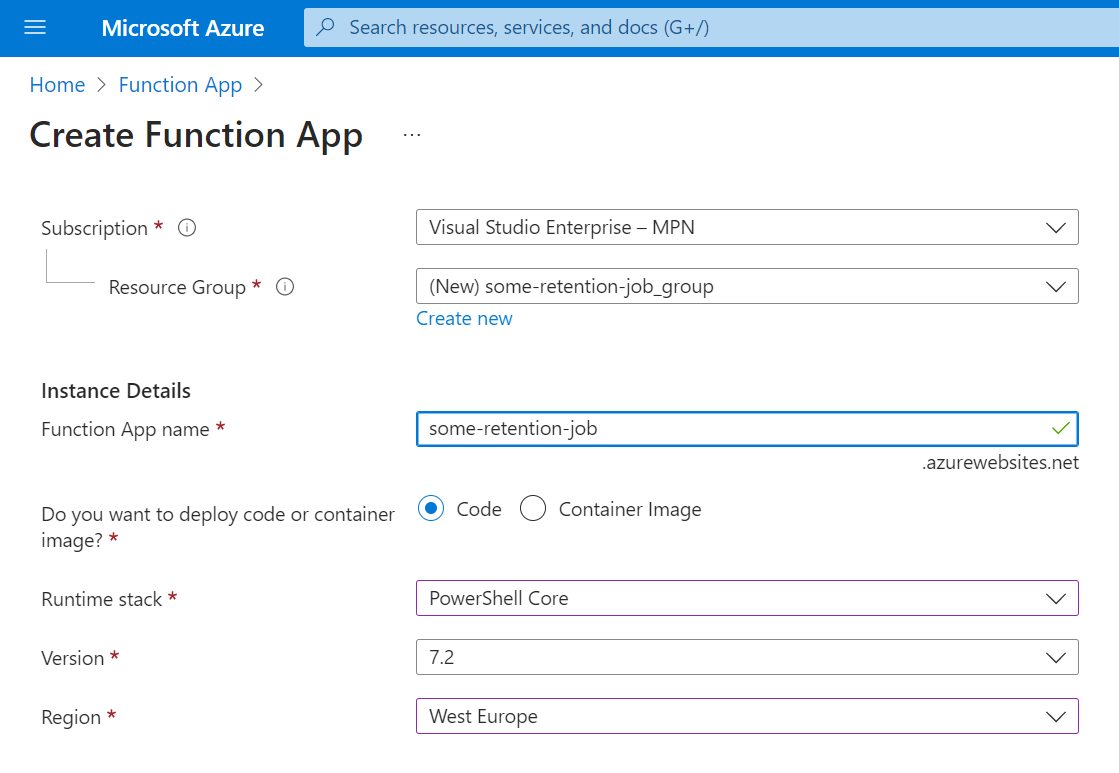
Step 1: Creating an Azure Function
The first step is to create an Azure Function. You can do this from the Azure Portal. Just create a new Function App and select the PowerShell Core runtime.
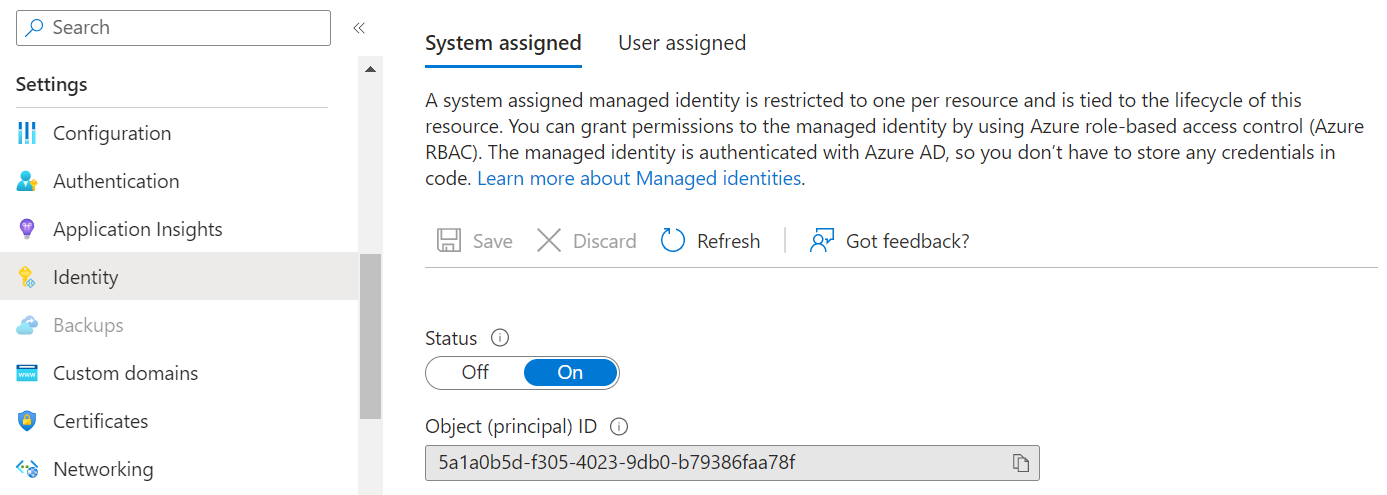
Step 2: Enabling an identity
To allow the Azure Function to authenticate with SharePoint and apply labels, we’ll need to give it an identity. You can enable this on the Identity blade of your new Function app. Just toggle the Status to On and click Save. It will return an Object ID for the Managed Identity Service principal that has been created in Entra ID. You’ll need this later on, so copy it to notepad.
Step 3: Assigning permissions
The Service Principal will need to be assigned permissions. Now I’m a big fan of the CLI for Microsoft 365. It’s a great tool to automate tasks in Microsoft 365. It can also be used in Azure Functions and it has some awesome purview commands. But in this blog post, I’ll go all PnP.PowerShell for a change. I’ve been using that tool for years now and it’s simply fabulous as well.
To assign the permissions, we’ll use the Add-PnPAzureADServicePrincipalAppRole cmdlet. You’ll need the Object ID that you copied in the previous step. As we’re searching the entire SharePoint tenant to apply retention labels we’ll use a big permission scope: Sites.FullControl.All, which is an application permission (not delegated) as we’re assigning the permissions to an application instead of a user. Instead of this tenant-wide scope, you can also go the route of least privilege (By using resource specific consent) and limit the access this application has. For more details on that, read up my other post here.
Execute the following script on your machine to sign in and assign the permissions to the Service Principal:
Connect-PnPonline -Url "https://contoso.sharepoint.com" -Interactive

Add-PnPAzureADServicePrincipalAppRole -Principal "5a1a0b5d-f305-4023-9db0-b79386faa78f" -AppRole "Sites.FullControl.All" -BuiltInType SharePoint
Step 4: Adding the PnP.PowerShell module
Having authentication out of the way, we can now focus on the functionality. First we’ll need to update the requirements.psd1 file to force the Azure Function to load the PnP.PowerShell module as a dependency. You can reach this file through the App Service Editor blade of your Function App. Just add the following lines to the file:
@{
    'PnP.PowerShell' = '2.3.0'
}
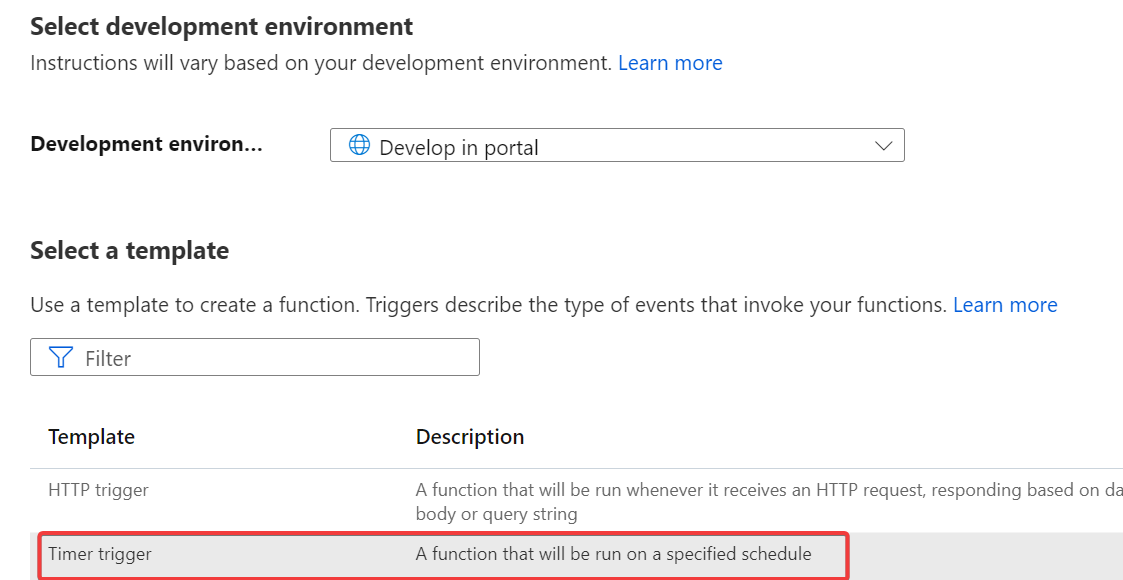
Step 5: Creating a Timer Triggered Function
Now you can create a new timer triggered function in your Function app. You can choose to develop it in the portal, no need to install VS Code or anything. Just open the Functions blade, click ‘Create’ and select the Timer Trigger template. Scroll down to give it a name and a schedule expression. To run the job every day at midnight, you can use the expression 0 0 0 * * *, but there’s a a whole range of possibilities here.
Step 6: Writing the script
You can finally start writing some PowerShell now. Open your timer trigger function and select the Code + Test blade. Write the following code in the run.ps1 file:
# Connect to your SharePoint tenant using the identity of the Azure Function
Connect-PnPOnline -Url "https://contoso.sharepoint.com" -ManagedIdentity

# Get a list of documents to be processed
$items = Submit-PnPSearchQuery -Query "<some search query>" -RelevantResults -All -SelectProperties "SPWebUrl,ListItemId,ListId"

# Loop through the items
foreach($item in $items) {

    # Connect to the site where the document is located
    Connect-PnPOnline -Url $item.SPWebUrl -ManagedIdentity

    # Do some extended validation here if needed
    # ...

    # Apply the retention label
    Set-PnPListItem -List $item.ListId -Identity $item.ListItemId -Label "<Some retention label name>"
}
You can save it and test it out to see if it works.
Now of course, this is an extremely simplified example! And the important part, the part why you wanted custom automation in the first place, still needs to be written. I’m talking about the way to find the right documents and the way to conditionally apply the retention label to them.
You’ll need to think real well about a lot of things. Just a few considerations:
Considerations
Finding the right documents
What’s the ideal search query that will surface just those documents that you need to process? This will depend entirely on the metadata setup in your company. Tuning the search schema may be needed to achieve the best results. You want to avoid having to loop through millions of documents. Instead you need to harness the power of metadata and Search to find the right documents.
Validation and notification
Will this job need to send notifications to IT administrators or content owners when validations fail? This can help people fix issues that may block the application of the retention label. You may need a location to store the results of the retention job for specific documents so you don’t notify the same people every day.
Time to run
How much time will this job likely take to run? This is influenced by the script you write and by the amount of files that might be processed at a time. That has impact on the ideal setup of the Azure Function. You may be able to run a function like this on a Consumption plan, so you only pay what you use. But that means the job will be broken off after 5 minutes (which can be lengthened to 10), which might not be ideal.
A loop or a queue
A foreach loop is not a very manageable way of processing a list of files. You may want to create an extra queue triggered function and use the timer triggered function to add messages to a Storage Account queue. The queue triggered function can then process these queue messages in a more orderly and controlled fashion. This will also help with the issue of the 5-10 minute timeout on Consumption plan functions. You’ll now have 5-10 minutes to search and queue items and 5-10 minutes per queue message to process the queued document.
Conclusion
This blog post showed you how to automate the application of retention labels, using a PowerShell script in Azure Functions. It’s a great way to automate this process, but you’ll need to think well about a few things before you start building. I hope I helped you to get started. If you have any questions, feel free to reach out to me on Bluesky or LinkedIn or using the comment form down below. 👇
Sources
- Azure Functions – Time Trigger (CRON) Cheat Sheet
- PnP PowerShell - Add-PnPAzureADServicePrincipalAppRole
- PnP PowerShell - Set-PnPListItem
- PnP PowerShell - Submit-PnPSearchQuery
- Microsoft Docs - Azure Functions PowerShell developer guide
purview retention sharepoint powershell
More
More blogs
Working with Purview event-based retention using code
Do you want to retain data for a period of time after a certain event has happened? It is called event-based retention and this is how you use it from code.
Read more
Managing and applying Purview retention labels using code
An overview of the different ways you can manage and apply Microsoft 365 Purview retention labels in SharePoint using code.
Read more
Daisy-chaining retention labels and automated archival
An partner-post with Joanne C. Klein on how to automatically move files labelled with a Purview retention label to some archive location.
Read moreThanks
Thanks for reading

Thanks for reading my blog, I hope you got what you came for. Blogs of others have been super important during my work. This site is me returning the favor. If you read anything you do not understand because I failed to clarify it enough, please drop me a post using my socials.
Warm regards,
Martin
Microsoft MVP | Microsoft 365 Architect