I’ve recently worked with two static site generators within a short period of time. Which is a good moment generally to reflect and evaluate. Putting that reflection in words helps me to consolidate a bit, and I hope it will help some other people as well.
Table of Contents
Static sites and the Jamstack
Static site generators have been hip and happening for a while, the result is this list on jamstack.org of no less than 333 generators (at the time of writing) to choose from in all flavours, sizes and purposes. The idea of a static site is that it contains only static resources. (HTML, CSS, JavaScript files) These resources are prebuild and uploaded to a webserver or even just a CDN to be served to the user when accessing a website. Because everything is static, it's often blazing fast, and it's a fine way to build all kinds of sites, also sites that integrate with API's. Which is why you'll often also hear the term Jamstack, when talking about Static Site Generators. Static Sites are actually one of the base components of Jamstack architecture. (JAM stands for JavaScript, Api's and Markup and is a way of architecting websites that focuses on static resources, api's and CDN's for optimal performance.)
Purpose
So let’s get to it with MkDocs. Static site generators have their intended uses. The purpose of MkDocs is to build documentation sites out of a set of Markdown files, and it’s fantastic at doing just that. If you already have existing Markdown documentation, for example on an Azure DevOps project or in a GitHub repository, you can have a documentation site up and running in no time.
Note:
If you just want a straightforward documentation site, for your project/product documentation, MkDocs is your go-to generator.
Charming simplicity
The charm of MkDocs for me, is that it’s configurable with a single YAML file. You don’t get a big folder structure with node_modules, lock-files, templates, layouts or what not. Just a single declarative configuration file is enough to configure MkDocs and start running.
The up/downsides of simplicity
I think this simplicity is perfect for what it should do. If you just want a straightforward documentation site, for your project/product documentation, MkDocs is your go-to generator. And of course MkDocs can be themed and extended, or you could even build your own theme. But if you have very specific requirements about how the site should look, and existing themes don’t match. I’d personally go for another generator to use.
Getting started
MkDocs is based on python, so you need to install python to be able to use it. After installing python you should be able to run the python package manager pip. You don’t really need any further knowledge of python to build your site, so long as you don’t create your own theme.
MkDocs has a great getting-started page. But no need to go there, just run the following script:
pip install mkdocs   # Install mkdocs (globally)
mkdir blimped-mkdocs # Create a directory
cd blimped-mkdocs    # Enter that directory
mkdocs new .         # Init mkdocs
code .               # Open in VS Code :-)
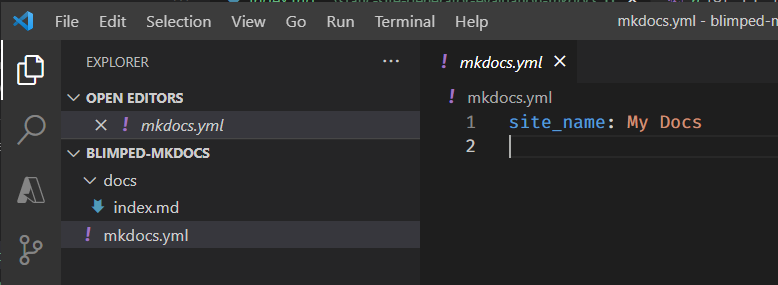
The result looks as follows, and as you can see it’s very lightweight. Just the single yaml-file with super-basic default configuration, and a docs folder for markdown files:
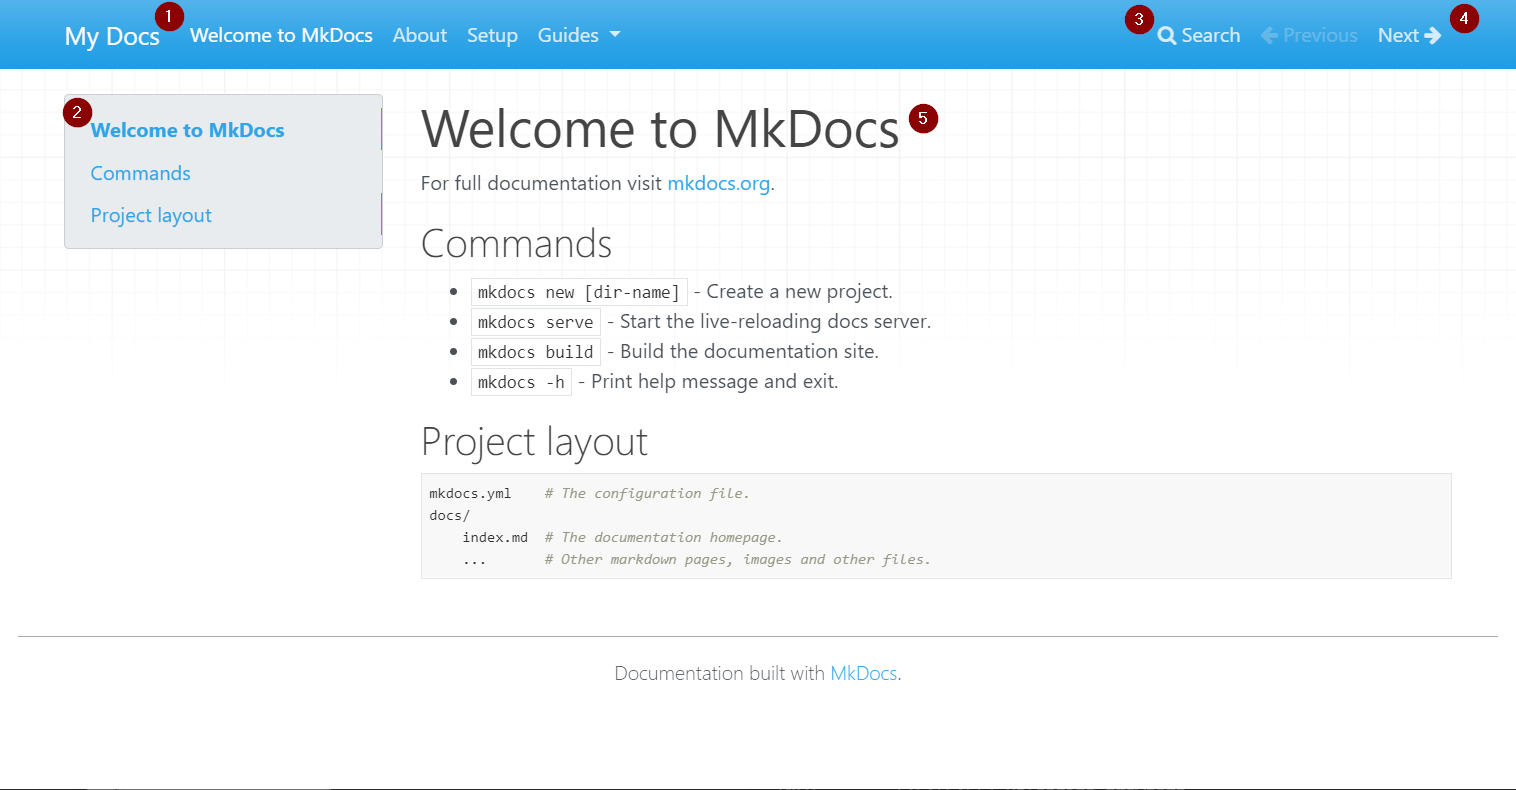
And after adding some extra markdown files to the lonely index.md, running mkdocs serve will start the mkdocs server, and show the result. A basic site, with some functionalities by default:
- Automatic layered navigation, based on the available markdown files.
- Table of Contents, based on page headers.
- Searchbar, to search the entire site and hotlink to results.
- Prev/Next buttons, to quickly jump to other pages.
- And of course, the markdown elements are translated to a nice html equivalent.
Working with it
You’ll notice a couple of things when taking a deep-dive in MkDocs. I’ll list a few that I’ve run into.
Navigation
The navigation is automatically build, based on the files in the docs folder. The titles are read from the first header in the markdown files, or from your front matter title attribute, if you are into using front matter.
The names are sorted alphabetically though. If you want more control, you can resort to defining the navigation in the mkdocs.yml file:
# Managing your own navigation structure with the table of contents (toc) extension
nav:
    - Home: index.md
    - Guides:
        - guides/getting-started.md
    - setup.md
    - about.md
This is great. You’ll have more flexibility, but also the need to remember putting your pages in there. Luckily MkDocs throws warnings for all pages you’ve missed.
Permalinks / Anchor links
You can enable permalinks in MkDocs, which adds anchors with paragraph icons to headers, so you can easily copy links to subsections on pages. I find this required material for a documentation site. You need to enable it by adding it to the mkdocs.yml file:
# Enabling permalinks on the table of contents (toc) extension
markdown_extensions:
    - toc:
        permalink: true
Hotlink to repository
You can also add some repository metadata. The following will show a repository link and even allow you to jump directly to the source file in Azure DevOps or GitHub. Just add these lines to the mkdocs.yml file, and you’re good to go:
# Add repository metadate for more integration and ease-of-use
repo_name: Github
repo_url: https://github.com/martinlingstuyl/blimped-mkdocs/
edit_uri: 'docs/'
Using a different theme
Now of course, the default theme does not really look like much. So let’s apply a theme. You can install the wildly popular Material theme as follows:
# Installs theme package globally
pip install mkdocs-material
Next you can add the theme to the mkdocs.yml file as follows:
# Configuring a theme
theme:
    name: material
Page revision date
Another useful thing with documentation: showing the latest revision date for the page. There is a nifty plugin that makes this possible, using the modification date from Git. You can use this with or without the Material Theme, but the theme does have some default templating that will save you work.
To use it, you’ll need to have configured your git repository url. Install the plugin by running:
# Installs git revision date plugin globally
pip install mkdocs-git-revision-date-plugin
Next, you need to add the git-revision-date to the plugins property in the mkdocs.yml file. If you do not have a plugins property yet, just add the following lines. Something to remember here is to add the search plugin as well. It is enabled by default, but will be disabled if yo u do not add it to the plugins list:
# Adding the git revision date plugin
plugins:
- search
- git-revision-date
Note:
You need to add the search plugin if you configure the plugins property in your mkdocs.yaml file.
PDF Export
A last thing which is nice in documentation sites, is the ability to export the site to a PDF file, so that a user can download the entire documentation. There are multiple plugins that can do this. You first need to install a dependency called Weasyprint, which is a tool that converts html to PDF files. It took me some time to get this to work on Windows. But I got it to work after sorting the entries in my Path environment variable, so that the system32-reference was at the lower end.
After installing weasyprint, you can now install the mkdocs plugin:
# Installs pdf-export plugin globally
pip install mkdocs-pdf-export-plugin
After installing, you can add it to the plugin list. Using combined:true will make sure the entire site is exported to one pdf.
# Adding the pdf-export plugin
plugins:
    - pdf-export:
        combined: true
The result
Let’s look at the result of what we’ve achieved so far. As you can see, the site already looks much better.
- The navigation bar is now vertical by default;
- repository integration is showing up;
- there is an edit icon that redirects to the source file on github or DevOps, depending on the repo_url;
- and the user can download a PDF
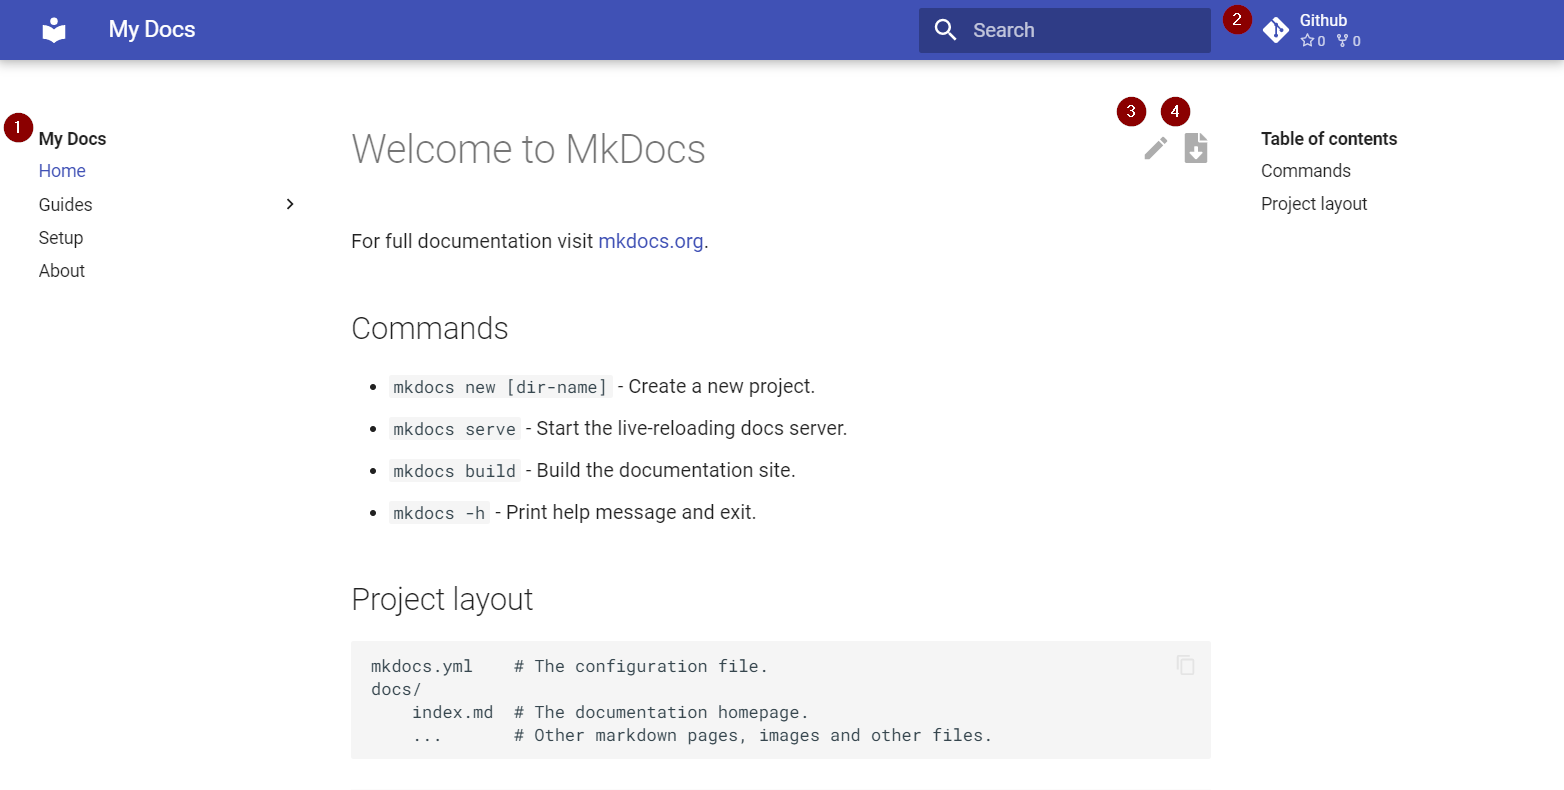
Also, the search experience is much better looking. And it’s everything is nicely responsive and mobile friendly.
Extending it
By default, there are a few ways to extend MkDocs.
CSS / JavaScript
You can start by configuring a CSS-stylesheet to update the styling, or by adding some JavaScript library or script. Simply adding it to the mkdocs.yml file will make sure that the files are loaded and available:
# Adding css/js customization files
extra_css:
    - assets/stylesheets/extra.css
extra_javascript:
    - assets/scripts/extra.js
Templates
You can also adapt the way the site HTML is built up. This needs to be configured on theme-level. The specific extension points differ per theme. The way to do this is configure a folder for template overrides:
# Adding template override config
theme:
    name: material
    custom_dir: docs/assets/templates_overrides
You can choose to override entire files, or just override certain placeholders, for example, adding a main.html file to the template_overrides folder with the following content shows an announcement bar above the site:
{% extends "base.html" %}

{% block announce %}
    Check out this announcement!
{% endblock %}
Content Components
The default markdown syntax is quite basic. It would be useful to add some new markdown components to be used in your markdown files. I haven’t created these myself, but a great library for this is the Python Markdown Extension library, which can be used by default with the Material theme. Of course, you can also install it without using the material theme.
The library offers a lot of beautiful components, like tabs, nice callouts and alerts, icons etc, to make your documentation content stand out, and even allow for more interaction.
Wrapping up
I must bring this to a conclusion. I think it is quite clear: I really like this tool. It’s simple, extendable and has some great features. Coupled with a Continuous Integration and Deployment pipeline (CI/CD) with for example GitHub Actions or Azure DevOps pipelines makes this a great tool to simply update your website by just pushing some changes. If you think you need a lot of customization, or even something more SPA-like, I don’t think I would use MkDocs. But if you just need a good looking, no-nonsense, static documentation site that can be configured without a hassle, something to replace your Azure DevOps wiki, to be able to communicate to a wider audience, I would highly recommend you to use MkDocs for your documentation needs.
Pro-tip:
You can also install and use MkDocs from a docker dev container. This is great for containing your dependencies.
Sources
- Example MkDocs setup in GitHub repository
- List of Static Site Generators
- Getting started writing Markdown
- Installing python
- Getting started with MkDocs
- MkDocs Material theme by squidfunk
- MkDocs PDF export plugin
- Installing Weasyprint PDF creator
- Issues with Weasyprint on Windows
- Customizing your MkDocs site with CSS/JavaScript
- Customizing your MkDocs site with template overrides
- Python Markdown Extensions
staticsite webapp jamstack mkdocs
More
More blogs
Fixing the Nginx trailing slash issue on Linux based Azure Web Apps
When running a Linux based Azure Web App with the PHP 8 runtime stack, URL's without trailing slashes pose a problem.
Read more
Fixing an Azure web app zip deployment issue
My Azure DevOps pipeline recently stopped zipdeploying to Azure App Service. This is how I fixed it.
Read more
Contributing as a holiday season present
Last month I contributed to an Open Source project: CLI for Microsoft 365. I did that both because I love using CLI's and because I love not reinventing wheels.
Read moreThanks
Thanks for reading

Thanks for reading my blog, I hope you got what you came for. Blogs of others have been super important during my work. This site is me returning the favor. If you read anything you do not understand because I failed to clarify it enough, please drop me a post using my socials.
Warm regards,
Martin
Microsoft MVP | Microsoft 365 Architect