Introduction
I’ve recently written a series of blog posts on managing and applying retention labels in Microsoft 365 Purview. In this blog post I’m joining swords with Joanne C. Klein on a specific scenario: How to move data that is labelled with a retention label to an archive location after the retention period has ended? Joanne has written the functional side, and I’m adding some technical details. Hope you enjoy it!
Table of contents
- Joannes partner-post: Daisy-chaining retention labels | A Good Use-case for Record Archival
- My post: Daisy-chaining retention labels and automated archival
Scenario
Say you have financial documents (or really any type of document). These documents are “archived in place” using a record retention label. Your company has requirements that demand that these documents should not be destroyed after the retention period has ended. Instead they should be transferred to a central archive location, a SharePoint Archive site for example.
What do you do?
Solutions
There’s several ways this objective can be accomplished.
1. Using the Power Automate / Purview integration
One way would be to use the Power Automate / Purview integration, which means a flow that triggers after the retention period has ended. This flow could contain business logic to move a document elsewhere. Using the Power Automate integration with Purview does come with some limitations though. And there are some other consequences of Power Automate here. For example that it will run for every file that has been retained. This may result in a significant amount of flow runs, which may not be desirable. And it’s certainly not very efficient. It would be better to achieve the objective using something that can move files in bulk.
2. Using “daisy-chaining” and custom automation
Joanne describes a different route in her blog post that offers a lot more efficiency and flexibility. And that is by combining “daisy-chaining” with custom automation. With “daisy-chaining” she’s referring to the practice to let Purview automatically change the retention label of a document after the retention period has ended. Relabeled files can then be found using the SharePoint or Microsoft Graph Search API’s and moved to their new home: for example an archive site.
👉 Read Joannes partner-post for an in depth description. 👈
This way of working is much more efficient, as it will need to run only once in a while and can find and move files by the dozens.
How to set it up
Okay, so how to set this up? For configuring the “daisy-chaining” part within Purview, again: do read Joannes partner-post.
The goal of my post is to show how to build an application that can be scheduled to regularly search for documents on SharePoint that have been relabeled by Purview with a “Send to Archive” retention label. These documents should then be moved to the archive location, which in this case is a SharePoint site.
Prolog: Deciding what to build
The most important part of building custom automation is always thinking up what you want to build and why. We can use any route to reach the objective:
- a PowerShell script on a schedule,
- a Power Automate Flow on a schedule,
- a Logic App on a schedule,
- a fully coded solution in whatever programming language you prefer,
- etc etc…
Every solution has its pro’s and cons, and every solution will need to be maintained. In the long run it will incur technical debt for your company, which must be factored in. Do not only think about who’s going to build what, but also ask yourself questions like:
- Who’s going to maintain this piece of software when I’m gone?
- What happens when something misfires?
- How will the software be monitored and who will take action?
- How can we ensure the quality and security of the software?
- How will we deploy fixes and updates?
In short, think about principles of ALM: Application Lifecycle Management.
My example architecture
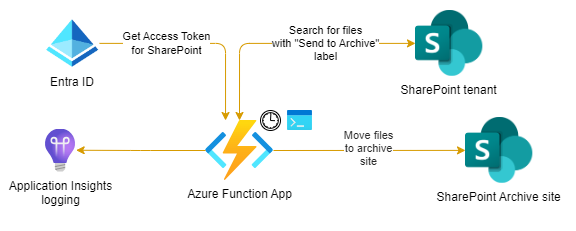
For the purpose of this blog post, let’s go the route of a short PowerShell script, as that’s a well-known tool for IT-admins and Developers alike. The script will run on a schedule using an Azure Function App. The reason I’m choosing an Azure Function App is because it offers excellent integration with other Azure resources we will need, like Entra ID (for authentication) and Application Insights (for logging and monitoring). Also, it can be very cheap to run an Azure Function App. Using a consumption plan, we can run the script a million times each month without paying anything. Logging may be the priciest part, but even that is quite affordable if configured correctly.
The architecture would look something like this:
Step 1: Setting up the infrastructure
Having decided what we’re building, the first step is to set up the infrastructure. We’ll need to create an Azure Function App, and configure it to run on a schedule using what’s called a Timer Trigger. We’ll also need to configure permissions, so that the Azure Function can actually call SharePoint and do stuff.
As it happens I’ve recently written a blog post on how to do just that. If you need the details of how to get this set up, please read step 1-6 of that blog post first. The only thing that’s different here, is the actual script we’re going to run.
👉 Automating Purview data retention using Azure Functions
If you’re familiar enough with Azure Functions, you can also skip that blog post and continue here.
There’s a couple of things that are important to consider when setting up the Azure Function App.
a) How often and how long does it run?
If you’re like me, you’ll probably try to take the road that’s cheapest. Or maybe it’s because I’m Dutch… 🙂 In Azure Functions this means I always try to see if the Function can run on a consumption plan. Which means we only pay for the time the function actually runs. However, when running on a consumption plan, a function execution may only last for 5 minutes max by default. You can stretch that to 10 minutes by setting the functionTimeout property in the host.json file.
Be it 5 or 10 minutes, if the function is stopped, it will just continue moving files the next time it runs. But you’ll have to consider how many files the function will generally need to process in a given day. If there’s not enough processing time for the number of files, your function may need to be scheduled to run more often. Otherwise you may end up with a backlog of files that are not moved because of the time constraint. You can run a function every week, every day or every 5 minutes if you like. Even if you’re running it every 5 minutes, if there are no files to move, the function will just stop successfully and the cost will still be minimal.
☝️ The point is: just make sure that you’re running it as often as is necessary.
b) A note on scale and concurrency
Azure Function apps are great in scaling & concurrency: running multiple processes and instances at the same time. However, for this scenario we want to avoid that, as it may lead to all kinds of issues. Your application may be throttled by SharePoint. Multiple instances of the function may try moving the same files. And PowerShell scripts on an Azure Functions instance also happen to share the same process, which may cause concurrency-issues as well. This may all seem logical, and a TimerTrigger will generally run only one instance at the time. But I’d like to point out that it’s important to be aware of this, and to design your application for it.
☝️ Just something to keep in mind.
Step 2: Searching for the files
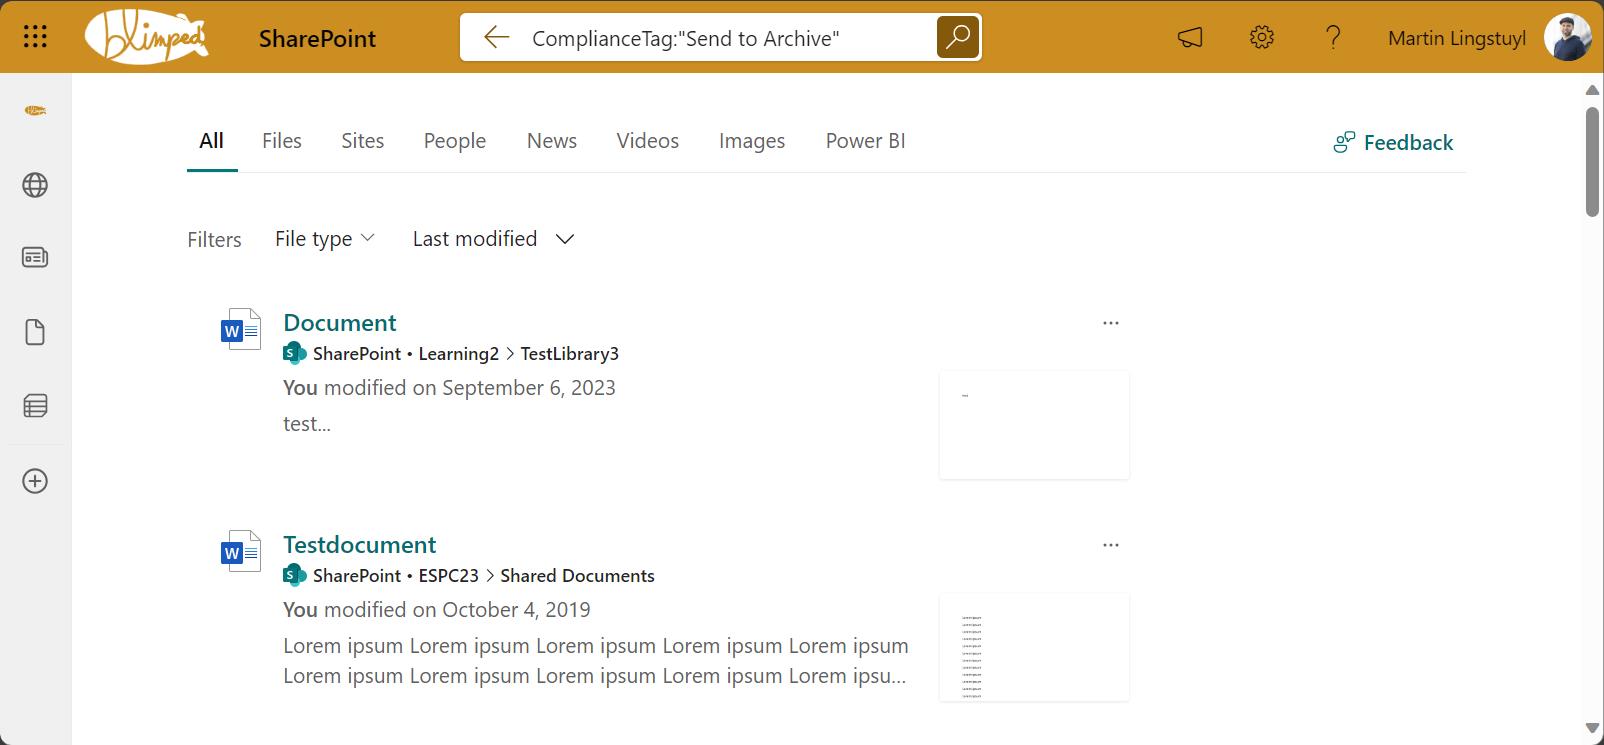
When searching for files on SharePoint we will either use the SharePoint Search API or the search part of the Microsoft Graph API. Either one is fine, and what’s the best fit will depend on you and the tools you’re using. Whatever route we use, we’ll need to know how to search for files by their labels. Well, that’s easy. Files with a retention label can be found by using the ‘ComplianceTag’ managed property of the Search Schema. From the search bar in SharePoint it would work as follows:
As we will be building a PowerShell script, we can use the well known open source, community driven PnP.PowerShell module to search for files. It offers a lot of functionality to work with SharePoint, and it’s very easy to use.
We can use the Submit-PnPSearchQuery cmdlet to search for files with a certain retention label. The cmdlet has a -Query parameter that accepts a KQL query. The query we need to use is the same as before: ComplianceTag:"Send to Archive". This will return all files that have the “Send to Archive” retention label. To make the query as efficient as possible, we should only request the file properties that we need.
The following script can be used in an Azure Function App to connect using Managed Identity and search for files with a certain retention label:
# We connect to SharePoint using managed identity. (Enabling managed identity is part of the blog post I mentioned earlier. It's the best and most secure route to connect to SharePoint from an Azure Function App.)
Connect-PnPOnline -Url "https://contoso.sharepoint.com" -ManagedIdentity

# We search for any file in the tenant with the retention label "Send to Archive". We only request the properties we need.
$results = Submit-PnPSearchQuery -Query 'ComplianceTag:"Send to Archive"' -RelevantResults -SelectProperties Path,ListId,ListItemId,SPSiteUrl -All
It’s that easy to get a list of files.
Step 3: Moving the documents
We can extend this script to iterate through the search results, and move them to the archive location. For this we can use the Move-PnPFile cmdlet. We also have to clear the label before moving the file. (It’s a record retention label, so the file cannot be moved unless the label is cleared.) To do that we’ll need to connect to the site where the file is located. The script could look something like this:
foreach($result in $results) {
    Connect-PnPOnline -Url $result.SPSiteUrl -ManagedIdentity

    Set-PnPListItem -ListId $result.ListId -Identity $result.ListItemId -ClearLabel

    $uri = [uri]::new($result.Path)
    Move-PnPFile -SourceUrl $uri.AbsolutePath -TargetUrl "/sites/archive/Documents" -AllowSchemaMismatch -AllowSmallerVersionLimitOnDestination -Overwrite -Force
}
Now this is a very simple script. But while it’s a good start, it’s definitely not production ready. It will need quite some extra things to be sturdy and reliable. But this is the basics, which is what I’m trying to demonstrate.
A couple of things to consider to make it more production ready are the following:
a) Availability of metadata columns in the target library
If you’re an avid user of metadata in SharePoint (Content Types and Columns), check out this fine print: Using the -AllowSchemaMismatch parameter, we’ve made sure that the script will not fail when the target library does not have the same metadata columns available. However, it’s important to know the consequence: metadata may be ditched when this is the case. Dataloss may occur when the file is transferred. If this is acceptable to you, so be it. If not, you may need a different and more structured approach where the archive contains the same Content Types and Columns as the source libraries do. Your SharePoint information architecture will need to be tip top.
b) Files left behind without label
Important to take into account is that if the Function crashes between clearing the label and moving a file, the file may be left behind in the place it was found. It will not be picked up by subsequent runs because of the cleared retention label. It’s therefore important to make sure you’ve got good logging and exception handling in place, so you’re able to correct any issues that may arise.
c) Blocking function execution
You’ll also need to make sure that exceptions that occur when moving a single file, will not interfere with any other files that ought to be moved. You don’t want a single file to block the entire function. You can do this by wrapping the moving of a single file in a try-catch block. You can build your exception handling in there so that it can log errors (and notify IT) for a single file and continue on moving the rest.
d) Logging and notifications
Logging is important, and can be done simply by inserting ‘Write-Host’, ‘Write-Error’ (etc) statements in your PowerShell script. These will end up in Application Insights. I’d advise adding enough of these statements to be able to trace what’s going on. Application Insights logs will contain an ‘InvocationId’ property, so you can check what happened in a single run.
But you also need to think about some notification mechanism. You could for example send an email to IT when something goes wrong. Or you could post a message to a Teams Incoming Webhook when the script has finished. Whatever you do, it will need to be something that’s reliable in itself. You don’t want to send an email from a script that’s supposed to move files, and then have the email fail.
Conclusion
And that’s more or less the gist of it. I’ve given you a few pointers and ideas on how to accomplish this. But of course there might be other things as well that I’ve skipped for brevity, or because I forgot. I hope this blog post has at least given you some ideas on how to do it. If you’ve got questions, please reach out to me using any channel available.
Happy coding!
Sources
- Joannes partner-post: Daisy-chaining retention labels | A Good Use-case for Record Archival
- Microsoft Docs - Purview / Power Automate flow integration
- Microsoft Docs - Function Timeout
- Microsoft Docs - PowerShell Functions and Concurrency
- PnP.PowerShell
- PnP.PowerShell - Submit-PnPSearchQuery
- PnP.PowerShell - Move-PnPFile
- PnP.PowerShell - Set-PnPListItem
purview retention sharepoint powershell
More
More blogs
Automating Purview data retention using Azure Functions
An example of how to automatically apply Purview retention labels using Azure Functions.
Read more
Working with Purview event-based retention using code
Do you want to retain data for a period of time after a certain event has happened? It is called event-based retention and this is how you use it from code.
Read more
Managing and applying Purview retention labels using code
An overview of the different ways you can manage and apply Microsoft 365 Purview retention labels in SharePoint using code.
Read moreThanks
Thanks for reading

Thanks for reading my blog, I hope you got what you came for. Blogs of others have been super important during my work. This site is me returning the favor. If you read anything you do not understand because I failed to clarify it enough, please drop me a post using my socials.
Warm regards,
Martin
Microsoft MVP | Microsoft 365 Architect