If you’re using GitHub actions to deploy stuff to Microsoft 365, and you’re still using certificates or even username and password, this blog post is for you! Learn how to properly deploy from GitHub workflows to Microsoft 365 without fiddling with certificates or user credentials.
Introduction
The CLI for Microsoft 365 is a flexible and powerful tool that can be used to automate all kinds of diverse tasks in Microsoft 365. From bundling and deploying SharePoint Framework solutions to updating site scripts or other Microsoft 365 artifacts. The CLI for Microsoft 365 can do it all. And it can be installed and run from any environment, be it Linux, Windows, Azure Cloud Shell, as long as the Node.js runtime is present.
If you’re like me, you like to save artifacts and code in Git repositories, like on GitHub. And if you’re like me, you also like to automate things. So you might have set up GitHub actions to build and deploy your solutions. You can use the CLI for Microsoft 365 in such a GitHub action workflow to deploy your solutions or artifacts when changes are pushed to your repository. The CLI even has specific GitHub action extensions that can be used to automate the deployment of solutions to Microsoft 365. You can read the usage guide for more information.
🔐 Authenticating from GitHub Actions
Okay, so GitHub actions are fantastic and the CLI for Microsoft 365 is as well. And you can combine these tools in flexible ways to deploy your artifacts to Microsoft 365. So far so good.
However, till now you had to use a certificate or a username and password to authenticate the CLI for Microsoft 365 to your Microsoft 365 tenant from within GitHub actions. This is not ideal for several reasons:
- Certificates can expire and need to be replaced.
- The same goes for username and password: using service accounts with a username and password is not a best practice. You’d need to disable MFA and passwords expire as well.
- Certificates and passwords can leak and be misused.
❓ So what’s the alternative? Federated identity of course!
📒 A note on Federated identity
Federated identity is a concept where you create a trust relationship between an external identity provider (GitHub) and an application in Entra ID, allowing the external identity provider to authenticate as the application in Entra ID. It’s a bit like managed identity, meaning nothing can leak or expire.
Federated Identity has been around for a couple of years, and should always be preferred over other forms of application authentication in my opinion.
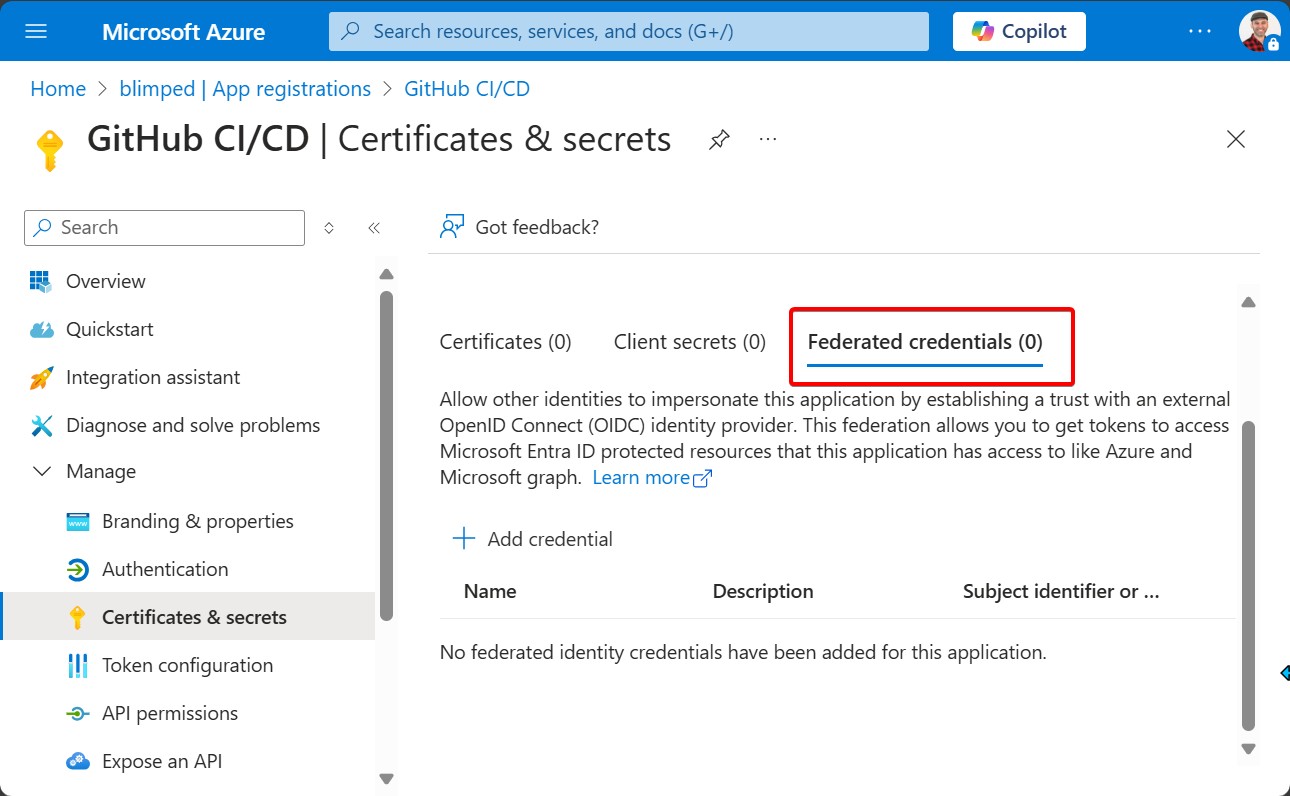
You can find federated identity in Entra ID where you find secrets and certificates as well. On application registrations.
CLI for Microsoft 365 and Federated Identity
For a long time, the CLI did not have support for Federated Identity. You could sign in with applications using certificates, secrets and managed identities. But from version 10.5.0, the CLI for Microsoft 365 has finally got some support. For now it concerns support for federated identity within GitHub actions only. But we’re looking into extending it to Azure DevOps as well.
So how can we set this up?
Step 1: Configure a federated credential in Entra ID
The first step is to configure a federated credential. Entra ID has several preconfigured scenario’s. GitHub is one of them. You basically need to fill in your GitHub organisation, the repository and what kind of entity you would like to connect the credential to. This can be a branch, a tag, a pull request, or even an environment:
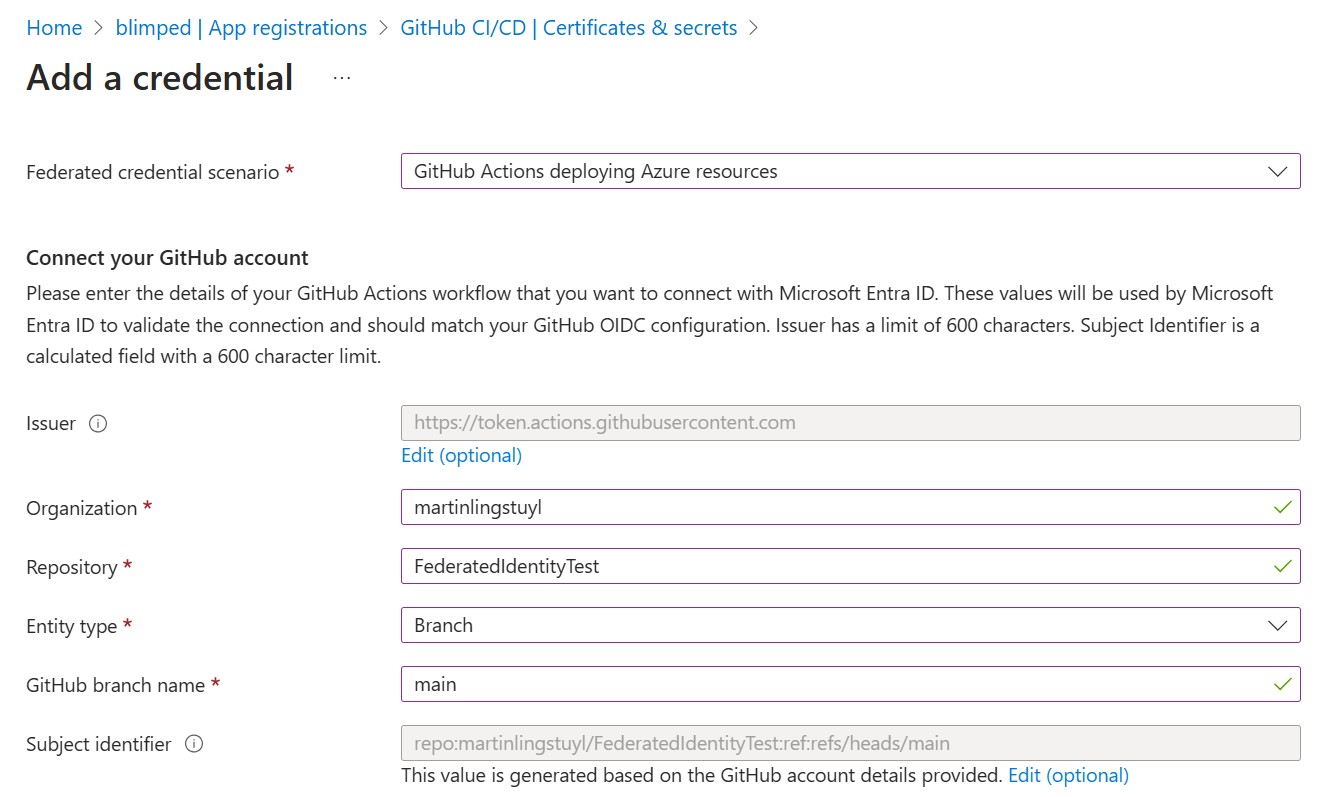
In my case I’ve chosen the main branch. This means that the credential will be valid for actions running against the main branch of the specified repository. But I also really like the environment option. This allows you to create a credential that allows deployments only if connected to a specific environment in your GitHub repository, making it more secure to deploy from one repository to multiple tenants (dev, acceptance, production).
Note:
Federated credentials can be used to secure deployments from specified branches, or even environments, making it more secure to deploy from one repository to multiple tenants. (dev, acceptance, production)
Step 2: Configuring your GitHub actions workflow
Having added the federated credential, we can now move to our GitHub repository. We’ll need a few yaml snippets to be able to use federated identity.
The first thing we need to do is give it access to retrieve a federation token. The workflow will need that to swap it for an Entra ID access token. It’s done by adding the following permissions to the workflow:
permissions:
  id-token: write
  contents: read
All that’s left is to add the steps to install the CLI and login using the federated identity.
- name: 'Install CLI'
  run: "npm install @pnp/cli-microsoft365@latest -g"

- name: 'Connect using Federated Identity'
  run: "m365 login --authType federatedIdentity --appId ${{ secrets.APP_ID }} --tenant ${{ secrets.TENANT_ID }}"
  # (This script will work from version 10.5 of the CLI for Microsoft 365, older versions don't include federatedIdentity as a valid authType)
🚀 And that’s really it. Now, depending on the permissions that were configured on the App Registration, we can now start deploying our solutions or artifacts to Microsoft 365. It’s easy, right?
Using the CLI’s GitHub login extension
The above code does not use the CLI’s GitHub extensions. But you can also use that to make it easier to work with the CLI within GitHub actions. You can sign in using federated identity with the CLI’s GitHub extensions (v3.1.0 and above) like this:
- name: 'Connect using Federated Identity'
  uses: pnp/action-cli-login@v3.1.0
  with:
    APP_ID: ${{ secrets.APP_ID }}
    TENANT: ${{ secrets.TENANT_ID }}
But it does not make a lot of difference, aside from the fact that your yml will look a bit cleaner.
A more complete snippet
You can find a more complete yaml snippet below:
name: Test Federated Credential CLI for Microsoft 365

# This GitHub action is triggered manually, or when code is pushed
on:
  workflow_dispatch:
  push:

# The GitHub Action is given the necessary permissions to get a federation token that's needed to authenticate with Entra ID
permissions:
  id-token: write
  contents: read

jobs:
  deploy:
    name: 'Deploy stuff to Microsoft 365'
    runs-on: ubuntu-latest
    steps:
      # Checkout the repository
      - name: 'Checkout GitHub Action'
        uses: actions/checkout@v4

      # Select the Node.js version we want to use
      - uses: actions/setup-node@v4
        with:
          node-version: 20

      # Install the CLI for Microsoft 365 (But take care to install 10.5.0 or higher)
      - name: 'Install CLI'
        run: "npm install @pnp/cli-microsoft365@latest -g"

      # Login using the federated credential from the application registration we configured
      - name: 'Connect using Federated Identity'
        run: "m365 login --authType federatedIdentity --appId ${{ secrets.APP_ID }} --tenant ${{ secrets.TENANT_ID }}"
        # (This script will work from version 10.5 of the CLI for Microsoft 365, older versions don't include federatedIdentity as a valid authType)

      # Do anything you want to do with the CLI for Microsoft 365 (that your app have permissions for)
Conclusion
Using federated identity to authenticate your GitHub actions to Microsoft 365 is a fantastic feature. It’s more secure, it’s easier to manage and things don’t leak or expire.
The CLI for Microsoft 365 has support for federated identity in GitHub actions from version 10.5.0 onwards. You can use it to deploy your solutions to Microsoft 365 without the need for certificates or passwords.
Do give this feature a try and let us know what you think!
🚀 Happy coding!
Sources
- GitHub marketplace - CLI for Microsoft 365 extensions
- CLI for Microsoft 365 - Automate your CI/CD workflow using CLI for Microsoft 365 GitHub Actions
- Microsoft Docs - Overview of federated identity credentials in Microsoft Entra ID
auth cli-microsoft365 entraid
More
More blogs
Release Branch Strategies in CI/CD with Federated Identity - GitHub edition
Learn how to secure SPFx deployments using GitHub Actions and Federated Identity with release branch strategies. A deep dive into flexible federated credentials for effective CI/CD security.
Read more
Deploying to Microsoft 365 using the CLI and federated identity - DevOps edition
Learn how to properly deploy artifacts from Azure DevOps Pipelines to Microsoft 365 using the CLI for Microsoft 365 without fiddling with certificates or user credentials.
Read more
Finding the minimal Azure Function authentication setup
Using the built-in authentication for Azure Functions is powerful, as long as you optimize it a bit!
Read moreThanks
Thanks for reading

Thanks for reading my blog, I hope you got what you came for. Blogs of others have been super important during my work. This site is me returning the favor. If you read anything you do not understand because I failed to clarify it enough, please drop me a post using my socials.
Warm regards,
Martin
Microsoft MVP | Microsoft 365 Architect