If you’re using Azure DevOps Pipelines to deploy stuff to Microsoft 365, and you’re still using certificates or even username and password, this blog post is for you! Learn how to properly deploy from Azure DevOps to Microsoft 365 without fiddling with certificates or user credentials. If you’re interested in deploying from GitHub Actions, do check out my previous post.
Table of Contents
Introduction
Do you have an SPFx app that you want to automatically deploy to your tenant from Azure DevOps? Do you want to deploy site scripts from Azure DevOps to Microsoft 365? You can already do that using the CLI for Microsoft 365 for quite some time. The CLI is a flexible and powerful tool that can be used to automate all kinds of diverse tasks in Microsoft 365. From bundling and deploying SharePoint Framework solutions to updating site scripts or other Microsoft 365 artifacts. The CLI for Microsoft 365 can do it all. And it can be installed and run from any environment, be it Linux, Windows, Azure Cloud Shell, as long as the Node.js runtime is present.
The case for credentialless authentication
However, until recently, you needed to do the deployments using an Entra app with a certificate. You would need to:
- Create an Entra App.
- Create a self-signed certificate.
- Upload the certificate public key (the .cer file) to the Entra App.
- Upload the certificate private key (the .pfx file) to Azure DevOps.
- Use the certificate in the deployment step when signing in with the CLI.
🥱 That’s quite some steps though. And the main trouble with a certificate is that it needs to be managed. It can expire, so you’ll need to mark refreshing the certificate in someones calendar. Working with certificates is experienced by many as a difficult task. Plus certificates are a potential security risk because you need to be aware of not leaking it.
You can/could also do the deployments with a service account, which essentially is just a user in your Entra ID. That sounds simpler, but it suffers from similar drawbacks: it means that you need to save username and password to Azure DevOps. Passwords can also expire and the account should be excluded from MFA policies.
All this is not great…
Federated Identity
🤔 What if there would be a way to deploy without credentials, something like Managed Identity in Azure?! That Entra ID is configured to just trust the Azure DevOps pipeline, so that a tool running in the pipeline can authenticate to Entra ID and do stuff in Microsoft 365.
…well, happily there is 👏, and it’s called federated identity.
With Federated Identity an application can delegate authentication to an Identity Provider. It effectively says “Hey, this is me, you know me, right? Please sign me in.” to the identity provider. It’s like coming to a party and you’re on the guest list. The application does that by sending along a federation token, which proves what application it is. The identity provider has been instructed that he indeed knows the application. And so the authentication is completed. In Azure DevOps this means that it calls Entra ID, sending along a federation token that contains a specific subject, issuer and audience. The subject contains information about the organisation and project or even the repository that the pipeline is running in.
Federated Identity: It's like coming to a party and being on the guest list. Like an application saying to Entra ID: "Hey, this is me, you know me, right? Please sign me in."
If all information in the federation token conforms to the information entered in the Entra ID App Registration, the authentication will succeed and Azure DevOps will be able to request an access token for other resources, such as the Microsoft Graph or SharePoint.
Schematically the authentication looks as follows:

It’s configured on the side of Entra ID, where you create a federated credential. This is really just a configuration of what DevOps organization will authenticate and from what repository or service connection. It’s a configuration, so it cannot expire. If you use service connections, Azure DevOps will help you to the correct values you need. Do look at the example configurations I’ve inserted at the end of this post to know what to expect.
Federated Identity and Permission Scopes
When using Federated Identity you’ll still need to configure permission scopes. Federated Identity is the route to authenticate, but you’ll also need the correct authorization to do what you want to do. So if you want to deploy an SPFx app, you’ll need the SharePoint app-only permission Sites.FullControl.All on the Entra ID app where you’ve configured federated identity. Or even better: use Sites.Selected and limit your app to only have permissions on the SharePoint App Catalog. Azure DevOps may be able to authenticate with Entra ID, but it also needs to be authorized to use Microsoft 365 services.
How to set it up
I’ll show how to use the CLI for Microsoft 365 to authenticate to Entra ID from an Azure DevOps pipeline, using Federated Identity. I’ll take deploying an SPFx app to SharePoint as an example of how to apply this in practice. To follow along you need a SharePoint framework project, a tenant on which you have appropriate permissions in Entra ID, and an Azure DevOps project where you are project administrator. The Azure DevOps project doesn’t necessarily need to be in the same Entra ID tenant. For the example I’ll deploy the SPFx app to a different tenant.
Step 1: Create a Service Connection
Service Connections: You don't necessarily need to use Service Connections in Azure DevOps to be able to benefit from Federated Identity. But because Service Connections are the defacto standard when connecting to other workloads, we'll use Federated Identity with Service Connections in this example.
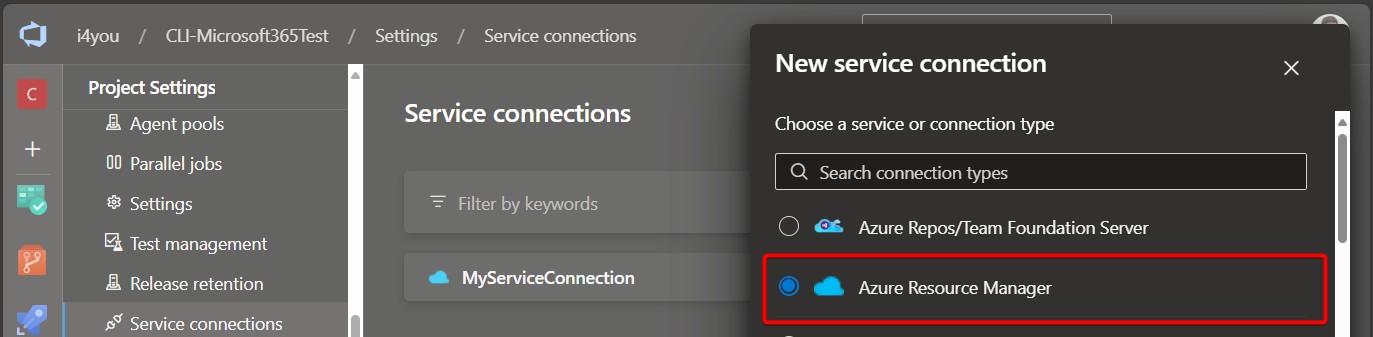
To create a service connection, open your Project Settings and move to the “Service Connections” page. You’ll need to be Project Administrator to be able to do this. Click the button to create a new Service Connection, select “Azure Resource Manager” and click next.
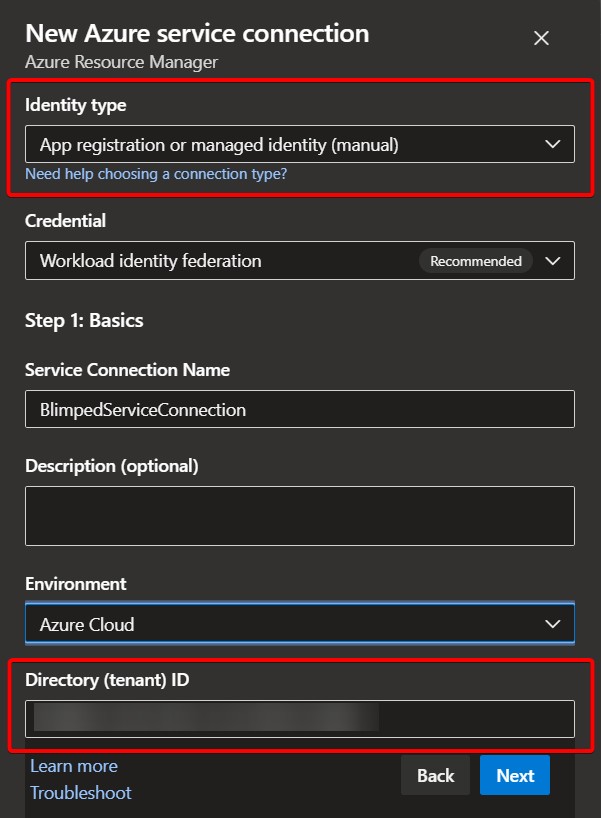
The Service Connection will need to be connected to an App Registration. Azure DevOps can create it for you if it’s on the same tenant. For the purpose of this blog post (and because my Entra ID is a different tenant then my Azure DevOps.) I’ll select App registration or managed identity (manual), to be able to do it manually. I’ll need to fill in a name and the Tenant ID of my Entra ID.
After clicking next, you’ll see the service connection has been saved as a draft. Azure DevOps now shows the configuration values that will need to be entered in the Entra App Registration, in the form of an Issuer URL and a Subject Identifier. It also requests that we fill out the subscription ID and Application ID of the Entra App Registration as soon as we’ve created it.
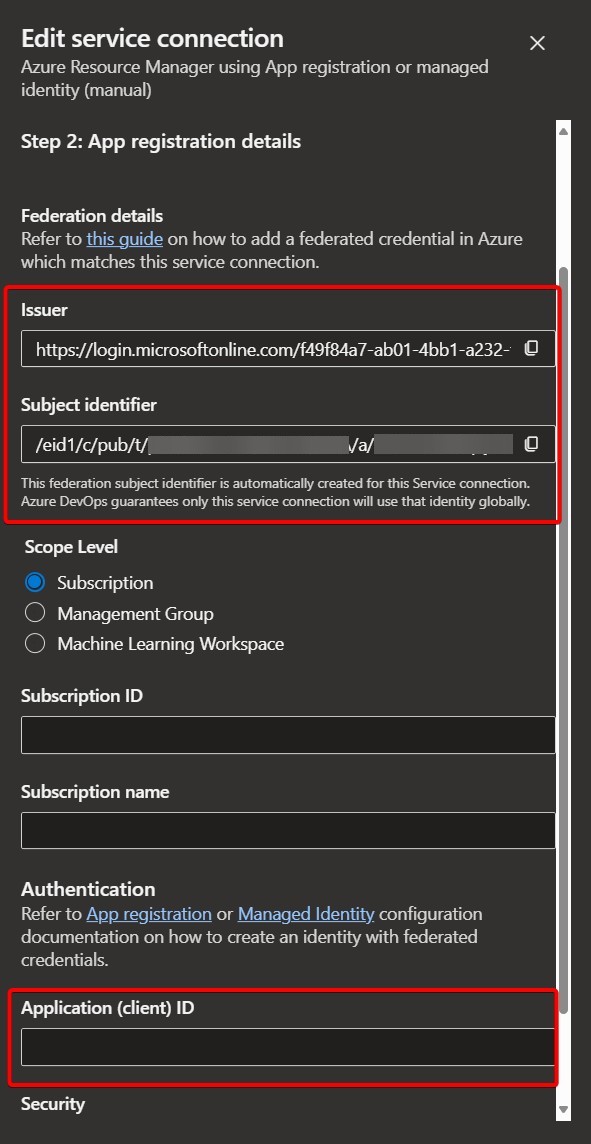
Copy the Issuer URL and Subject Identifier and head over to the Entra ID portal.
Step 2: Create an App Registration
In the Entra ID portal, head over to the App Registrations section and create a new App Registration.

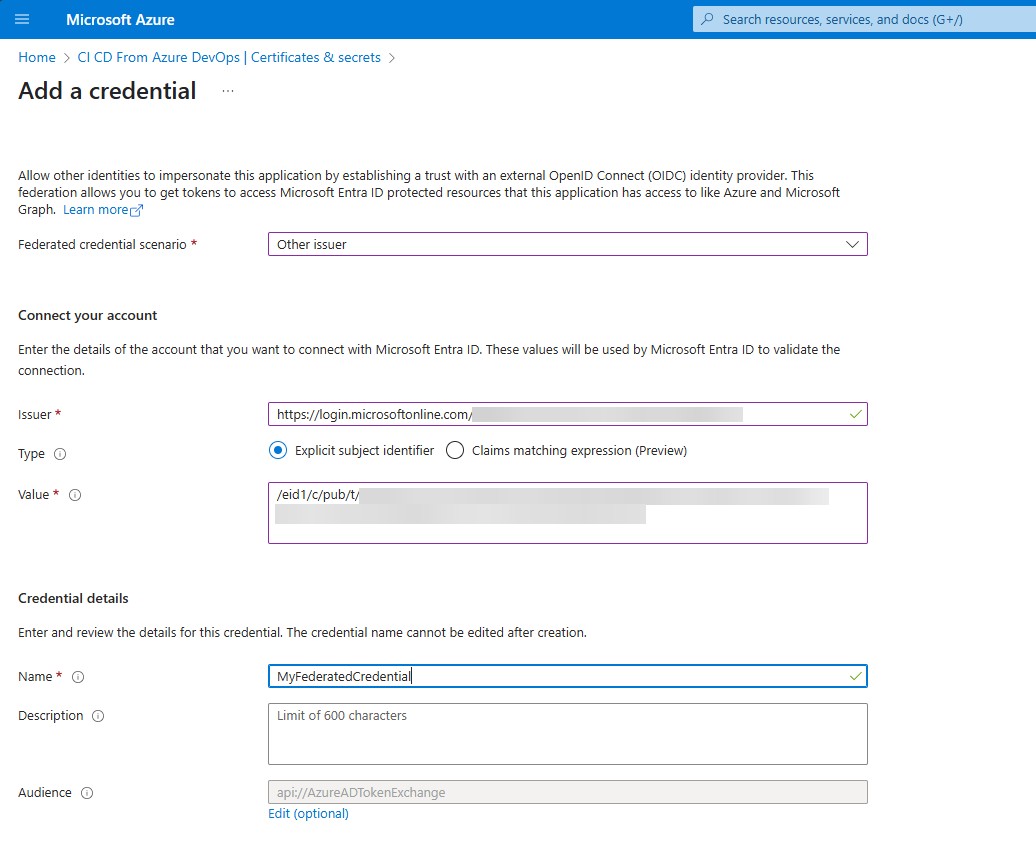
Now go to the Certificates & Secrets section, select Federated credentials and click add credential. You’ll need to select Other Issuer for the Federated Identity Scenario. Next you can paste your issuer URL and Subject Identifier in the Issuer and Value fields:
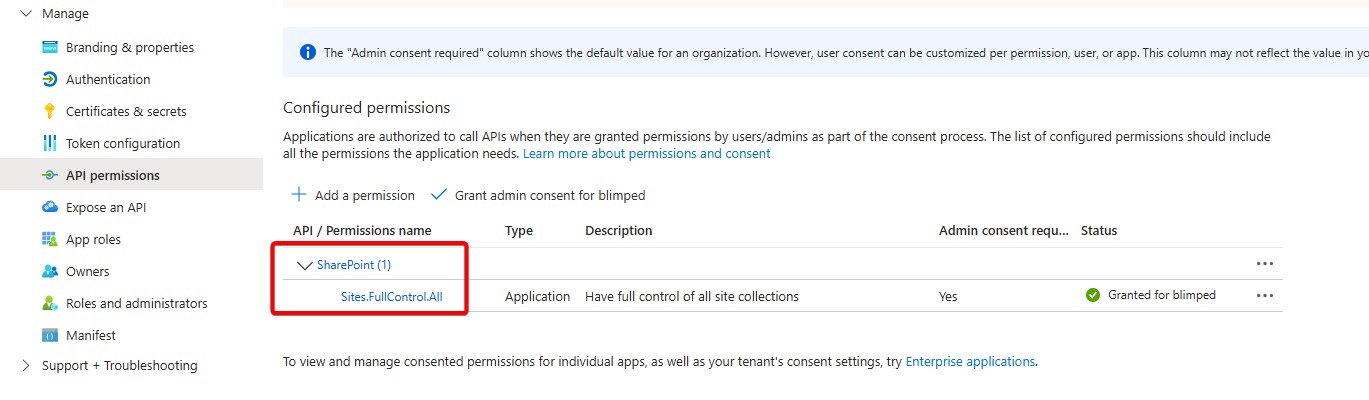
Now go to the permissions section and add SharePoint > Sites.FullControl.All permissions. Remember that it’s better to use Sites.Selected, but for this demo I’m fine with Sites.FullControl.All as it requires less configuration.
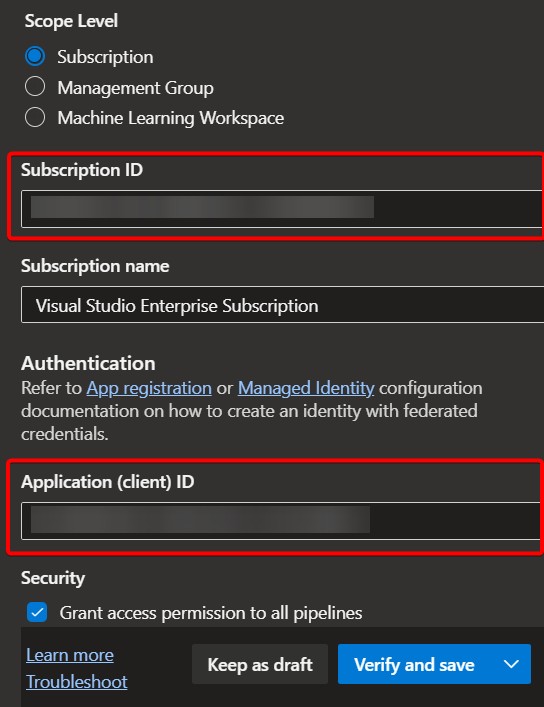
Now go back to the Overview tab and copy the Application ID.
Also copy the Subscription ID from your Azure subscriptions. You could ask: why do I need a subscription ID? I won’t be publishing the app to an Azure resource. And that’s correct. We need to fill it in because we’re using the Azure Resource Manager Service Connection type, the purpose of which is signing into Azure to manage Azure Resources. When deploying SPFx apps we’re technically doing something else, but we can use the Service Connection type anyway. There is no dedicated Service Connection type for connecting just to Entra ID.
An additional thing is that you’ll need to give your App Registration read permissions on your subscription. Otherwise validating the service connection will fail.
Access to Subscription:
Even if you're not deploying Azure Resources, you'll still need to give your CI/CD App Registration read permissions to your Azure Subscription, because we're using the "Azure Resource Manager" service connection type. This might not be logical if your just publishing SPFx apps. If it is a problem from a security perspective, I'd advise going the route of federated identity without a service connection. Checkout the federated credential configuration examples at the end of this post for more info.
Step 3: Finalize the Service Connection
Going back to Azure DevOps now we can Finalize the creation of the Service Connection by filling in both values we’ve copied. Clicking Verify and save should verify if the connection can be used correctly.
Step 4: Implement the Azure DevOps Pipeline
So to publish an SPFx App, we need a repository in our Azure DevOps project with an SPFx project. In that repository we need to create a pipeline definition. This is essentially a .yml file in your SPFx project. The way to bundle and package the SPFx app itself is excluded here for brevity. An entire example pipeline definition can be found at the end of this post. I’ve just written down the steps that are needed to deploy the SPFx app to the SharePoint App Catalog using federated identity.
Like I wrote in the beginning of this blog post, we will be deploying the SPFx app using the CLI for Microsoft 365. We’ll need a couple of steps in our pipeline yaml to install and use the tool. A couple of things to note:
AzurePowerShell - To be able to use federated identity with service connections, we’ll need the
AzurePowerShelltask type. That task has the capability to use a service connection. Something that the default scripting task cannot do. The CLI for Microsoft 365 will retrieve the Application (Client) ID and the tenant ID from the service connection and will request a federation token based on a System AccessToken that’s available in the context of the running pipeline.System AccessToken - The CLI will need the System AccessToken from the pipeline context, which is available in the variable
System.AccessToken. That token is used by the CLI to call the Azure DevOps OpenIDConnect URL and retrieve a Federation Token which can then be used to call Entra ID to get tokens for Microsoft 365 services. We’ll need to make the System AccessToken variable available as an environment variable to be able to read it in the CLI.
The following yaml shows how to install the CLI, login with it using federated identity, and deploy an SPFx package. It’s just a couple of steps:
# The CLI for Microsoft 365 uses the LTS version of node, currently Node 22, so we select that version
- task: NodeTool@0
  displayName: 'Use Node 22.x'
  inputs:
    versionSpec: '22.x'

# We now install the CLI for Microsoft 365 globally.
- task: Npm@1
  inputs:
    command: 'custom'
    customCommand: 'install @pnp/cli-microsoft365 -g'

# The following task logs in and deploys
# We need the 'AzurePowerShell' task to be able to insert the service connection
- task: AzurePowerShell@5
  displayName: 'Deploy app to SharePoint App Catalog'
  env:
    # We need to insert the System AccessToken as an environment variable to be able to read it in the CLI.
    SYSTEM_ACCESSTOKEN: $(System.AccessToken)
  inputs:
    # We insert the Service Connection
    azureSubscription: 'BlimpedServiceConnection'
    ScriptType: 'InlineScript'
    azurePowerShellVersion: LatestVersion
    Inline: |
      m365 login --authType federatedIdentity
      m365 spo set --url 'https://blimped.sharepoint.com'
      m365 spo app add --filePath '$(System.ArtifactsDirectory)/blimped-hello-world.sppkg' --overwrite
      m365 spo app deploy --name 'blimped-hello-world.sppkg' --appCatalogScope 'tenant'
As you can see, the actual CLI script is only four lines:
- logging in,
- presetting the SharePoint base URL (this is done to stop the CLI for needing to discover it),
- add and deploy the app to the App Catalog.
Now, assuming you have a pipeline based on your YAML build definition, you can just run the pipeline. The result should be that your SPFx app becomes available in the App Catalog:

🚀🚀 And that’s basically it! 🚀🚀
Using this route you could deploy any (!!) artifact to Microsoft 365 from Azure DevOps Pipelines using the CLI for Microsoft 365 and federated identity.
Note on CLI for Microsoft 365: The CLI for Microsoft 365 is a community-driven project, so it may change over time. The commands used in this blog post are based on version 10.8.0 of the CLI. Make sure to check the CLI for Microsoft 365 documentation for the latest information and updates.
The complete YAML
The following YAML can be used as a reference. This is what I used for setting up the example. This pipeline consists of a build stage and a deployment stage. It publishes the SPPKG file as an artifact during the build stage, and consumes and deploys it in the deployment stage.
trigger:
  branches:
    include:
    - main

pool:
  vmImage: 'ubuntu-latest'

stages:
- stage: Build
  jobs:
  - job: Build
    pool:
      vmImage: 'ubuntu-latest'

    steps:
      - task: NodeTool@0
        displayName: 'Use Node 18.x'
        inputs:
          versionSpec: '18.x'

      - task: Npm@1
        displayName: 'Npm install packages'
        inputs:
          workingDir: '.'

      - task: Gulp@0
        displayName: 'Execute bundle gulp task'
        inputs:
          gulpFile: ./gulpfile.js
          targets: bundle
          arguments: '--ship'

      - task: Gulp@0
        displayName: 'Execute package-solution gulp task'
        inputs:
          targets: 'package-solution'
          arguments: '--ship'

      - task: CopyFiles@2
        displayName: 'Copy sppkg-file to artifact staging directory'
        inputs:
          Contents: |
            sharepoint/**/*.sppkg
          TargetFolder: '$(Build.ArtifactStagingDirectory)'
          flattenFolders: true

      - task: PublishBuildArtifacts@1
        displayName: 'Publish staged artifacts'
        inputs:
          artifactName: 'drop'

- stage: Deploy
  condition: succeeded('Build')
  jobs:
  - deployment: 'Deploy'
    environment: 'Production environment'
    pool:
      vmImage: 'ubuntu-latest'

    strategy:
      runOnce:
        deploy:
          steps:
          - task: DownloadPipelineArtifact@2
            inputs:
              artifactName: drop
              downloadPath: '$(System.ArtifactsDirectory)'

          - task: NodeTool@0
            displayName: 'Use Node 22.x'
            inputs:
              versionSpec: '22.x'

          - task: Npm@1
            inputs:
              command: 'custom'
              customCommand: 'install @pnp/cli-microsoft365 -g'

          - task: AzurePowerShell@5
            displayName: 'Deploy app to SharePoint App Catalog'
            env:
              SYSTEM_ACCESSTOKEN: $(System.AccessToken)
            inputs:
              azureSubscription: 'BlimpedServiceConnection'
              ScriptType: 'InlineScript'
              azurePowerShellVersion: LatestVersion
              Inline: |
                m365 login --authType federatedIdentity
                m365 spo set --url 'https://blimped.sharepoint.com'
                m365 spo app add --filePath '$(System.ArtifactsDirectory)/blimped-hello-world.sppkg' --overwrite
                m365 spo app deploy --name 'blimped-hello-world.sppkg' --appCatalogScope 'tenant'
Federated Credential Configuration Examples
Azure DevOps helps you to configure federated identity in Entra ID by providing the necessary issuer and subject values to add there. But here is some background on what values you can expect to use for the Entra configuration:
1. Service Connections created after (roughly) March 2025
Since march 2025, new service connections created for federated identity scenario’s are using the following Entra ID configuration. The idea is that the Access Token that is returned from the Service Connection contains these values in the issuer, subject and audience claims. These should match with what’s configured in Entra ID in the Federated Credential on the Certificates & Secrets page.
Read more about the change here.
- Issuer:
https://login.microsoftonline.com/<EntraTenantId>/v2.0 - Subject:
/eid1/c/pub/t/.../a/.../sc/<DevOpsOrganizationId>/<ServiceConnectionId> - Audience:
api://AzureADTokenExchange
Of course, I added the dots in the subject myself, the subject actually contains a hash-like series of characters of which I’m unsure what is meant. The entire section before /sc/ is called an Entra ID prefix by Microsoft.
2. Service Connections created before (roughly) March 2025
Before march 2025, service connections created for federated identity would create the following Entra ID configuration. The idea is that the Access Token that is returned from the Service Connection contains these values in the issuer, subject and audience claims. These should match with what’s configured in Entra ID in the Federated Credential on the Certificates & Secrets page.
- Issuer:
https://vstoken.dev.azure.com/<DevOpsOrganizationId> - Subject:
sc://<OrganizationName>/<ProjectName>/<ServiceConnectionName> - Audience:
api://AzureADTokenExchange
If you ever need to find the DevOpsOrganizationId manually, you can do so using this route.
3. Without Service Connections
It’s also possible to use federated identity without service connections. You’ll need to manually configure the Entra ID App Registration with the following values:
- Issuer:
https://vstoken.dev.azure.com/<DevOpsOrganizationId> - Subject:
p://<DevOpsOrganizationName>/<ProjectName>/<RepoName> - Audience:
api://AzureADTokenExchange
For this to work, you’ll have to manually insert the appId and tenant when signing in using the CLI for Microsoft 365 and you won’t need the AzurePowerShell task. You can instead use a regular script task and insert the System.AccessToken as an env variable:
- task: PowerShell@2
  env:
    SYSTEM_ACCESSTOKEN: $(System.AccessToken)
  inputs:
    targetType: 'inline'
    script: |
      m365 login --authType federatedIdentity --appId "<appid>" --tenant "<tenantid>"
The route I’ve explained in this blog post is built on using Service Connections. If you need more instructions on this specific scenario, let me know.
Conclusion
Deploying to Microsoft 365 using federated identity is a lot simpler and easier to manage than using certificates or service accounts. It’s also a lot safer. Using the CLI for Microsoft 365 a wide range of options for deploying artifacts to Microsoft 365 emerges. Deploying an SPFx app is a cool example, but I’m wondering what examples you can all think of. Do let me know!
🚀 Happy coding!! 🚀
Sources
- Microsoft Docs - Federated Identity pattern
- Microsoft Docs - Identity Federation uses Entra Issuer
- Microsoft Docs - Get list of organizations backed by Microsoft Entra ID
- CLI for Microsoft 365 - login command
- CLI for Microsoft 365 - app add command
- CLI for Microsoft 365 - app deploy command
auth cli-microsoft365 entraid azuredevops
More
More blogs
Release Branch Strategies in CI/CD with Federated Identity - GitHub edition
Learn how to secure SPFx deployments using GitHub Actions and Federated Identity with release branch strategies. A deep dive into flexible federated credentials for effective CI/CD security.
Read more
Deploying to Microsoft 365 using the CLI and federated identity - GitHub edition
Learn how to properly deploy artifacts from GitHub workflows to Microsoft 365 using the CLI for Microsoft 365 without fiddling with certificates or user credentials.
Read more
Finding the minimal Azure Function authentication setup
Using the built-in authentication for Azure Functions is powerful, as long as you optimize it a bit!
Read moreThanks
Thanks for reading

Thanks for reading my blog, I hope you got what you came for. Blogs of others have been super important during my work. This site is me returning the favor. If you read anything you do not understand because I failed to clarify it enough, please drop me a post using my socials.
Warm regards,
Martin
Microsoft MVP | Microsoft 365 Architect