In part 1 of this blog series, we’ve seen how to run a CLI for Microsoft 365 script on an Azure Function. In part 2 I showed an example of how that can work in a specific scenario. In this blog post I’ll build that out with a new scenario: Getting notified of changes in guests accessing SharePoint online.
Table of Contents
- Part 1 - how to run a CLI for Microsoft 365 script on an Azure Function
- Part 2 - Getting notified of service incidents in Microsoft Teams
- Part 3 - Getting notified of changes in guests accessing SharePoint (this blog)
- Part 4 - Configuring the CLI for Microsoft 365 in Azure Functions
Scenario
As an IT admin for my organisation, I’d like to keep tabs on external users in our SharePoint tenant. Employees may share files with guests, but if they invite a guest user to be a site member or visitor, I want to be notified. I’d like to be in control of how much guest users can access. And knowing who can access what and where is the first step.
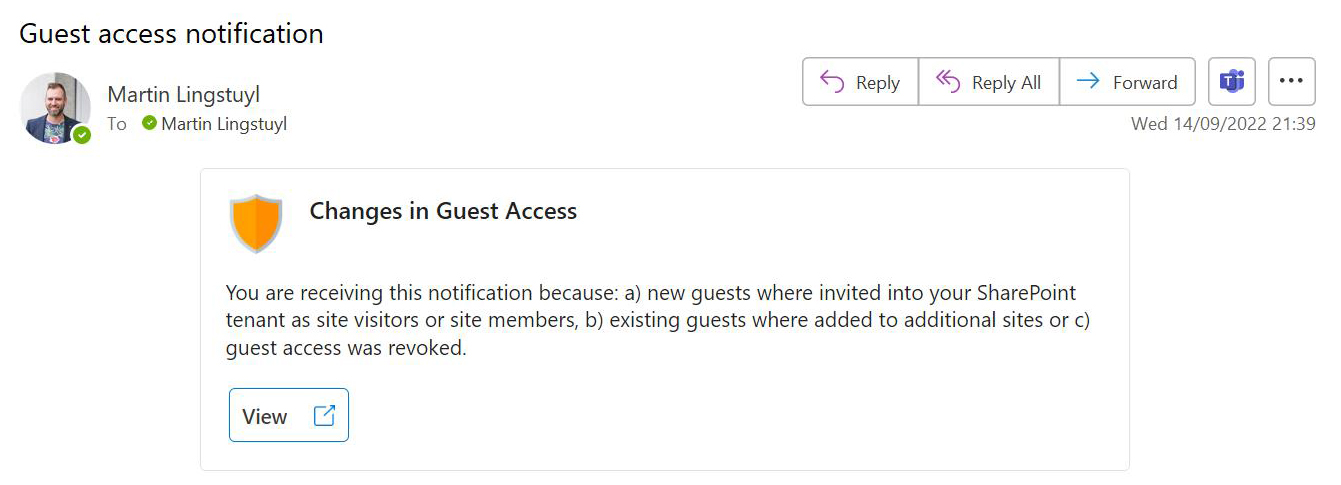
When guest users are given permissions on entire sites, I want to be notified, this time by email:
Also, I’d like to have some form of overview. So how could we solve this scenario?
How to set it up
I assume you’ve read my previous blog about setting up the CLI for Microsoft 365 on an Azure Function. If not, you can find it here. The end of that blog post is the starting point for today.
1. Install CLI beta version
We’ll start by installing the beta version of the CLI for Microsoft 365. Version 5.8 will contain a few new features that I want to use for this script, which are currently only available in the beta version:
- The new command
m365 requestoffers an easy to use capability to execute custom requests against API’s in the Microsoft 365 cloud. This could be used for functionality that’s not yet covered, or functionality that is just too specific to be included. You don’t need to worry about authentication, and it’s much easier to use than many shell specific web request tools. - Sending emails using
m365 outlook mail sendhas been enhanced to include sending on behalf of others. And you can now also send emails from an application identity, which is what I will use in this blog post.
The beta version of the CLI for Microsoft 365 can be installed as follows. Just open your Azure Function project in VS Code, open a terminal, and run:
npm install @pnp/cli-microsoft365@next
We’re installing it locally just like explained in the first blog of this series.
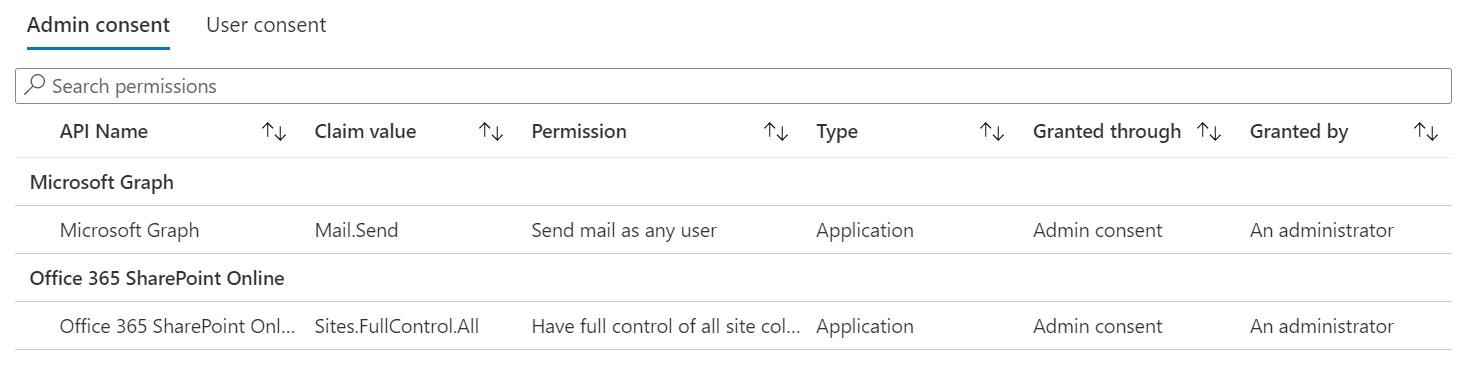
2. Permissions
Just like in the previous posts, we’re planning on using Managed Identity, the System Assigned Identity of the Azure Function, to call the necessary commands in the Microsoft 365 tenant. In the previous blog posts I’ve shown how to add permissions. We added the Sites.FullControl.All SharePoint permission then. We need that for today as well. We also need permissions to send emails. We can use the Microsoft Graph for that, and will need the Mail.Send application permission scope. Execute the following script to log into the CLI for Microsoft 365 on your local machine and assign the necessary permissions. You’ll need the Object Id for your Azure Function, which you can find on the Identity Blade in the Azure Portal.
m365 login
m365 entra approleassignment add --appObjectId "<paste the object id here>" --resource "SharePoint" --scopes "Sites.FullControl.All"
m365 entra approleassignment add --appObjectId "<paste the object id here>" --resource "Microsoft Graph" --scopes "Mail.Send"
After executing this, the Service Principal for your Azure Function should show the following permissions:
Writing the script
Having set that up it’s time to come back to the Azure Functions project in VS Code. If you don’t have one yet, be sure to read up part 1 of this blog series, or just checkout the source code on Github.
1. Setting up a new TimerTrigger
For todays script we need a new TimerTrigger folder with function.json and run.ps1 files. The contents are the same as the default TimerTrigger that you create when you start a new project. Be sure to set the schedule to “every day at midnight”: "schedule": "0 0 0 * * *".
2. Sign in and get a list of all SharePoint sites
Now we’re ready to write the script in the run.ps1 file. The following scripts will take care of signing in, using managed identity. And like we did before, we use the spo set command to circumvent the CLI for Microsoft 365 needing to discover my SharePoint environment for us. We also retrieve a list of all sites. This command uses administrative permissions, which is why we really need the Sites.FullControl.All permission scope.
m365 login --authType identity

m365 spo set --url "https://contoso.sharepoint.com"

$sites = m365 spo site list --type All | ConvertFrom-Json
Important:
If you run into 403 exceptions running this command or any of the other, check if your access token contains the correct scopes. When working with an existing identity, I've sometimes stumbled on the access token stubbornly keeping the old permission scopes, even after waiting some time and signing out and in. I eventually disabled and re-enabled System Assigned Identity on the Azure Function and re-applied the permissions before they eventually came through as scopes on the Access Token.
3. Get a list of guests
Next we’ll need a way to query guests. There is a specific command for that. (m365 spo external user list) But for our purpose today, I want to know if guest users are added to site groups, and I want to be able to quickly navigate there or contact the site owner. Which is why I’ll use the new m365 request command to execute a specific GET request at the SharePoint REST API for each site on my tenant. The following code does that, and filters out some items that are about sharing links and limited permissions, as I’m not interested in those.
$guestList = [System.Collections.ArrayList]::new()

foreach ($site in $sites) {
    $users = m365 request --url "$($site.Url)/_api/web/siteusers?`$filter=IsShareByEmailGuestUser eq true&`$expand=Groups&`$select=Title,LoginName,Email,Groups/LoginName"  | ConvertFrom-Json

    foreach($user in $users.value) {
        foreach($group in $user.Groups | Where-Object { $_.LoginName -cnotmatch "Limited Access System Group" -and $_.LoginName -cnotmatch "SharingLinks"}) {
            $obj = [PSCustomObject][ordered]@{
                Title = $user.Title;
                Email = $user.Email;
                LoginName = $user.LoginName;
                SiteUrl = $site.Url;
                Group = $group.LoginName;
            }
            $guestList.Add($obj) | Out-Null
        }
    }
}
4. Get the previous list of guests
This script will eventually save a list of guests to SharePoint in the form of a CSV file. To compare changes with the previous run, I’ll need to download that CSV first, if it’s available, and load it in memory:
$path = Join-Path -Path "$PSScriptRoot" -ChildPath ".." | Join-Path -ChildPath ".." -Resolve

m365 spo file get --webUrl "/sites/mysite" --url "/sites/mysite/shared documents/guest-list.csv" --path "$path/previous-guest-list.csv" --asFile | out-null

If ((Test-Path -Path "$path/previous-guest-list.csv") -eq $true) {
    $previousList = Import-Csv -Path "$path/previous-guest-list.csv" -ErrorAction Ignore
}
File interactions on Azure Functions when running from a package
Using the PowerShell Join-Path commandlet, I’m making sure that I’m not saving the file somewhere in the wwwroot of the Azure Function. The reason for this is that my Azure Function has WEBSITE_RUN_FROM_PACKAGE enabled. This means that my Function was deployed as and is mounted from a ZIP-file. As a result, the wwwroot folder is readonly, which is why I cannot save files there. Luckily I can save files in the parent folder though.
5. Posting updates and sending a notification
Now that I have retrieved the previous list of guests, I can now compare the two lists, using the Compare-Object commandlet. If there are changes in the list, I’ll export the new list to a CSV-file and upload it to the SharePoint site already mentioned. I’m also sending an email to myself as a notification.
$postUpdates = $null -eq $previousList -or (Compare-Object -ReferenceObject $guestList -DifferenceObject $previousList).length -gt 0

if ($postUpdates -eq $true) {
    $guestList | Export-Csv -Path "$path/guest-list.csv" -NoTypeInformation

    m365 spo file add --webUrl "/sites/mysite" --folder "shared documents" --path "$path/guest-list.csv"

    m365 outlook mail send --to "martin@contoso.com" --sender "<user-id-of-my-account>" --subject "Guest access change notification" --bodyContents `@TimerTrigger3/email-body.html --bodyContentType HTML
}
m365 outlook mail send
The outlook mail send command boasts two new options to control send-as behavior: --sender and --mailbox. We use the --sender option when running on an application identity. The --mailbox option can be used for sending on behalf of other mailboxes. For example when using a shared mailbox, group or distribution list. Read more on the various scenario’s and permissions necessary in the documentation.
Note:
I am using my Entra user ID as the value for the '--sender' option. I should also be able to use a UPN (aka martin@contoso.com). But I've seen that fail with the exception: 'Resource could not be discovered' when running with application permissions.
Adaptive card
I’m using a file token to include html from a local file included in the Azure Function. This file contains a simple HTML body, including an Adaptive Card, that I designed using the adaptive card designer. The specific card and email body that I used, can be found in the GitHub repository. You can read up on how to send them in the Microsoft documentation.
Note:
You'll need to have some [security requirements](https://learn.microsoft.com/outlook/actionable-messages/security-requirements) in place to send adaptive cards to outlook. Also: to send adaptive cards to other people, you'd need to register a provider with the Actionable Email Developer Dashboard. But as I'm using my own user account to send a card to my own inbox, this is not necessary.
The complete script
After posting the CSV-file and sending the update, we also need to clean the csv files from the Azure Function storage.
The complete script looks as follows:
m365 login --authType identity

m365 spo set --url "https://contoso.sharepoint.com"

$sites = m365 spo site list --type All | ConvertFrom-Json

$guestList = [System.Collections.ArrayList]::new()

foreach ($site in $sites) {
    $users = m365 request --url "$($site.Url)/_api/web/siteusers?`$filter=IsShareByEmailGuestUser eq true&`$expand=Groups&`$select=Title,LoginName,Email,Groups/LoginName" | ConvertFrom-Json

    foreach($user in $users.value) {
        foreach($group in $user.Groups | Where-Object { $_.LoginName -cnotmatch "Limited Access System Group" -and $_.LoginName -cnotmatch "SharingLinks"}) {
            $obj = [PSCustomObject][ordered]@{
                Title = $user.Title;
                Email = $user.Email;
                LoginName = $user.LoginName;
                SiteUrl = $site.Url;
                Group = $group.LoginName;
            }
            $guestList.Add($obj) | Out-Null
        }
    }
}

$path = Join-Path -Path "$PSScriptRoot" -ChildPath ".." | Join-Path -ChildPath ".." -Resolve

m365 spo file get --webUrl "/sites/mysite" --url "/sites/mysite/shared documents/guest-list.csv" --path "$path/previous-guest-list.csv" --asFile | out-null

If ((Test-Path -Path "$path/previous-guest-list.csv") -eq $true) {
    $previousList = Import-Csv -Path "$path/previous-guest-list.csv" -ErrorAction Ignore
}

$postUpdates = $null -eq $previousList -or (Compare-Object -ReferenceObject $guestList -DifferenceObject $previousList).length -gt 0

if ($postUpdates -eq $true) {
    $guestList | Export-Csv -Path "$path/guest-list.csv" -NoTypeInformation

    m365 spo file add --webUrl "/sites/mysite" --folder "shared documents" --path "$path/guest-list.csv"

    m365 outlook mail send --to "martin@contoso.com" --sender "<user-id-of-my-account>" --subject "Guest access change notification" --bodyContents `@TimerTrigger3/email-body.html --bodyContentType HTML
}

If ((Test-Path -Path "$path/previous-guest-list.csv") -eq $true) {
    Remove-Item -Path "$path/previous-guest-list.csv" -Force
}

If ((Test-Path -Path "$path/guest-list.csv") -eq $true) {
    Remove-Item -Path "$path/guest-list.csv" -Force
}
Time to round up, I hope I’ve demonstrated succesfully how to use the CLI for Microsoft 365 in such automation scenario’s. If you have any questions, please drop me a message.
Happy coding all!
Sources
- CLI for Microsoft 365 - Manage your Microsoft 365 tenant and SharePoint Framework projects on any platform
- Source Code for this blog on GitHub
- m365 spo external user list documentation
- m365 request documentation
- m365 outlook mail send documentation
- File tokens in the CLI for Microsoft 365
- Adaptive Cards - Designer
- Adaptive Cards - Sending by mail
- Adaptive Cards - security requirements
cli-microsoft365 azurefunction sharepoint guest access powershell
More
More blogs

Getting notified of service incidents in Microsoft Teams
Part 2 on how to use the CLI for Microsoft 365 and Azure Functions: How to get notified in Teams, when a service health incident occurs on SharePoint?
Read more
How to run the CLI for Microsoft 365 on an Azure Function
Did you know can run a CLI for Microsoft 365 script on an Azure Function based on the PowerShell stack? Here's how to do it.
Read more
Don't trust $PWD in Azure PowerShell Functions
Note to self: do not trust $PWD in Azure PowerShell Functions.
Read moreThanks
Thanks for reading

Thanks for reading my blog, I hope you got what you came for. Blogs of others have been super important during my work. This site is me returning the favor. If you read anything you do not understand because I failed to clarify it enough, please drop me a post using my socials.
Warm regards,
Martin
Microsoft MVP | Microsoft 365 Architect