
In part 1 of this blog series, we’ve seen how to run a CLI for Microsoft 365 script on an Azure Function. In this blog post let’s see how that works with a specific scenario: Getting notified in Microsoft Teams, when a service health incident occurs on SharePoint
Table of Contents
- Part 1 - how to run a CLI for Microsoft 365 script on an Azure Function
- Part 2 - Getting notified of service incidents in Microsoft Teams (this blog)
- Part 3 - Getting notified of changes in guests accessing SharePoint
- Part 4 - Configuring the CLI for Microsoft 365 in Azure Functions
Scenario
As an IT admin for my organisation, I’d like to get notified as soon as possible when a service health incident occurs. I’m primarily interested in SharePoint health incidents and I’d like to receive the notifications in Microsoft Teams.
In fact, I’d like to get this end result in Microsoft Teams: 👇
So how could we solve this scenario?
How to set it up
I assume you’ve read my previous blog about setting up the CLI for Microsoft 365 on an Azure Function. If not, you can find it here. The end of that blog post is the starting point for today.
1. An incoming webhook
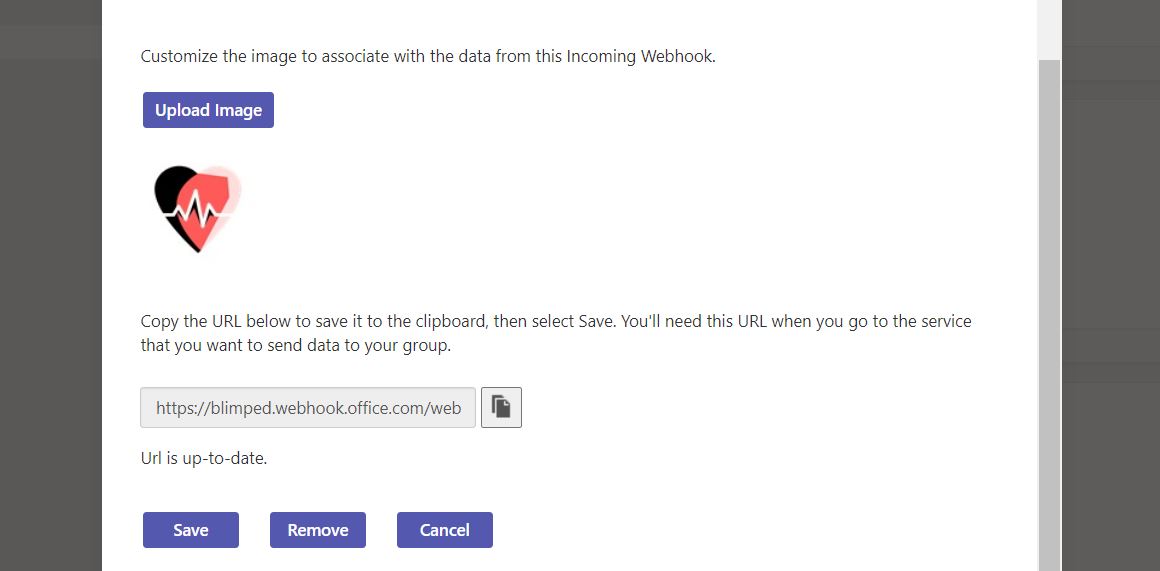
We’ll start by registering an incoming webhook in Microsoft Teams. An incoming webhook is an easy way to set-up one way traffic with Teams. This can be done manually within the Teams client. Just follow the steps outlined here, pick a channel you want to receive the health incident notifications, give it a nice picture and click save. After hitting save, you’ll receive an URL. Copy that to something like notepad temporarily.
2. Permissions
Just like in the previous post, we’re planning on using Managed Identity, the System Assigned Identity of the Azure Function, to call the necessary commands in the Microsoft 365 tenant. In the previous blog post I’ve shown how to add permissions. We added the Sites.FullControl.All SharePoint permission then. We need that for today as well. We also need permissions to query for Service Health though. We can use the Microsoft Graph for that, and will need the ServiceHealth.Read.All permission scope. Execute the following script to log into the CLI for Microsoft 365 on your local machine and assign the necessary permissions. You’ll need the Object Id for your Azure Function, which you can find on the Identity Blade in the Azure Portal.
m365 login
m365 entra approleassignment add --appObjectId "<paste the object id here>" --resource "Microsoft Graph" --scopes "ServiceHealth.Read.All"
After executing this, the Service Principal for your Azure Function should show the following permissions:
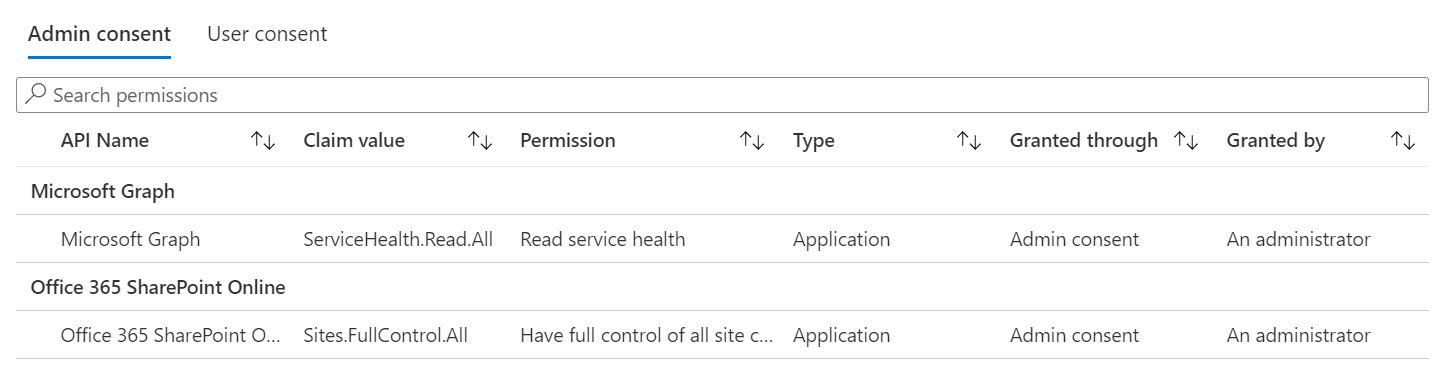
Remember:
You can find the Service Principal by navigating to your Entra ID and searching your tenant for it using the Object ID.
Writing the script
Now we’ve registered an Incoming Webhook and have the correct permissions set up, it’s now time to come back to the Azure Functions project in VS Code. If you don’t have one yet, be sure to read up part 1 of this blog series, or just checkout the source code on Github.
1. Setting up a new TimerTrigger
The first thing to do is to create a new TimerTrigger. This is basically just a folder with function.json and run.ps1 files. The contents are the same as the default TimerTrigger that you create when you start a new project. Be sure to set the schedule to “every 5 minutes”: "schedule": "0 */5 * * * *". In this way, the Azure Function will post health incidents as soon as possible.
2. Signing in
Now we’re ready to write the script in the run.ps1 file. The first thing we do is sign in using Managed Identity, and set the base URL for Sharepoint. We do this to circumvent the CLI for Microsoft 365 having to discover my SharePoint URL for us. I’m also setting a few local variables.
m365 login --authType identity
m365 spo set --url "https://contoso.sharepoint.com"

$webUrl = "/sites/contoso"
$incomingWebhookURL = "<paste your incoming webhook URL>"
3. Get the cache
Next I’ll need a place to cache the Health incidents as I don’t want to receive the same notifications every 5 minutes. I’ll use a SharePoint list for that. A really simple one, as I only want to save the ID of the Health Incidents. The following script tries to get the list, if it does not exist, it will create it. It will also retrieve all items from the list, if any exist.
$list = m365 spo list get --webUrl $webUrl --title HealthIssuesSent | ConvertFrom-Json

if ($null -eq $list) {
    $list = m365 spo list add --webUrl $webUrl --title HealthIssuesSent --baseTemplate GenericList | ConvertFrom-Json
}

$cachedIssues = m365 spo listitem list --webUrl $webUrl --listId $list.Id --fields "Id,Title" | ConvertFrom-Json
4. Retrieve Health issues
Next I’ll query the service announcements for health issues in the SharePoint service.
$issues = m365 tenant serviceannouncement healthissue list --service "SharePoint Online" --query "[?!isResolved]" | ConvertFrom-Json
I’m using a JMESPath query [?!isResolved] to only get unresolved issues. You can read more about filtering in the CLI for Microsoft 365 - here. The important thing to understand is that this is a client side filter. I’m just getting precisely what I want in 1 line.
5. Sending a notification
Now that I have retrieved a list of health issues, I can start sending messages for those that are relevant. The following code loops throught the issues. If I haven’t sent a notification before, it will do so now. It will also cache the Issue Id, so I will not be notified multiple times.
foreach ($issue in $issues) {
    $sendNotification = @($cachedIssues | Where-Object { $_.Title -eq $issue.id }).Count -eq 0

    if ($sendNotification -eq $true) {

        m365 adaptivecard send --card `@TimerTrigger2/adaptive-card.json --url $incomingWebhookURL --cardData "{ \`"title\`": \`"A health incident occurred on SharePoint\`", \`"description\`": \`"$($issue.Title)\`", \`"issueId\`": \`"$($issue.id)\`", \`"issueTimestamp\`": \`"$($issue.startDateTime.ToString("yyyy-MM-ddTHH:mm:ssZ"))\`", \`"viewUrl\`": \`"https://admin.microsoft.com/Adminportal/Home#/servicehealth/:/alerts/$($issue.id)\`", \`"properties\`":[{\`"key\`":\`"Classification\`",\`"value\`":\`"$($issue.classification)\`"},{\`"key\`":\`"Feature Group\`",\`"value\`":\`"$($issue.featureGroup)\`"},{\`"key\`":\`"Feature\`",\`"value\`":\`"$($issue.feature)\`"}] }"

        m365 spo listitem add --webUrl $webUrl --listId $list.Id --Title $issue.id | out-null
    }
}
There’s a few things to note here.
File tokens
As you can see I’m using --card @TimerTrigger2/adaptive-card.json. This is a file token and can be used to load data from a file that I have on disk. You’ll need to include the file in the Function App to make it work. The CLI loads the data from the file when processing the options of the command. The specific adaptive card that I used, can be found in the GitHub repository coming with this blog.
File tokens are very handy when passing complex data, like JSON strings. As adaptive cards are JSON strings, I like to use the File token for it. The @ symbol in PowerShell is a reserved character though, so you need to escape it using the backtick: `.
Important to notice is that the current script path when executing run.ps1 is not the sub directory of the timer trigger, but the root directory of the Function App. Hence I’ve included the folder name of my Timer Trigger, to load the card from the correct place.
Adaptive card I created the Adaptive card using the Adaptive Card Designer.
Escaping JSON strings in PowerShell
When sending an adaptive card, you can specify the card, but also the content that you want to inject in the card. For this reason, I’m using the --cardData property, and here I need to add a JSON string containing all the values. I can’t use a file token here, as the data is dynamic. So I need to escape the quotes. Escaping in PowerShell with the CLI for Microsoft 365 can be tricky. This is due to an issue in PowerShell where the command arguments are being parsed twice. (once by PowerShell and once by the m365 executable that’s being called) This is fixed in PowerShell 7.3. But until that’s current we’ll have to be careful when escaping quotes. A simple JSON string can be escaped in a few ways. The only ones I successfully used in PowerShell 5 and 7 are the following:
# Method 1: Escaping the quotes twice, using a combination of backslash and backtick:
m365 adaptivecard send --cardData "{ \`"title\`": \`"A health incident occurred on SharePoint\`" }"

# Method 2: Using a verbatim string (single quotes) and escaping the double quotes with a backslash:
m365 adaptivecard send --cardData '{ \"title\": \"A health incident occurred on SharePoint\" }'
Truth be told: I like PoSh, but escaping is easier in bash/zash.
Update 08-09-2022:
I've updated the above section slightly after more research.
The complete script
After sending the notifications and caching the incident Id’s, I clean the cache list next, to ensure that resolved items get removed from there. The complete script looks as follows:
m365 login --authType identity

m365 spo set --url "https://contoso.sharepoint.com"

$webUrl = "/sites/contoso"
$incomingWebhookURL = "<paste your incoming webhook URL>"

$list = m365 spo list get --webUrl $webUrl --title HealthIssuesSent | ConvertFrom-Json

if ($null -eq $list) {
    $list = m365 spo list add --webUrl $webUrl --title HealthIssuesSent --baseTemplate GenericList | ConvertFrom-Json
}

$cachedIssues = m365 spo listitem list --webUrl $webUrl --listId $list.Id --fields "Id,Title" | ConvertFrom-Json

$issues = m365 tenant serviceannouncement healthissue list --service "SharePoint Online" --query "[?!isResolved]" | ConvertFrom-Json

foreach ($issue in $issues) {
    $savedIssue = $cachedIssues | Where-Object { $_.Title -eq $issue.id }

    if ($null -eq $savedIssue) {
        m365 adaptivecard send --card `@adaptive-card.json --url $incomingWebhookURL --cardData "{ \`"title\`": \`"A health incident occurred on SharePoint\`", \`"description\`": \`"$($issue.Title)\`", \`"issueId\`": \`"$($issue.id)\`", \`"issueTimestamp\`": \`"$($issue.startDateTime.ToString("yyyy-MM-ddTHH:mm:ssZ"))\`", \`"viewUrl\`": \`"https://admin.microsoft.com/Adminportal/Home#/servicehealth/:/alerts/$($issue.id)\`", \`"properties\`":[{\`"key\`":\`"Classification\`",\`"value\`":\`"$($issue.classification)\`"},{\`"key\`":\`"Feature Group\`",\`"value\`":\`"$($issue.featureGroup)\`"},{\`"key\`":\`"Feature\`",\`"value\`":\`"$($issue.feature)\`"}] }"

        m365 spo listitem add --webUrl $webUrl --listId $list.Id --Title $issue.id | out-null
    }
}

foreach ($cachedIssue in $cachedIssues) {
    $isResolved = @($issues | Where-Object { $_.id -eq $cachedIssue.Title }).Count -eq 0

    if ($isResolved -eq $true) {
        m365 spo listitem remove --webUrl $webUrl --listId $list.Id --id $cachedIssue.Id --confirm | out-null
    }
}
The end result looks sweet!
I hope this was helpful for you. It’s certainly time for me to round it up.
Happy coding all!
Sources
- CLI for Microsoft 365 - Manage your Microsoft 365 tenant and SharePoint Framework projects on any platform
- Source Code for this blog on GitHub
- Incoming Webhooks in Microsoft Teams
- Filtering CLI data using JMESPath
- File tokens in the CLI for Microsoft 365
- Using the stop-parsing token in PowerShell
- Adaptive Card Designer
- PowerShell parsing issue
cli-microsoft365 azurefunction teams powershell
More
More blogs
Getting notified of changes in guests accessing SharePoint
Part 3 on how to use the CLI for Microsoft 365 and Azure Functions: How to get notified of updates in guests accessing SharePoint.
Read more
How to run the CLI for Microsoft 365 on an Azure Function
Did you know can run a CLI for Microsoft 365 script on an Azure Function based on the PowerShell stack? Here's how to do it.
Read more
Don't trust $PWD in Azure PowerShell Functions
Note to self: do not trust $PWD in Azure PowerShell Functions.
Read moreThanks
Thanks for reading

Thanks for reading my blog, I hope you got what you came for. Blogs of others have been super important during my work. This site is me returning the favor. If you read anything you do not understand because I failed to clarify it enough, please drop me a post using my socials.
Warm regards,
Martin
Microsoft MVP | Microsoft 365 Architect