
When contributing to the CLI for Microsoft 365 Open Source project, you need to write a fair amount of unit tests. Enough to test every single code path. Protecting code quality in this way is a good thing. But if you’re like me and have simply not gotten around to writing many unit tests, it can be tedious to get started. If you’re thinking about contributing, I hope this blog post will help you get up to speed quickly!
Table of Contents
- Changing your mindset
- CLI for Microsoft 365 test setup
- Test suite structure
- Mocking related code (using Stubs)
- Verifying something happens
- Running and debugging
- Errors, exceptions and things to keep in mind…
- Parting words
Changing your mindset
Creating unit tests can feel like an afterthought. So you’ve written some truly outstanding functionality (or so you think), and oh right, you need to write some tests as well. The first thing to do is to turn this mindset upside down. Writing tests takes a significant amount of time! Maybe as much as it took to create the functionality in the first place. So let’s enjoy it and take pride in writing good tests!
Pro tip:
Let's enjoy it and take pride in writing outstanding tests!
So plan for it, make it your primary objective to write fantestic tests! Make them readable to other contributors. Refactor your tests like you would refactor your code. There’s an obvious upside to creating unit tests: it will improve code quality without some human tester (or a maintainer) pointing out basic flaws in your code. Which is good, right?!
CLI for Microsoft 365 test setup
The CLI for Microsoft 365 project uses Mocha together with Sinon.JS. Mocha is a well known and well supported JavaScript test-framework. Sinon.JS is used for mocking (for example) Graph requests and responses or for checking expected command output. It works very well together with Mocha. Tests are written in typescript. You’ll find the project structure containing a lot of <name>.spec.ts files. Every spec.ts file contains a test suite for the regular typescript file alongside it. When executing npm run watch or npm run build, these typescript files are transpiled into <name>.spec.js files in the dist folder. After which you can execute npm run test to run all the test-cases.
Test suite structure
Opening up any spec file for the first time, you might find something like the following code. I’ve added some inline clarifications to explain the various parts:
// We want to test the code of a certain command. The command module is therefore dynamically imported at runtime.
const command: Command = require('./command-x');

// The describe function registers the test suite.
describe(commands.COMMAND_X, () => {

    // The following hooks are called by Mocha before and after the test suite is run and before and after each test-case is run.
    // They are ideal for global code, like creating and disposing of certain mocks.
    before(() => { /* ... */ });
    beforeEach(() => { /* ... */ });
    afterEach(() => { /* ... */ });
    after(() => { /* ... */ });

    // This function registers a test-case for the suite.
    // The idea is that you should be able to read the line as if it was a sentence: 'it has a correct name'.
    it('has a correct name', () => {

        // Assertions define when the test-case is successful. So this test-case is successful when the command name starts with the value of a certain string constant.
        assert.strictEqual(command.name.startsWith(commands.COMMAND_X), true);
    });
}
Mocking related code (using Stubs)
One of the biggest parts of unit testing is to get your tests to run in isolation. If your command calls the Microsoft Graph, you don’t want it to actually call the Graph, you just want to test what the code does with the various possible responses it might get. The same goes for all other dependencies in your code. Let’s call that related code: code you are not currently writing tests for, but you have to deal with it’s influence. Here Sinon.JS comes in, allowing us to use things like mocks, stubs and fakes.
Take the following code in the spec.ts files:
before(() => {
    sinon.stub(auth, 'restoreAuth').callsFake(() => Promise.resolve());
    sinon.stub(appInsights, 'trackEvent').callsFake(() => { });
    auth.service.connected = true;
});
What’s happening here is that two stubs are created through Sinon.JS. But what is a stub? A great definition I found is that by Roy Osherove: a stub is a controllable replacement for an existing dependency in the system. By using a stub, you can test your code without dealing with the dependency directly.
Definition:
A stub is a controllable replacement for an existing dependency in the system. By using a stub, you can test your code without dealing with the dependency directly. - The art of unit testing, Roy Osherove
The stubs override (or ‘fake’) the functions restoreAuth and trackEvent so the command can run in isolation. The specific responses are not important here, just that the functions can be executed without failing. auth.service.connected = true is used here as an extra to trick the system into thinking it’s connected. The stubs are created in the before() hook, so they are available on all the test-cases. But all stubs must be disposed of, which is why you’ll find the following in the after() hook:
after(() => {
    Utils.restore([
        auth.restoreAuth,
        appInsights.trackEvent
    ]);
    auth.service.connected = false;
});
This code uses a helper function to restore the stubbed functions to their normal behavior. Forgetting to restore stubbed functions will lead to errors when running tests:
TypeError: Attempted to wrap <functionName> which is already wrapped
    at checkWrappedMethod (node_modules/sinon/lib/sinon/util/core/wrap-method.js:64:21)
    at wrapMethod (node_modules/sinon/lib/sinon/util/core/wrap-method.js:135:13)
    at Function.stub (node_modules/sinon/lib/sinon/stub.js:126:44)
    at Sandbox.stub (node_modules/sinon/lib/sinon/sandbox.js:388:37)
    at Context.<anonymous> (src/m365/teams/commands/conversationmember/conversationmember-add.spec.ts:284:11)
    at processImmediate (node:internal/timers:464:21)
Basically this says: we cannot fake the function, as it is already faked. So don’t forget to restore them! Stubs created in the before() hook will need to be restored in the after() hook. Stubs created in the beforeEach() hook, will need to be restored in the afterEach() hook. You can also restore a stub in a test-case, for example just before you create a new stub.
Example: mocking the current user
So what if you need to use the emailaddress of the signed-in user in your command? There is an existing utility function that allows you to get that emailaddress: getUserNameFromAccessToken(accessToken: string). You’ll need to add the following code to stub this:
before(() => {
    // ...
    if (!auth.service.accessTokens[auth.defaultResource]) {
        auth.service.accessTokens[auth.defaultResource] = { expiresOn: '123', accessToken: 'abc' };
    }
    sinon.stub(accessToken, 'getUserNameFromAccessToken').callsFake(() => { return 'MeganB@contoso.com'; });
});

after(() => {
    Utils.restore([
        // ...
        accessToken.getUserNameFromAccessToken
    ]);
    // ...
    auth.service.accessTokens = {};
});
The code above stubs the function to return a dummy emailaddress. Because the function expects an access token, you’ll need to make sure some token is available on the auth service. Afterwards, the function is restored and the access token reset.
Example: mocking a Microsoft Graph request
So what about another important part, mocking requests to the Microsoft Graph? This essentially works the same. The CLI for Microsoft 365 project uses an intermediary request class to initiate HTTP requests towards the Microsoft Graph. All we need to do is stub the get() or post() functions on that class and make it return what we want to return.
// ...
const messageResponse = { /* ... */ };

// ...
sinon.stub(request, 'get').callsFake((opts) => {
    if (opts.url === `https://graph.microsoft.com/v1.0/me/messages`) {
    return Promise.resolve(messageResponse);
});

// ...
Utils.restore([ request.get ]);
In the code above we make the get() function return a dummy response that we first declared as a JSON object. The nice thing here is the opts argument on the fake function. This allows us to repond to parameters that are used by the code. In this case we can respond differently based on what url is passed to the get() function. We can thus create a stub that can take care of all the GET requests in the command and respond as required. The largest part of the work here is to get good dummy responses. Luckily, the Microsoft Graph Explorer helps us out in that regard. It has great dummy data that we can easily use!
The location of these stubs is a matter of thought. I personally like to declare these request stubs in the before or beforeEach hook, as I’m using them multiple times and it makes it more readable for me to have them in one place. But sometimes you just need to put them within a test-case itself, for example because you need different responses in different test-cases, all with the same GET-request. In any case: don’t forget to restore the stubs afterwards.
Pro tip:
Using the Microsoft Graph Explorer (while not signed in) is a great way to get good dummy content.
Verifying something happens
When all related code is finally mocked/stubbed, fake responses and all, running a test-case on a command is pretty straightforward. The following code benefits from the Stubs created in before() hooks, and runs fine in isolation:
it('sends chat message using chatName', (done) => {
    command.action(logger, {
        options: { chatName: "Just a conversation", message: "Hello World" }
    }, (err?: any) => {
        try {
            assert(loggerLogSpy.notCalled);
            assert.strictEqual(err, undefined);
            done();
        }
        catch (e) {
            done(e);
        }
    });
});
using the assert() functions, the callback of the commands action() function is checked, and if everything is trueish, the test-case returns successful. You can use multiple assert() statements in a single test-case, like I’ve done here: verifying multiple things at once. Because the action() function is running asynchronously, the test-case done argument is used to signal completion.
Verifying something happens in related code (using Spies)
As you can see in above code though, the test-case is not only verifying returned values. It’s also verifying against loggerLogSpy. Which is a Sinon.JS Spy. A Spy is like a Stub in the sense that you use it on related code. But where you use a Stub to control the return values of functions, you use a spy to verify the return values of functions, or even to verify if they are called at all. Spies are about verifying the interaction with functions.
In the case of the CLI project, all commands use an injected object to output values: the logger: Logger. From the perspective of a command, the logger is related code. The logger is the most logical thing to check if you want to know if a CLI command executed successfully. Therefore it is often spied upon.
In the spec.ts files, the logger object is re-created in the beforeEach() hook:
beforeEach(() => {
    log = [];
    logger = {
        log: (msg: string) => { log.push(msg); },
        logRaw: (msg: string) => { log.push(msg); },
        logToStderr: (msg: string) => { log.push(msg); }
    };
    loggerLogSpy = sinon.spy(logger, 'log');
});
It’s a ‘mock’ implementation of the Logger interface, as there is no real logger available while testing. There’s no need to use Sinon.JS Mocks/Stubs here, as we’re in control of what we are passing into the command as arguments. And that’s okay, we just want to spy on how it’s used by our code. The spy is created by using the sinon.spy() function, and we’re good to go. We could use multiple types of assertions now to check command output using the Spy. The ones I most often use are these:
// With some commands successful execution means no output:
assert(loggerLogSpy.notCalled);

// With many commands successful execution means a certain json output:
assert(loggerLogSpy.calledWith({ /* Some json*/ }));
There’s a lot more options in there as well. But we’ll leave that for now.
Running and debugging
After writing your tests, don’t forget running them. To successfully run tests, you first have to compile/transpile the code so that they end up in the dist folder. The best way to do this is to just run npm run watch in your terminal. This way, you can keep making changes and have them transpiled immediately so you can keep running your tests.
Running tests using the commandline
If you like using the commandline, you can simply run your tests by executing npm run test in the terminal.
To only run your own tests, you’ll need to update the package.json scripts section. For example:
"mytest": "c8 mocha \"dist/**/some-command-file.spec.js\" --timeout 10000",
…after which you can execute npm run mytest to execute just your own tests.
Debugging your unit tests
You can also debug your unit tests from within VS Code. A launch configuration named ‘Debug Tests’ has been added to the .vscode/launch.json file. You can start debugging by opening the Run & Debug panel, selecting the correct configuration and hitting F5. Don’t forget to place a breakpoint in your spec file.

Running and Debugging using Mocha Test Explorer
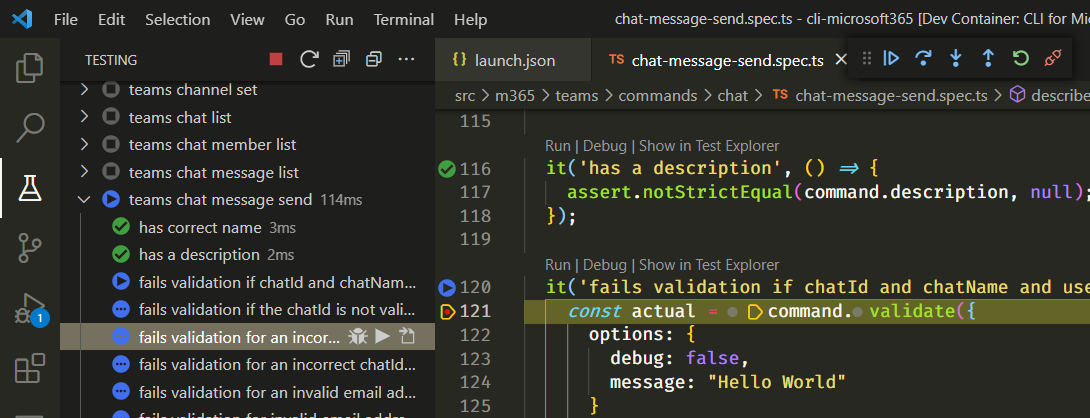
But an even better way to run and debug tests is to use the Mocha Test Explorer extension. This extension gives you a fantastic overview of all your test suites and test-cases. It allows you to run/debug everything at once or just one test suite or test-case at a time. It shows nice green checks if a test-case has succeeded. Take care that you have transpiled your code, the Test Explorer should start showing your tests.
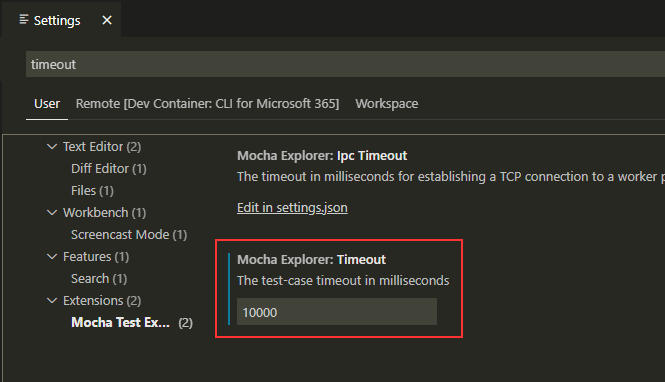
By default, the Mocha Test Explorer has a test-case timeout of 2000ms. This is problematic for some unit tests, as they need a little more time to complete. The npm scripts in the package.json file show that the maintainers thought of this: they added a --timeout 10000 argument on the mocha scripts. So when using the Mocha Test explorer we should update this timeout value as well. We can do that in the extension settings of VS Code:
Errors, exceptions and things to keep in mind…
I’ve seen
npm run testrun very slow when the watcher was active. If this is the case with you, break off the watcher and just executenpm run build. Or use Mocha Test explorer, which does not seem to be bothered by the watcher.An error occurred intermittently on my end where
npm run testwould not execute, or test cases could not be loaded into Mocha Test explorer because of the following error:TypeError: Suite argument "title" must be a string. Received type "undefined". Just execute annpm run cleanand rebuild to solve this.
Parting words
It’s time to close this down. I hope my blog helped you get closer to writing good unit tests! If you ran into issues, you might want to check out my other blog. I already listed a few things that can go wrong there.
Happy testing!
Links
cli-microsoft365 testing mocha contributing
More
More blogs

Contributing as a holiday season present
Last month I contributed to an Open Source project: CLI for Microsoft 365. I did that both because I love using CLI's and because I love not reinventing wheels.
Read more
Running applications with limited SharePoint permissions
Securing application access to SharePoint through Entra ID is easy, but how to access SharePoint using the principle of least privilege?
Read more
Getting notified of changes in guests accessing SharePoint
Part 3 on how to use the CLI for Microsoft 365 and Azure Functions: How to get notified of updates in guests accessing SharePoint.
Read moreThanks
Thanks for reading

Thanks for reading my blog, I hope you got what you came for. Blogs of others have been super important during my work. This site is me returning the favor. If you read anything you do not understand because I failed to clarify it enough, please drop me a post using my socials.
Warm regards,
Martin
Microsoft MVP | Microsoft 365 Architect