Are you planning on creating an Automation script that needs to be run in the cloud? And are you considering to use the CLI for Microsoft 365 to do that? If that’s the case, this blog might just be what you need to read. I’m covering the basics on how to set it up. So dust off your PowerShell and Azure skills and let’s get started!
Table of Contents
- Part 1 - how to run a CLI for Microsoft 365 script on an Azure Function (this blog)
- Part 2 - Getting notified of service incidents in Microsoft Teams
- Part 3 - Getting notified of changes in guests accessing SharePoint
- Part 4 - Configuring the CLI for Microsoft 365 in Azure Functions
Prerequisites
For this scenario I used the following:
On my machine:
- VS Code + Azure Account and Azure Functions extensions
- The Azure Function Core tools
- Node.js
- CLI for Microsoft 365
- An Azure Functions project with a TimerTrigger
On Azure:
- An Azure Subscription
- An Azure Function App based on Windows and running the PowerShell stack
If you’re not familiar on how to create a local Azure Functions project or an Azure Function, you can follow the steps outlined here: Quickstart: Create a PowerShell function in Azure using Visual Studio Code.
The source code for this blog can be found on GitHub.
How to install the CLI for Microsoft 365 on an Azure Function
Using PowerShell modules in an Azure Function is quite easy. You just have to define them in the requirements.psd1 file. The CLI for Microsoft 365 however is not a PowerShell module, it’s a Node.js application. Hence you cannot deploy it on an Azure PowerShell Function in the usual way you would arrange for PowerShell Modules to be installed. So how can we get Node.js to run on an Azure PowerShell function?
1. Configuring Node.js on the Azure Function
Well fortunately, Node.js is already available out of the box! A quick check running node -v brings to light that node version 0.6.20 is installed:
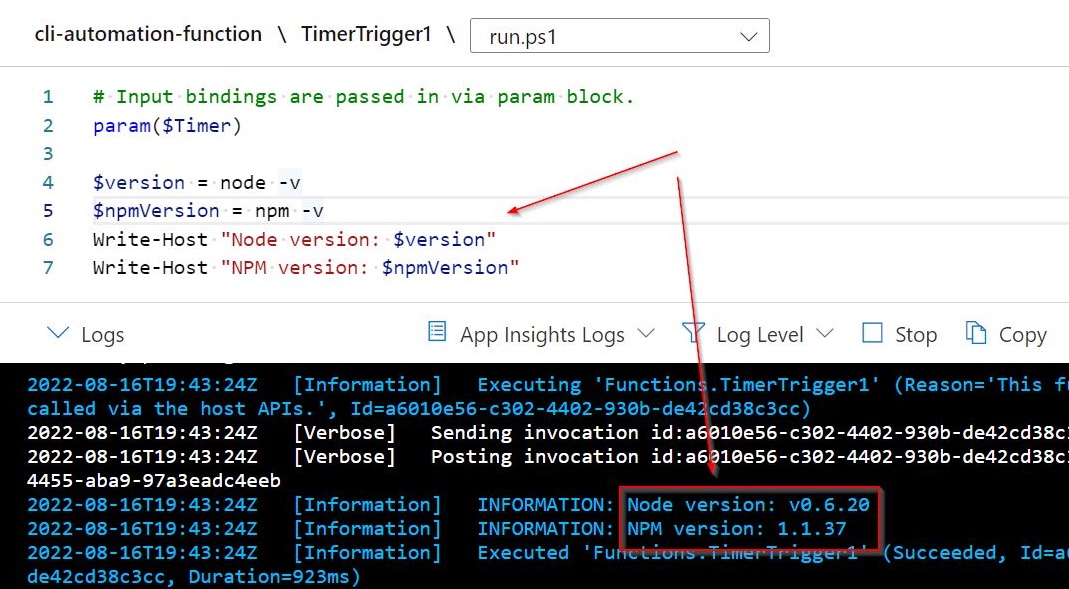
Now that’s quite old…
Luckily you can influence the Node.js version, just like you would with a Azure Function running the Node.js stack. This is as simple as configuring an app setting. Just add the WEBSITE_NODE_DEFAULT_VERSION app setting and set it to ~16, this will ensure the currently LTS version of Node.js will be available on your PowerShell Function.
2. Installing the CLI for Microsoft 365
Now that we have Node.js configured as we want it, how can we install the CLI for Microsoft 365 on an Azure PowerShell Function? Usually (on your local machine) you would install the CLI for Microsoft 365 as a global npm package, running: npm install @pnp/cli-microsoft365 -g. You could take this route and include the install command in the profile.ps1 file that every Azure PowerShell Function has. This file is run after every cold start before running the actual function script. That can be very slow though. Apparently due to the way Azure Functions work with their file system. I’ve had to wait 20 minutes before the module was installed and ready.
I’ve found the following a better way:
Step 1: Create a package.json file in your project with the CLI for Microsoft 365 as a local dependency:
{
    "name": "cli-automation-function",
    "version": "1.0.0",
    "dependencies": {
        "@pnp/cli-microsoft365": "^5.6.0"
    }
}
Step 2: Run npm install on your local machine.
If you are using a CI/CD build pipeline you can configure it there as well.
Step 3: Add the following to the profile.ps1 file to make sure that the local node_modules folder is included in the PATH Environment Variable:
$functionPath = "$PSScriptRoot\node_modules\.bin"
if ($Env:PATH.Contains($functionPath) -eq $false) {
    [System.Environment]::SetEnvironmentVariable('PATH',$Env:PATH + ";$functionPath")
}
If you do not do this, PowerShell will not recognize the m365 command once it’s running on Azure
Step 4: Add the following lines to your run.ps1 file to test whether the CLI works once deployed to Azure:
$status = m365 status
Write-Host "Current Status: $status"
Note:
With newer versions of the CLI for Microsoft 365, you may get red lines in your log file because of the spinner. Read part 4 of this series on configuring the CLI optimally.
Step 5: Now deploy the entire project to the Azure Function, including the node_modules folder.
Deploying the node_modules folder along with your code takes care of slow startup times associated with the enormous volume of file interactions when running npm install.
Now run the timer trigger from the Functions > TimerTrigger1 > Code/Test blade in Azure. If all is well you’ll receive a nice message saying that you’re not logged in.
How to authenticate with Entra ID using the CLI for Microsoft 365
Next up: how to authenticate. The CLI for Microsoft 365 can sign in using Managed Identity, which is an awesome way to make sure you don’t need to package credentials along with your app.
1. Enabling Identity
To be able to login using Managed Identity, you’ll need to enable a System Assigned Identity on the Function App. This can be done from the Azure Portal:
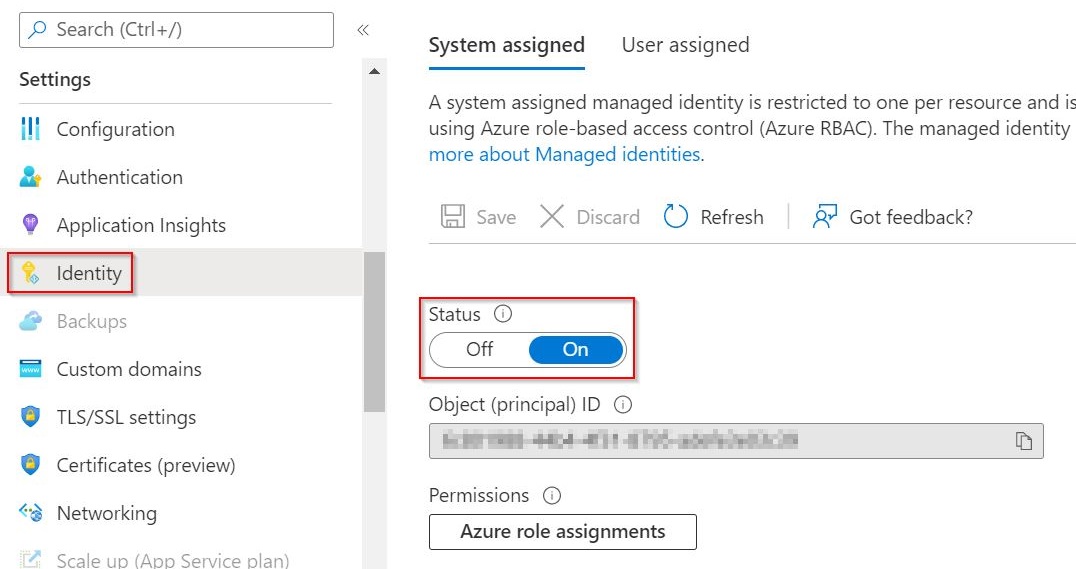
An Object ID will show up after enabling the Identity. You can copy this Object ID and search for it in Entra ID. You’ll find the Service principal that’s been created for the function app.
2. Adding app only permissions
After enabling the Identity, we need to assign it some permissions. On your local machine, run the following lines to sign into the CLI for Microsoft 365 and add permissions for SharePoint, using the Object ID from the Service principal that was created for the Azure Function:
m365 login
m365 entra approleassignment add --appObjectId "<paste the object id here>" --resource "SharePoint" --scopes "Sites.FullControl.All"
The important thing to keep in mind is that these are app only permissions, instead of delegated permissions where a user context is available. The application will have these permissions on it’s own, when running. Executing the above command effectively gives the Azure Function permissions on all SharePoint sites. So be wise about it, and always evaluate whether you really need the level of permissions, especially on production apps.
Note:
Executing the above command effectively gives the Azure Function permissions on all SharePoint sites. So be wise about it, and always evaluate whether you really need the level of permissions, especially on production apps.
3. Sign into Microsoft 365
Now update your run.ps1 file, so that it contains the following lines:
m365 login --authType identity
$status = m365 status
Write-Host "Current Status: $status"
Deploying your Function and running it in testmode should now print that you are signed in. All without a single credential saved anywhere!
Note:
Not all CLI for Microsoft 365 commands can be executed with app only permissions. Make sure to check the documentation if you're going down this road with your script.
How to run a CLI for Microsoft 365 script
It’s now time to write some script. This could basically be anything. The following is not very useful, it just prints the number of sites. But you can probably see all the scenario’s you could potentially solve with this.
m365 login --authType identity
$status = m365 status
Write-Host "Current Status: $status"

m365 spo set --url "https://blimped.sharepoint.com"

$sites = m365 spo site list --type All | ConvertFrom-Json
Write-Host "Number of sites: $($sites.Count)"
Notice how I added a line setting the base URL of SharePoint (m365 spo set). If I wouldn’t have done that, the CLI would try to discover the base URL of SharePoint, using the Microsoft Graph. I would need to add the Microsoft Graph Sites.Read.All permission to the permissions of the Function App. To work around that behavior, I configure the URL myself using the spo set command.
And that’s all for today, folks! Any questions? Do send me a post using the socials or this site.
Happy coding!
Sources
- CLI for Microsoft 365 - Manage your Microsoft 365 tenant and SharePoint Framework projects on any platform
- Source Code for this blog on GitHub
- Configuring the Node.js version of an Azure Function
- Azure Functions PowerShell developer guide
- Quickstart: Create a PowerShell function in Azure using Visual Studio Code
- CLI documentation - m365 spo set
- Azure Function Core tools
cli-microsoft365 azurefunction powershell
More
More blogs
Getting notified of changes in guests accessing SharePoint
Part 3 on how to use the CLI for Microsoft 365 and Azure Functions: How to get notified of updates in guests accessing SharePoint.
Read more
Getting notified of service incidents in Microsoft Teams
Part 2 on how to use the CLI for Microsoft 365 and Azure Functions: How to get notified in Teams, when a service health incident occurs on SharePoint?
Read more
Don't trust $PWD in Azure PowerShell Functions
Note to self: do not trust $PWD in Azure PowerShell Functions.
Read moreThanks
Thanks for reading

Thanks for reading my blog, I hope you got what you came for. Blogs of others have been super important during my work. This site is me returning the favor. If you read anything you do not understand because I failed to clarify it enough, please drop me a post using my socials.
Warm regards,
Martin
Microsoft MVP | Microsoft 365 Architect