Introduction
Microsoft 365 Purview allows you to create and publish retention labels that you can apply to data in SharePoint, OneDrive, Teams and Exchange. These labels ensure that data is retained for a required period of time. They define if content should be locked as a record in the meantime and if it should be deleted after the retention period has ended. This is especially useful for data that is not actively used, but still needs to be kept for legal or compliance reasons.
There’s already a great series of blog posts by Joanne C Klein about retention in SharePoint. For example this one… There’s a lot of amazing info in there, which I’ll not redo here.
Instead, in this blog post series I will dive a little deeper into how to programmatically manage Purview retention labels and apply them to SharePoint content. What are the options and how can we use them, all from code. It may function as a reference guide for you to use in your own projects, and I’ve tried to cover as many things as I could, which is the reason it’s gotten a bit large. But that’s okay. It’s a guide after all. Happy coding and enjoy!
Series overview
- Part 1: Managing and applying Purview retention labels using code (this blog)
- Part 2: Working with Purview event-based retention using code
- Part 3: Finding and fixing incorrectly applied Purview retention labels
- Part 4: Implications of applying Purview retention labels to folders
- Part 5: Automating Purview data retention using Azure Functions
Table of contents
- Introduction
- Tools that you can use
- How to manage retention labels
- How to get a list of retention labels to apply to SharePoint content
- How to apply retention labels to SharePoint content (Advised Routes)
- How to clear a retention label
- How to use Record Versioning (Locking and unlocking)
- How to configure default retention labels (on folders and lists/libraries)
- Conclusion
- Archive: Routes to avoid when applying retention labels to SharePoint content
Tools that you can use
To work with the Purview retention labels, you can use a variety of tools to manage and/or apply retention labels. Let me first explain what tools there are and how you can use them with Purview retention labels. The following is probably not a complete list, but it contains the tools I’ve worked with extensively.
1. Security & Compliance PowerShell
This is part of the Exchange Online PowerShell module and it’s currently the most complete way to manage Purview retention labels. You can list, create, update, publish and delete retention labels, etc. You can also use it to work with event-based labels. You can connect with the module using delegated as well as application permissions, (Using a certificate) so this module can be used in Automation scenario’s as well.
Read more about Security & Compliance PowerShell
2. Microsoft Graph API
The Microsoft Graph API contains a relatively new series of endpoints with which to manage and apply retention labels. Some of these endpoints, while powerful, are still in beta at the time of writing. Also, for managing the labels, these endpoints are currently not as complete as the Security & Compliance PowerShell module. You can only list, create, update and delete retention labels, but you cannot publish them yet.
Read more about the Microsoft Graph API / Graph PowerShell module
3. CLI for Microsoft 365
The CLI for Microsoft 365 is a commandline tool to manage your Microsoft 365 tenant, and it contains an expanding series of commandlets to manage and apply purview retention labels. It’s based on the Microsoft Graph, so for the management part it has the same limitations as the Microsoft Graph API. But it’s a great tool to use in automation scenarios, because it’s cross-platform and it’s easy to use in scripts.
Read more about the CLI for Microsoft 365
4. PnP.PowerShell
PnP.PowerShell is a great community-driven PowerShell module with which you can manage your Microsoft 365 tenant, and it contains a few commandlets to apply purview retention labels. It’s a great tool to use in automation scenarios, just like the CLI for Microsoft 365.
Read more about PnP.PowerShell
5. SharePoint REST API
The SharePoint REST API can be used to programmatically apply purview retention labels to content. As it’s an HTTP API, like the Graph API, it can be used from any piece of code. It can be run from a SharePoint Framework webpart, from a script, from a standalone application, from Power Automate, etc.
Read more about the SharePoint REST API
6. Client Side Object Model (CSOM)
The Client Side Object Model (CSOM) is a proven and powerful way of dealing with SharePoint from .NET applications. It can be used to apply purview retention labels to SharePoint content. It can be run from a .NET application in the context of a user or as a daemon/webjob tool running in the background.
Read more about CSOM
How to manage retention labels
Let’s start by speaking about how to manage retention labels programmatically. From the above tools there’s three that can be used to do that (as far as I know). So let’s see how far we can get with only code!
1. Using Security & Compliance PowerShell
As mentioned, the Security & Compliance PowerShell module is currently the most complete way to manage retention labels.
The following example will create a retention label that retains content for 10 years and locks it as a record during that time. It will publish the retention label across all possible locations, so the label can be applied to content anywhere.
Install-Module -Name ExchangeOnlineManagement

Connect-IPPSSession
$retentionLabel = New-ComplianceTag -Name "Retain 10 years" -RetentionType "TaggedAgeInDays" -IsRecordLabel $true -IsRecordUnlockedAsDefault $false -Regulatory $false -RetentionDuration 3650 -RetentionAction "KeepAndDelete" -Notes "Record - Destroy - 10 years - No review"
$policy = New-RetentionCompliancePolicy -Name "Some Policy" -ModernGroupLocation "All" -SharePointLocation "All" -ExchangeLocation "All" -OneDriveLocation "All"
New-RetentionComplianceRule -Policy $policy.Guid -PublishComplianceTag $retentionLabel.Id
And that’s basically it! The retention label is created and published. You can now apply it to content in SharePoint, OneDrive, Teams and Exchange. Of course, you may need more lines of code if you want to create a more complex setup. But this is the basic idea.
2. Using the Microsoft Graph API
Using the Microsoft Graph API we can create the same label as above in the following manner:
POST https://graph.microsoft.com/beta/security/labels/retentionLabels
Authorization: "Bearer <accessToken>"
Content-Type: "application/json"

{
    "displayName": "Retain 10 years",
    "retentionTrigger": "dateLabeled",
    "retentionDuration": retentionDuration: {
        "@odata.type": "#microsoft.graph.security.retentionDurationInDays",
        days: 3650
    },
    "behaviorDuringRetentionPeriod": "retainAsRecord",
    "defaultRecordBehavior": "startLocked",
    "actionAfterRetentionPeriod": "delete",
    "descriptionForUsers": "Record - Destroy - 10 years - No review",
}
You can however currently not deploy this across your tenant, as you can not (yet) create label policies. So you’ll have to do that from the Security & Compliance Center.
3. Using CLI for Microsoft 365
Using the CLI for Microsoft 365, the same label as above can be created as follows:
m365 purview retentionlabel add --displayName 'Retain 10 years' --retentionTrigger 'dateLabeled' --retentionDuration 3650 --behaviorDuringRetentionPeriod retainAsRecord --actionAfterRetentionPeriod delete --descriptionForUsers 'Record - Destroy - 10 years - No review'
How to get a list of retention labels to apply to SharePoint content
After creating a retention label and publishing it throughout SharePoint, it might take a few days for those labels to become usable. When working from the User Interface of SharePoint, you’ll be able to see the label in the label dropdown in the item/file details pane. When working from code, you can also get a list of applicable labels. Labels that are in Purview might not be usable on all SharePoint sites and groups, due to how the policy was published. It’s possible to publish labels with an adaptive or static scope, targeted at all sites or just a section.
So here’s a few ways to only get the relevant labels for a specific SharePoint site or group:
1. Using CSOM
The following code fragment will get you a list of retention labels that are available for a specific site:
var labels = SPPolicyStoreProxy.GetAvailableTagsForSite(clientContext, "<site_url>");
clientContext.ExecuteQuery();
2. Using the SharePoint REST API
Using the SharePoint REST API you can use the following HTTP Request:
GET <site_url>/_api/SP.CompliancePolicy.SPPolicyStoreProxy.GetAvailableTagsForSite(siteUrl=@url)?@url='<site_url>'
Authorization: "Bearer <accessToken>"
Accept: "application/json"
This will give you a nice list of retention labels that are available for the site. Unfortunately you cannot use the $filter and $select query parameters to filter the results. So you’ll have to do that in code.
Fun fact:
The SharePoint UI uses this exact endpoint to populate the 'Apply a Label' dropdown in the item details pane.
3. Using the CLI for Microsoft 365
You can also use the CLI for Microsoft 365 to get a list of labels. It will essentially just use the SharePoint REST API, so the output is the same. Just execute the following:
m365 spo web retentionlabel list --webUrl "<site_url>"
4. Using PnP PowerShell
You can also use PnP PowerShell to get a list of labels. Just execute the following:
Get-PnPLabel
You don’t need to specify a site, because the site you’re connected to using Connect-PnPOnline will be used.
Output
The output of the above commands will be a list of retention labels that are available for the site. The below example shows how the output of the SharePoint REST API looks. The returned information is important, because you’ll need it to apply the label to content.
[
        {
        "AcceptMessagesOnlyFromSendersOrMembers": false,
        "AccessType": null,
        "AllowAccessFromUnmanagedDevice": null,
        "AutoDelete": true,
        "BlockDelete": true,
        "BlockEdit": true,
        "ComplianceFlags": 5,
        "ContainsSiteLabel": false,
        "DisplayName": "",
        "EncryptionRMSTemplateId": null,
        "HasRetentionAction": true,
        "IsEventTag": false,
        "MultiStageReviewerEmail": null,
        "NextStageComplianceTag": null,
        "Notes": null,
        "RequireSenderAuthenticationEnabled": false,
        "ReviewerEmail": null,
        "SharingCapabilities": null,
        "SuperLock": false,
        "TagDuration": 3650,
        "TagId": "ae32bea0-914c-47ac-9c48-9f4217f70c65",
        "TagName": "Retain 10 years",
        "TagRetentionBasedOn": "TaggedAgeInDays",
        "UnlockedAsDefault": false
    }
]
5. Using the Microsoft Graph API
You can also use the Microsoft Graph API to get a list of labels directly from Purview. You’ll need the appropriate permission scopes to execute that request. The list that is returned also contains retention labels that have not been published. The following HTTP request will get you a list of labels:
GET https://graph.microsoft.com/beta/security/labels/retentionLabels
Authorization: "Bearer <accessToken>"
The returned object is slightly different in shape though. Keep that in mind when working with this endpoint..
How to apply retention labels to SharePoint content (Advised Routes)
Applying retention labels through code can be done in a few different ways. There are a few routes that I advise you should use. And there are a few others that you should only use with extreme caution. The following is a selection of options that I would advise you to use when applying labels to content in SharePoint:
1. Using CSOM (through the bulk method)
The Client Side Object Model (CSOM) has a number of methods available that can be used to label content with retention labels, but the route I would advise is to use the SetComplianceTagOnBulkItems method. It can be used as follows:
//Include the following using statement: using Microsoft.SharePoint.Client.CompliancePolicy;
var result = SPPolicyStoreProxy.SetComplianceTagOnBulkItems(clientContext, new[] { 1,2,3 }, "<list_absolute_url>", "Retain 10 years");
clientContext.ExecuteQuery();
This is a very powerful method, because it allows you to apply labels to multiple items at once. Using this method you can label a 100 items at once. This only takes a few seconds per execution, making it easy to batch-label a lot of items. You’ll need to reference the retention label by its display name, but even if you make a typo, you’ll get an intelligible message returned.
If used correctly, the method will return an empty array. But it can also return the ids of items or files that where not labelled, for example because the item id did not exist.
2. Using the SharePoint REST API (through the bulk endpoint)
Just like with CSOM, you can use the SetComplianceTagOnBulkItems endpoint through the SharePoint v1 REST API to apply labels to one or more files/list items at once. And you can find it if you browse to the $metadata endpoint of the SharePoint REST Api. (Find it at https://contoso.sharepoint.com/_api/$metadata) The metadata definition is notoriously hard to fathom, but it’s there and it’s useful to find out if things are available. If you look it up you’ll see it contains the following function definition:
<FunctionImport Name="SP_CompliancePolicy_SPPolicyStoreProxy_SetComplianceTagOnBulkItems" ReturnType="Collection(Edm.Int32)">
    <Parameter Name="itemIds" Type="Collection(Edm.Int32)" Nullable="false"/>
    <Parameter Name="listUrl" Type="Edm.String"/>
    <Parameter Name="complianceTagValue" Type="Edm.String"/>
</FunctionImport>
What this essentially means is that you can call the SharePoint REST API as follows:
POST <site_url>/_api/SP_CompliancePolicy_SPPolicyStoreProxy_SetComplianceTagOnBulkItems
Authorization: "Bearer <accessToken>"
Content-Type: "application/json"

{
    "listUrl": "<list_absolute_url>",
    "complianceTagValue": "Retain 10 years",
    "itemIds": [1,2,3,4,5]
}
If used correctly, the HTTP request should return with a 200 OK and an "odata.null": true response. But it can also return the ids of items or files that where not labelled, for example because the item id did not exist.
So all in all I’d say: a very good REST-method to use.
Note:
The SetComplianceTagOnBulkItems-method is a powerful and fast method to label one or more files or list items in one go.
3. Using the CLI for Microsoft 365
From a scripting angle, you can use the CLI for Microsoft 365, which has a series of commands that can be used to apply retention labels to SharePoint content. Applying retention labels can be done using the following oneliners:
# Applying a label to files or list items
m365 spo listitem retentionlabel ensure --name "Retain 10 years" --webUrl "<site_url>" --listId "<list_guid>" --listItemId <item_id>

# Applying a label to a file
m365 spo file retentionlabel ensure --name "Retain 10 years" --webUrl "<site_url>" --fileUrl "<some_file_url>"
As you can see, you can reference a file in multiple ways, which is powerful. You can currently only apply the label to a single file or list item at a time.
4. Using PnP PowerShell
Just like with the CLI, you can also use PnP PowerShell to apply retention labels to SharePoint content in scripting. The following example shows how to apply a label to a list item:
Set-PnPListItem -List "<list_identifier>" -Identity <item_id> -Label "Retain 10 years"
5. Using the Microsoft Graph API
You can also use the Microsoft Graph API to apply retention labels to SharePoint content. This method is restricted to files. The following HTTP request will apply a label to a file:
PATCH https://graph.microsoft.com/v1.0/drives/<drive-id>/items/<item-id>/retentionLabel
Authorization: "Bearer <accessToken>"
Content-Type: "application/json"

{
    "name": "Retain 10 years"
}
How to clear a retention label
Clearing a retention label is essentially calling the different API’s with an empty string as the label name. If you need to use parameters, you can use the same parameters as you used to apply the label, but just put them to false. For example, if you applied a label with isTagPolicyHold set to true, you now just set it to false when you clear the label.
1. Using CSOM
Uing CSOM you can just clear the retention label by setting the ComplianceTag property to an empty string.
//Include the following using statement: using Microsoft.SharePoint.Client.CompliancePolicy;
var result = SPPolicyStoreProxy.SetComplianceTagOnBulkItems(clientContext, new[] { 1,2,3 }, "<list_absolute_url>", "");
clientContext.ExecuteQuery();
2. Using the SharePoint REST API
POST <site_url>/_api/SP_CompliancePolicy_SPPolicyStoreProxy_SetComplianceTagOnBulkItems
Authorization: "Bearer <accessToken>"
Content-Type: "application/json"

{
    "listUrl": "<list_absolute_url>",
    "complianceTagValue": "",
    "itemIds": [1,2,3,4,5]
}
…or
POST <site_url>/_api/web/lists(guid'<list_guid>')/items(<item_id>)/SetComplianceTag()
Authorization: "Bearer <accessToken>"
Content-Type: "application/json"

{
    "complianceTag": "",
    "isTagPolicyHold": false,
    "isTagPolicyRecord": false,
    "isEventBasedTag": false,
    "isTagSuperLock": false,
    "isUnlockedAsDefault": false
}
3. Using the CLI for Microsoft 365
# Clearing a label from files or list items
m365 spo listitem retentionlabel remove --webUrl "<site_url>" --listId "<list_guid>" --listItemId <item_id>

# Clearing a label from a file
m365 spo file retentionlabel remove --webUrl "<site_url>" --fileUrl "<some_file_url>"
As you can see, you can reference a file in multiple ways, which is powerful. You can currently only apply the label to a single file or list item at a time.
4. Using PnP PowerShell
Set-PnPListItem -List "<list_identifier>" -Identity <item_id> -ClearLabel -Force
5. Using the Microsoft Graph API
You can also use the Microsoft Graph API to clear retention labels from SharePoint content. This method is restricted to files. The following HTTP request will clear a label from a file:
DELETE https://graph.microsoft.com/v1.0/drives/<drive-id>/items/<item-id>/retentionLabel
Authorization: "Bearer <accessToken>"
How to use Record Versioning (Locking and unlocking)
If a retention label is used to classify content as a “Record”, users will not be able to edit or delete the content during the retention period. This is a good thing, because it prevents users from accidentally deleting or editing content that is subject to legal or regulatory requirements. But what if you still want to allow users to edit content that is classified as a “Record”, but in a safe recordy way? You can do that by using Record Versioning. The content will still be a record, but each version will be stored separately.
In Microsoft 365 Purview, you can enable Record versioning on the global records management settings page.
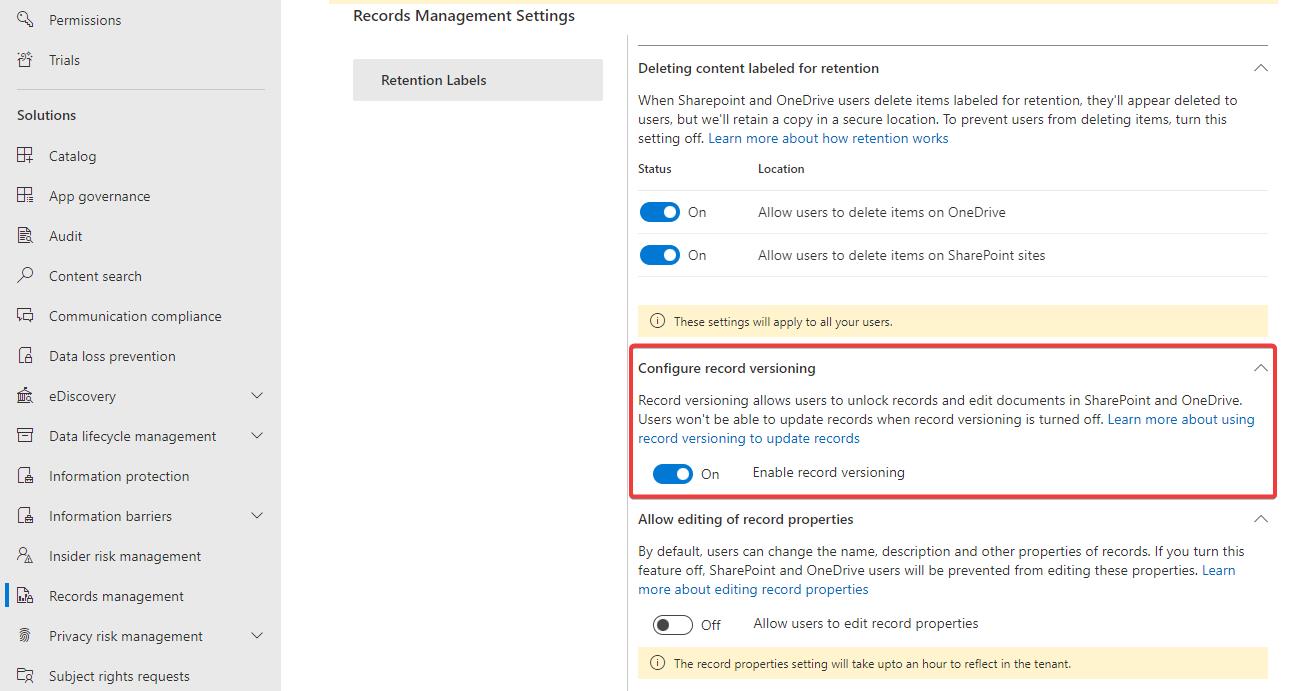
This will cause an extra toggle to show below labeled content in the SharePoint UI. This toggle allows users to unlock and lock the content.
Locking and unlocking content can be done programmatically in the following ways:
Note:
Locking and unlocking records is a functionality that seems to be limited to the SharePoint REST API and the Microsoft Graph API currently. I did not find a way to do this using CSOM and PnP.PowerShell.
1. Using the SharePoint REST API
Using the SharePoint REST API you can use the following HTTP Request to unlock a record:
POST <site_url>/_api/SP.CompliancePolicy.SPPolicyStoreProxy.UnlockRecordItem()'
Authorization: "Bearer <accessToken>"
Accept: "application/json"
Content-Type: "application/json"

{
    "listUrl": "<list_absolute_url>",
    "itemId": <item_id>
}
To lock an item again, execute the following:
POST <site_url>/_api/SP.CompliancePolicy.SPPolicyStoreProxy.LockRecordItem()'
Authorization: "Bearer <accessToken>"
Accept: "application/json"
Content-Type: "application/json"

{
    "listUrl": "<list_absolute_url>",
    "itemId": <item_id>
}
2. Using the CLI for Microsoft 365
You can also use the CLI for Microsoft 365 to lock or unlock records. It will essentially just uses the SharePoint REST API. The following commands can be used to lock and unlock files and list items:
m365 spo listitem record lock --webUrl "<site_url>" --listId "<list_guid>" --listItemId <item_id>

m365 spo listitem record unlock --webUrl "<site_url>" --listId "<list_guid>" --listItemId <item_id>
3. Using the Microsoft Graph API
You can also use the Microsoft Graph API to lock and unlock retention labels. This method is restricted to files. The following HTTP request will set the lock state of a record retention label:
PATCH https://graph.microsoft.com/v1.0/drives/<drive-id>/items/<item-id>/retentionLabel
Authorization: "Bearer <accessToken>"
Content-Type: "application/json"

{
  "retentionSettings": {
    "isRecordLocked": true
  }
}
How to configure default retention labels (on folders and lists/libraries)
Till now I’ve mostly mentioned labeling files and list items. But you can also apply retention labels to folders and lists or libraries. But this means something different. These labels act as default labels and can be synced to the items or files in the folder or list. New items in your folder or list/library will get the default label applied. But it’s still possible to change the label on any file, regardless of the default label set at the parent level. At the end of the retention term, the labeled files will be removed. Any labeled folders will be left behind.
Applying these labels works much in the same way as applying labels to other SharePoint content. You can do this programmatically as follows:
1. Using CSOM
Configuring default labels on folders using CSOM actually works in the same way as you would configure a label on a list item.
The Client Side Object Model (CSOM) does have a specific method for applying default labels to lists and libraries: SetListComplianceTag. It’s kind of hard to find, but here’s how it works:
//Include the following using statement: using Microsoft.SharePoint.Client.CompliancePolicy;
SPPolicyStoreProxy.SetListComplianceTag(clientContext, "<list_absolute_url>", "Retain 10 years", blockDelete: true, blockEdit: true, syncToItems: true);
clientContext.ExecuteQuery();
I’ve named the paramaters just so you know what they are. As you can see, the function has two odd boolean parameters: blockEdit and blockDelete. It’s important to know that the use of these booleans has been turned off by Microsoft. These booleans originally allowed you to override the default label configuration of Purview and have been marked by Microsoft as unwanted and unsupported in recent years. They are still there, but changing the values does not actually do something. So you can safely mark them true or false. The syncToItems boolean parameter however, does work. This parameter means that any existing files or list items will get the label applied immediately.
Clearing the default label can be done by executing the same with an empty value on the complianceTagValue parameter.
2. Using the SharePoint REST API
Configuring default labels on folders using REST actually works in the same way as you would configure a label on a list item.
However, to apply a default label to lists and libraries there are specific methods available. Looking at the /_api/$metadata endpoint there appear to be two methods: a central method, and one with Meta in the name, like we got on the listitem level. I’ll just highlight one:
<FunctionImport Name="SP_CompliancePolicy_SPPolicyStoreProxy_SetListComplianceTag">
    <Parameter Name="listUrl" Type="Edm.String"/>
    <Parameter Name="complianceTagValue" Type="Edm.String"/>
    <Parameter Name="blockDelete" Type="Edm.Boolean" Nullable="false"/>
    <Parameter Name="blockEdit" Type="Edm.Boolean" Nullable="false"/>
    <Parameter Name="syncToItems" Type="Edm.Boolean" Nullable="false"/>
</FunctionImport>
Just like I said in the section dealing with CSOM, the blockEdit and blockDelete parameters do not actually work anymore. Feel free to either mark them as true or false. The syncToItems boolean is available to use and just means that any existing files or list items will get the label applied immediately.
Applying a default label at list/library level can be done as follows:
POST <site_url>/_api/SP_CompliancePolicy_SPPolicyStoreProxy_SetListComplianceTag
Authorization: "Bearer <accessToken>"
Content-Type: "application/json"

{
    "listUrl": "<list_absolute_url>",
    "complianceTagValue": "Retain 10 years",
    "blockDelete": true,
    "blockEdit": true,
    "syncToItems": true
}
Clearing the default label can be done by posting the same with an empty value on the complianceTagValue property.
3. Using the CLI for Microsoft 365
The CLI for Microsoft 365 also has commands to apply default labels to folders and lists/libraries. These can be run as follows:
# Applying a default label to a list or library
m365 spo list retentionlabel ensure --webUrl "<site_url>" --listId "<list_guid>" --name "Retain 10 years"

# Applying a default label to a folder using the folder's URL
m365 spo folder retentionlabel ensure --webUrl "<site_url>" --folderUrl "<folder_url>" --name "Retain 10 years"

# Applying a default label to a folder using the folder's list item ID
m365 spo listitem retentionlabel ensure --webUrl "<site_url>" --listId "<list_guid>" --listItemId 1 --name "Retain 10 years"
4. Using PnP.PowerShell
And using PnP.PowerShell, this can be done using the following commandlets:
# Applying a default label to a list or library
Set-PnPLabel -List "<list_identifier>" -Label "Retain 10 years"

# Applying a default label to a folder using the folder's list item ID
Set-PnPListItem -List "<list_identifier>" -Identity <item_id> -Label "Retain 10 years"
Conclusion
In this post I’ve tried to give you an overview of how to manage retention labels and apply them to files and list items and what options there are to do this programmatically using the various API’s and scripting tools we’ve got at our disposal. I’ve also shown you how to apply default labels to folders and lists/libraries. I hope this post will help you to get started with retention labels. It’s an interesting subject that I feel isn’t used and explored enough. At least in the organizations I encounter. If you have any questions, feel free to reach out to me by dropping me a post through this site or the socials.
Sources
- Joanne C Klein - Retention in SharePoint - The How
- Microsoft Docs - Use file plan to create and manage retention labels
- Microsoft Docs - Create and publish retention labels by using PowerShell
- Microsoft Docs - Connect to Security & Compliance PowerShell
- Microsoft Docs - Records Management in the Graph API
- Microsoft Docs - CSOM SetComplianceTagOnBulkItems
- Microsoft Docs - CSOM SetComplianceTag
- Microsoft Docs - CSOM SetListComplianceTag
- Microsoft Docs - Record versioning
- Microsoft Docs - SharePoint REST API
- Microsoft Docs - Microsoft Graph API - applying a retention label
- Microsoft Docs - Microsoft Graph API - removing a retention label
- Microsoft Docs - Microsoft Graph API - locking and unlocking records
- CLI for Microsoft 365 - applying retention labels
- CLI for Microsoft 365 - listing retention labels
- CLI for Microsoft 365 - applying a default retention label to a list or library
- CLI for Microsoft 365 - applying a default retention label to a folder
- CLI for Microsoft 365 - lock records
- CLI for Microsoft 365 - unlock records
- PnP PowerShell - applying retention labels
- PnP PowerShell - listing retention labels
- PnP PowerShell - applying a default retention label to a list or library
Archive: Routes to avoid when applying retention labels to SharePoint content
There are a few other routes to take when applying retention labels to SharePoint content. I’ll talk about them here, and why you should void them altogether:
1. Using CSOM
The Client Side Object Model (CSOM) currently has a number of methods available that can be used to apply retention labels to content but should be avoided. For example the SetComplianceTag method on a list item. This method is available on the ListItem object. You can use it like this:
var list = clientContext.Web.GetListByTitle("SomeList");
var listItem = list.GetItemById(1);
listItem.SetComplianceTag("Retain 10 years", true, true, false, false, false);
clientContext.ExecuteQuery();
There’s a number of boolean parameters that you need to fill in, and those are really important (!!) and the reason to use these with caution. I’ll talk about that further down.
There are a few more methods available: SetComplianceTagWithExplicitMetasUpdate, SetComplianceTagWithHold, SetComplianceTagWithNoHold, SetComplianceTagWithMetaInfo and SetComplianceTagWithRecord.
It seems like most of these methods are shortcuts to using SetComplianceTag with specific parameters preconfigured. The only exception is the methods with ‘Meta’ in the name. The purpose of these variants is vague, I have not been able to discover their use case. The meta information (userEmailAddress and complianceTagWrittenTime) may be saved somewhere, but I’ve not seen where. I would personally stay away from these methods until Microsoft delivers some proper documentation on them.
You may think you can use the complianceTagWrittenTime parameter to set a custom start date for the retention period. As far as I’ve discovered that’s not the case though. For that scenario you’ll need event-based retention, as I’ll explain in a later post of this series.
Important:
These methods will be deprecated in the near future.
2. Using the SharePoint REST API
The same methods that are available in CSOM can also be used in the SharePoint REST API. We can lookup the available functions using the API metadata endpoint, like we did earlier in this post. The metadata endpoint reveals the following:
<FunctionImport Name="SetComplianceTag" IsBindable="true">
    <Parameter Name="this" Type="SP.ListItem"/>
    <Parameter Name="complianceTag" Type="Edm.String"/>
    <Parameter Name="isTagPolicyHold" Type="Edm.Boolean" Nullable="false"/>
    <Parameter Name="isTagPolicyRecord" Type="Edm.Boolean" Nullable="false"/>
    <Parameter Name="isEventBasedTag" Type="Edm.Boolean" Nullable="false"/>
    <Parameter Name="isTagSuperLock" Type="Edm.Boolean" Nullable="false"/>
    <Parameter Name="isUnlockedAsDefault" Type="Edm.Boolean" Nullable="false"/>
</FunctionImport>
So applying a label using the SharePoint API is basically a single HTTP call:
POST <site_url>/_api/web/lists(guid'<list_guid>')/items(<item_id>)/SetComplianceTag()
Authorization: "Bearer <accessToken>"
Content-Type: "application/json"

{
    "complianceTag": "Retain 10 years",
    "isTagPolicyHold": true,
    "isTagPolicyRecord": true,
    "isEventBasedTag": false,
    "isTagSuperLock": false,
    "isUnlockedAsDefault": false
}
Again, you’ll see the same boolean parameters that you’re required to fill in, as they’re not nullable. These are very important (!!) and the reason to tread with caution. Keep reading to discover what to do with them.
Important:
The SetComplianceTag-methods will be deprecated in the near future.
Keep in mind:
If you're using the SharePoint REST API, I'd choose to use the SetComplianceTagOnBulkItems-method instead.
(Important) About them parameters
So…about those parameters. If you’re using the raw API’s (CSOM and SharePoint REST), you’ll have to deal with these. What do they mean? What do they do? Why are they there? And maybe you’ve noticed: they are called by different names in multiple places. I’m talking about the following parameters:
| Parameter | Alternate name | Microsoft Graph | Description |
|---|---|---|---|
| isTagPolicyHold | blockDelete | behaviorDuringRetentionPeriod: retain, retainAsRecord | If true the file or item can not be deleted during the retention period. |
| isTagPolicyRecord | blockEdit | behaviorDuringRetentionPeriod: retainAsRecord | If true the file or item can not be edited during the retention period. |
| isEventBasedTag | IsEventTag | retentionTrigger: dateOfEvent | If true it is event-based label, the retention period should start based on the date given in a custom event. |
| isTagSuperLock | SuperLock | Currently invisible in Graph API | If true the label concerns a regulatory record. |
| isUnlockedAsDefault | UnlockedAsDefault | defaultRecordBehavior: startUnlocked | If true the file or item will be in an unlocked state after it becomes a record. |
As I said they are really important! If you don’t set them correctly, you may end up with a label that doesn’t work as expected. At least some of these parameters can be used to override the default settings of the label, as it has been configured in Purview. So basically, your label could have been configured to mark content as a Record, but you can override that by setting isTagPolicyRecord to false.
Be advised:
Be very careful of how you use these parameters. You can accidentally override the default label configuration of Purview.
In my honest opinion, it’s too easy make mistakes here, plus it’s questionable if this is even desirable. What’s the point of configuring a retention label for governance purposes if you make it too easy for people to divert from that path, even if by accident. Also: if you use these properties to override the behavior of Purview retention labels, it’s not visible to anyone that you have done so. You’ll only discover once you try to edit or delete a document. I did not find documentation about this, so I’m just hoping there’s some good reason for it, but personally I’d be very cautious about using these parameters in the right way. You should really only use the parameters as they’re configured in Purview, unless you know what you’re doing. The fact that parameters have different names here and there, doesn’t help either. I’d say there should be a method without parameters that just looks up what has been configured in Purview and takes that as a starting point. And there is in the SharePoint REST API (SetComplianceTagOnBulkItems), but there unfortunately isn’t one in CSOM.
The problem is: you have to enter some value. You can’t leave them blank. So what you need to do is first find the label and then apply it with the correct properties as it’s configured in Purview. Which by the way is the route PnP PowerShell and the CLI for Microsoft 365 take.
Note:
When using these ways of labelling content, first find the label and then apply it with the correct properties as it's configured in Purview. This is the only supported way of using these methods.
Mapping parameters for correctly applying a retention label
Ok, so you first retrieve a list of applicable labels, like we did in an earlier chapter, then find the one you want to apply and map the parameters. This is specifically necessary when you’re using CSOM or the SharePoint REST API to apply labels. As said before, the CLI for Microsoft 365 and PnP PowerShell already do this for you.
Based on the table above this is how that would work when using CSOM:
// First find the label
var labels = SPPolicyStoreProxy.GetAvailableTagsForSite(clientContext, "https://contoso.sharepoint.com/sites/sales");
clientContext.ExecuteQuery();

var label = labels.FirstOrDefault(l => l.TagName == "Retain 10 years");

// Then apply it with the correct parameters
var list = clientContext.Web.GetListByTitle("SomeList");
var listItem = list.GetItemById(1);
listItem.SetComplianceTag(label.TagName, label.BlockDelete, label.BlockEdit, label.IsEventTag, label.SuperLock, label.UnlockedAsDefault) ;
clientContext.ExecuteQuery();
And this is how it would work when using the SharePoint REST API and posting a JSON-object:
// The request object to POST to the SetComplianceTag() endpoint
{
    complianceTag: label.TagName,
    isTagPolicyHold: label.BlockDelete,
    isTagPolicyRecord: label.BlockEdit,
    isEventBasedTag: label.IsEventTag,
    isTagSuperLock: label.SuperLock,
    isUnlockedAsDefault: label.UnlockedAsDefault
}
…where label is the label you found using the GetAvailableTagsForSite endpoint.
And that’s it. But please avoid using it! You might break your own compliance rules if you don’t know what you’re doing.
purview retention sharepoint microsoftgraph powershell cli-microsoft365
More
More blogs
Working with Purview event-based retention using code
Do you want to retain data for a period of time after a certain event has happened? It is called event-based retention and this is how you use it from code.
Read more
Automating Purview data retention using Azure Functions
An example of how to automatically apply Purview retention labels using Azure Functions.
Read more
Finding and fixing incorrectly applied Purview retention labels
In this blog post I will show you how you can find incorrectly applied retention labels.
Read moreThanks
Thanks for reading

Thanks for reading my blog, I hope you got what you came for. Blogs of others have been super important during my work. This site is me returning the favor. If you read anything you do not understand because I failed to clarify it enough, please drop me a post using my socials.
Warm regards,
Martin
Microsoft MVP | Microsoft 365 Architect