
Have you heard of Resource Specific Consent? It’s The principle of least privilege applied to Microsoft 365, and thus a joy for every CSO. I wrote a blog post on this subject some time ago, and I’m always excited when new features are rolling out on this front. Recently, something new was added, which I think deserves some extra attention.
SharePoint now supports delegated Sites.Selected authentication
Microsoft announced this month that Sites.Selected has been made available in delegated mode. That’s great news, as any update on the RSC front is awesome. More security controls === better security. So what does it mean? If you’ve got an application running under application permissions, say some behind-the-scenes Web Job, or daemon tool, you could already give that application Sites.Selected permissions, and assign it a role to work with a specific SharePoint site or sites. This has been useful for many scenario’s. We generally do not want to assign an application tenant-wide permissions, unless it absolutely needs them.
Till now we could only use Sites.Selected for app-only scenario’s, where a user isn’t present. But what if you’ve got an application accessing Microsoft 365 in the context of a user? For example: a web application secured by Entra ID, which reads files from and writes files to a specific SharePoint site, in the context of a user of course. In this scenario you would (till now) need to give the related Entra application permissions to the entire SharePoint tenant. Of course, it would still be restricted to only those sites a user could access. But still, that’s quite broad and not ’least privilege’ at all. This restriction has now been lifted!
How does it work
Well, we’ll need:
- an application registration in Entra ID with the correct permission scopes
- the app will need to be given access to a specific SharePoint site
- a quick way to test it all, for example: a command line tool or a small web application.
🌶️ Now I’m always excited about using the CLI for Microsoft 365, one of my favorite command line tools. And building a small web application takes more time, so that’s an easy choice.
Step 1: Create an Entra app registration
The CLI for Microsoft 365 by default uses the PnP Management Shell multitenant application when signing users in. But that already has a lot of permission scopes assigned. We’ll need to create a new app registration to test this process out in a clean way.
There’s an entire guide on how to create an app registration that can be used by the CLI for Microsoft 365 to sign in. But we can also do that with the following CLI script.
# We first need to login with a user with enough security clearance to create apps.
# At this point, we're using the PnP Management Shell application to sign in.
m365 login

# Now we create the app registration with the correct permission scopes
# we configure it for use with public clients
# ...and we grant it admin consent
m365 entra app add --name "RSC Test App" --apisDelegated "https://graph.microsoft.com/Sites.Selected,https://graph.microsoft.com/User.Read" --platform publicClient --redirectUris "https://login.microsoftonline.com/common/oauth2/nativeclient" --allowPublicClientFlows --grantAdminConsent
# (This script will work from version 7.7 (beta) of the CLI for Microsoft 365, older versions are lacking the --allowPublicClientFlows parameter, which will mean you need to set that manually in the Azure Portal.)
☝️ Now this is all you need to get your own Entra application up-to-speed for use with the CLI for Microsoft 365. It will give you some Ids that you can save for use later.
Step 2: Assign permissions to a site
Ok, so we’ve created an application which we can use to sign in from the CLI for Microsoft 365. The next step is to assign that application permissions to a SharePoint site. We can do that as follows. Opening the terminal we’ve just been working in, we need to execute the following to grant the application access to a specific site. We’ll need to use the Application Id of the app we just created.
m365 spo site apppermission add --appId "<the-app-id>" --siteUrl "https://contoso.sharepoint.com/sites/project-x" --permission fullcontrol
Note:
You need to be a site collection admin on the site you are executing the script on.
Step 3: Login and get some files!
For the last step we need to sign-in using the newly created Entra application. In the CLI for Microsoft 365 we can just use the login command together with the Id of the application and our tenant Id. After succesfully signing in, we can now test the new delegated permissions by executing a command against the site, like the command to retrieve a list of files from a document library.
m365 login --appId "<the-app-id>" --tenant "<your-tenant-id>"

m365 file list --webUrl "https://contoso.sharepoint.com/sites/project-x" --folderUrl "Shared Documents"
🎉 This command should give you a nice list of files, providing your site contains files. While executing the same on another site should return an empty list. On my environment this looks as follows:
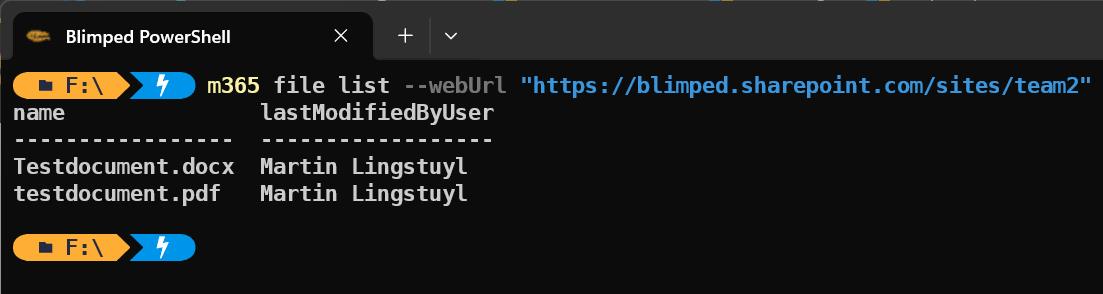
Now this of course is a very basic example. But it demonstrates how it can be used and how powerful this new RSC-feature is.
Things to take note of
A couple of things I’d like to highlight before we draw this to a close:
Only Microsoft Graph API
Yes, Microsoft only implemented Delegated Sites.Selected for the Microsoft Graph API. That’s an important thing to keep in mind. If you’re using the older SharePoint REST Api’s, the Client-side Object Model (CSOM) or if you use tools that use those API’s, you’ll not get it to work. DO NOT FORGET THIS! Major frustration issues may arise if you miss this detail.
A good example: PnP.PowerShell uses a lot of CSOM. You’ll not be able to use this new permission scope with those commandlets. For the same reason I was using m365 file list in the example, instead of m365 spo file list. As within the CLI, a lot of commands, especially in the spo command group use the SharePoint REST API’s as well. We happen to have two commands for listing files though, one that uses the Graph.
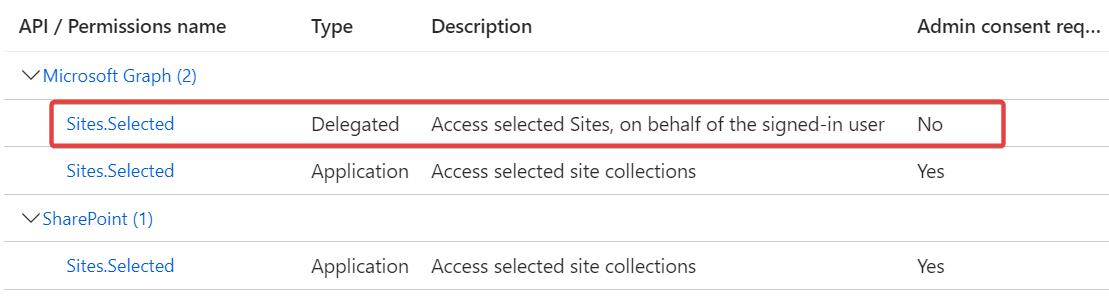
Two permission scopes, one permission role
Another thing to keep in mind is that while there’s two Sites.Selected scopes (One for app-only and one for delegated use), there’s really just one permission role that you add to a site. So if your app is also responsible for authenticating app-only web jobs that use the Sites.Selected scope, that will mean those applications will have access to all the sites that were configured for delegated use as well.
I don’t think this will be a big problem in real life though. You would probably use two separate Entra applications for these two separate purposes. But I just thought I’d mention it anyway.
The entire script
For those of you who like to copy paste efficiently, here’s the complete script:
# We first need to login with a user with enough security clearance to create apps.
# At this point, we're using the PnP Management Shell application to sign in.
m365 login

# Now we create the app registration with the correct permission scopes
# we configure it for use with public clients
# ...and we grant it admin consent
m365 entra app add --name "RSC Test App" --apisDelegated "https://graph.microsoft.com/Sites.Selected,https://graph.microsoft.com/User.Read" --platform publicClient --redirectUris "https://login.microsoftonline.com/common/oauth2/nativeclient" --grantAdminConsent

# Don't forget to manually flip the 'Allow public clients' switch to 'Yes' in the Azure Portal.

# Now we assign the app permissions to a site
# You need to be a site collection admin on the site you are executing the script on.
m365 spo site apppermission add --appId "<the-app-id>" --siteUrl "https://contoso.sharepoint.com/sites/project-x" --permission fullcontrol

# We login using the newly created app
m365 login --appId "<the-app-id>" --tenant "<your-tenant-id>"

# And we request a list of files
m365 file list --webUrl "https://contoso.sharepoint.com/sites/project-x" --folderUrl "Shared Documents"
Conclusion
Delegated Sites.Selected is another important step in the journey to be as lean as possible in terms of permissions granted. And as such it’s a great thing. Let me know if this post helped you grasp the scenario.
Happy coding!
Sources
- Microsoft Devblogs - SharePoint now supports delegated Sites.Selected authentication
- My other post - Running applicatios with limited SharePoint permissions
- CLI for Microsoft 365 - Using your own identity
entraid sharepoint microsoftgraph security cli-microsoft365
More
More blogs
Running .NET Function Apps or App Services accessing Microsoft 365
A guide on how to create a .NET application that can access SharePoint and the Microsoft Graph through Entra ID.
Read more
Running applications with limited SharePoint permissions
Securing application access to SharePoint through Entra ID is easy, but how to access SharePoint using the principle of least privilege?
Read more
Authentication and authorization highlights in the terminal
Highlighting some great features in the CLI for Microsoft 365 when working with multiple identities and PIM.
Read moreThanks
Thanks for reading

Thanks for reading my blog, I hope you got what you came for. Blogs of others have been super important during my work. This site is me returning the favor. If you read anything you do not understand because I failed to clarify it enough, please drop me a post using my socials.
Warm regards,
Martin
Microsoft MVP | Microsoft 365 Architect