Some time ago, I started a blog post as follows: ‘Securing application access to SharePoint through Entra ID is easy.’ I’m still convinced it’s easy. But there are quite a few running parts that you need to be aware of. This is a short guide on how to do such a thing with App Services and Function Apps.
Table of Contents
- Scenario
- Components
- Prerequisites
- Authentication
- Step 1: Setting up the Azure Resources
- Step 2: Assigning permissions to your Entra ID service principal
- Step 3: Creating a certificate for local development
- Step 4: Creating an Entra ID application for local development
- Step 5: Building the application
- Step 6: Deploying the application
- Conclusion
Scenario
Say you want to create a piece of automation that has the ability to communicate with SharePoint and/or the Microsoft Graph. You have the following requirements:
- You want to deploy this in Azure, using an App Service or a Function App.
- The application must be able to run outside of a user context.
- You want to be as secure as possible.
- You want to use .NET.
How would you go about this?
Components
Pictures say more than a thousand words. So here’s a diagram of the components that we’re going to use:
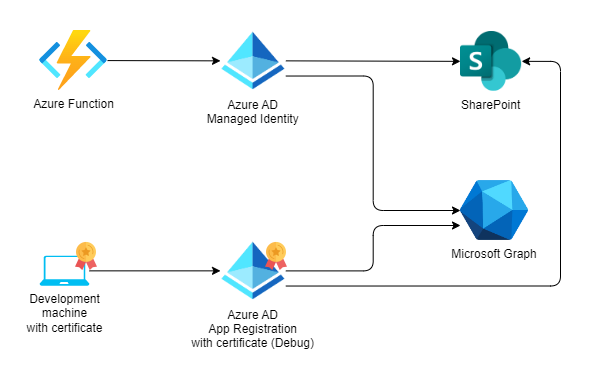
The Azure Function App can be swapped with an Azure App Service, depending on your needs. The setup is exactly the same. But for this scenario we’ll use an Azure Function App. In this scenario I’m planning to use CSOM to get information about a SharePoint site, and the Microsoft Graph SDK to get a list of Microsoft Teams teams.
Prerequisites
The following prerequisites are needed to follow along:
- A Windows PC
- VS Code with the Azure Functions for Visual Studio Code extension installed
- CLI for Microsoft 365 installed
- Optimistic ‘We can do this’-vibes.
Authentication
Let’s start with the most important part: Authentication. Your application will need to connect to SharePoint and/or the Microsoft Graph using Entra ID. There are a number of authentication flows that you can generally use to achieve this in applications. But because the application we want to create is running outside of a user context, we’re limited to the following three:
Client Credentials (with secret)
This is a very common authentication flow. You’ll use a Client ID and a Secret to authenticate. It’s the easiest flow to set up. But it’s also the least secure. So, if you’re using this flow, you should make sure that the secret is stored in a secure location, for example in an Azure KeyVault. This will increase the number of components in the solution. You should also take into account that secrets expire within a certain period of time. So, you’ll need to make sure that the secret is renewed before it expires, incurring an administration impact. Lastly not all Microsoft 365 services support using a Client Secret. SharePoint for example does not, which makes it impossible to use in our scenario.Client Credentials (with certificate)
This is a very similar authentication flow as the one above. But instead of using a secret, you’ll use a certificate. This is a more secure way of authenticating, as it’s essentially combining multiple values: A private key, used to sign communications with Entra ID and a public key used for verifying the signature. The private key is used by the application and the public key by Entra ID. So it’s more safe. But it’s also more complex to set up. You’ll need to create a certificate and store it in a secure location. You’ll also need to make sure that the certificate is renewed before it expires, incurring an administration impact.Managed Identity
This is the most secure way of authenticating. A Managed Identity is an Entra ID service principal that is created by Azure for your Function App or App Service. It’s very secure because it’s not possible to use this service principal outside of Azure. You can be sure that your application is the only thing able to access Microsoft 365 services from within Azure. Another pro is that you do not have to store or renew any credentials or certificates. Their are two forms of Managed Identity: System Assigned and User Assigned, the difference being that the User Assigned one can be used by multiple Azure resources, while the System Assigned one is restricted to a single resource.
Be advised:
You can safely use the mentioned authentication flows in automatically triggered code, like Timer or Queue triggered functions. But do not use these authentication flows in an HTTP triggered Azure Function App. That would open a door to your Microsoft 365 services for anyone calling your Azure Function. So, if you're using an HTTP triggered Azure Function App, you should look into using another type of authentication, like the On Behalf Of authentication flow for example.
For our scenario, we’ll use a System Assigned Managed Identity.
The only downside of Managed Identities is that you cannot use them from your local development machine, which means you have to use another form of Auth there. We’ll use the Client Credentials flow with a certificate for that scenario.
Step 1: Setting up the Azure Resources
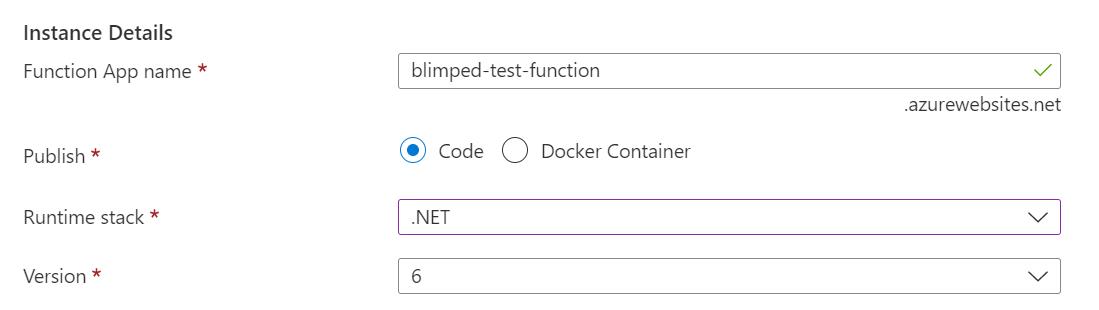
Setting up the Azure side of things is easy. We can just create a new Azure Function App using the Azure Portal. Be sure to select the .NET code stack.
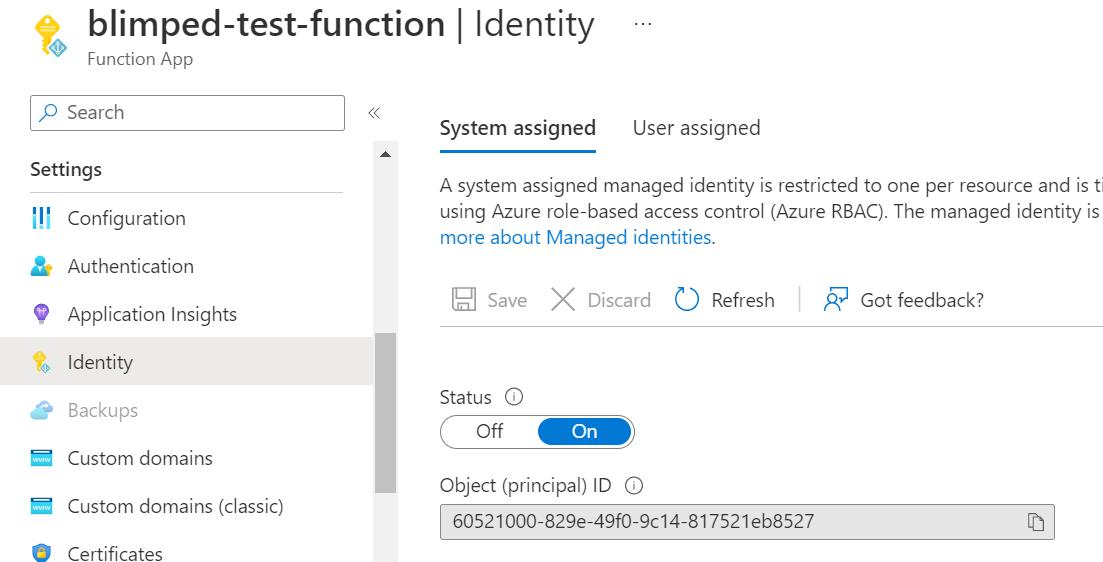
Next, head over to the identity blade of your new Function App and enable System Assigned Managed Identity. Azure will show you the resulting objectId of the Managed Identity. You can use this to find the service principal in Entra ID. You’ll need this value in the next step.
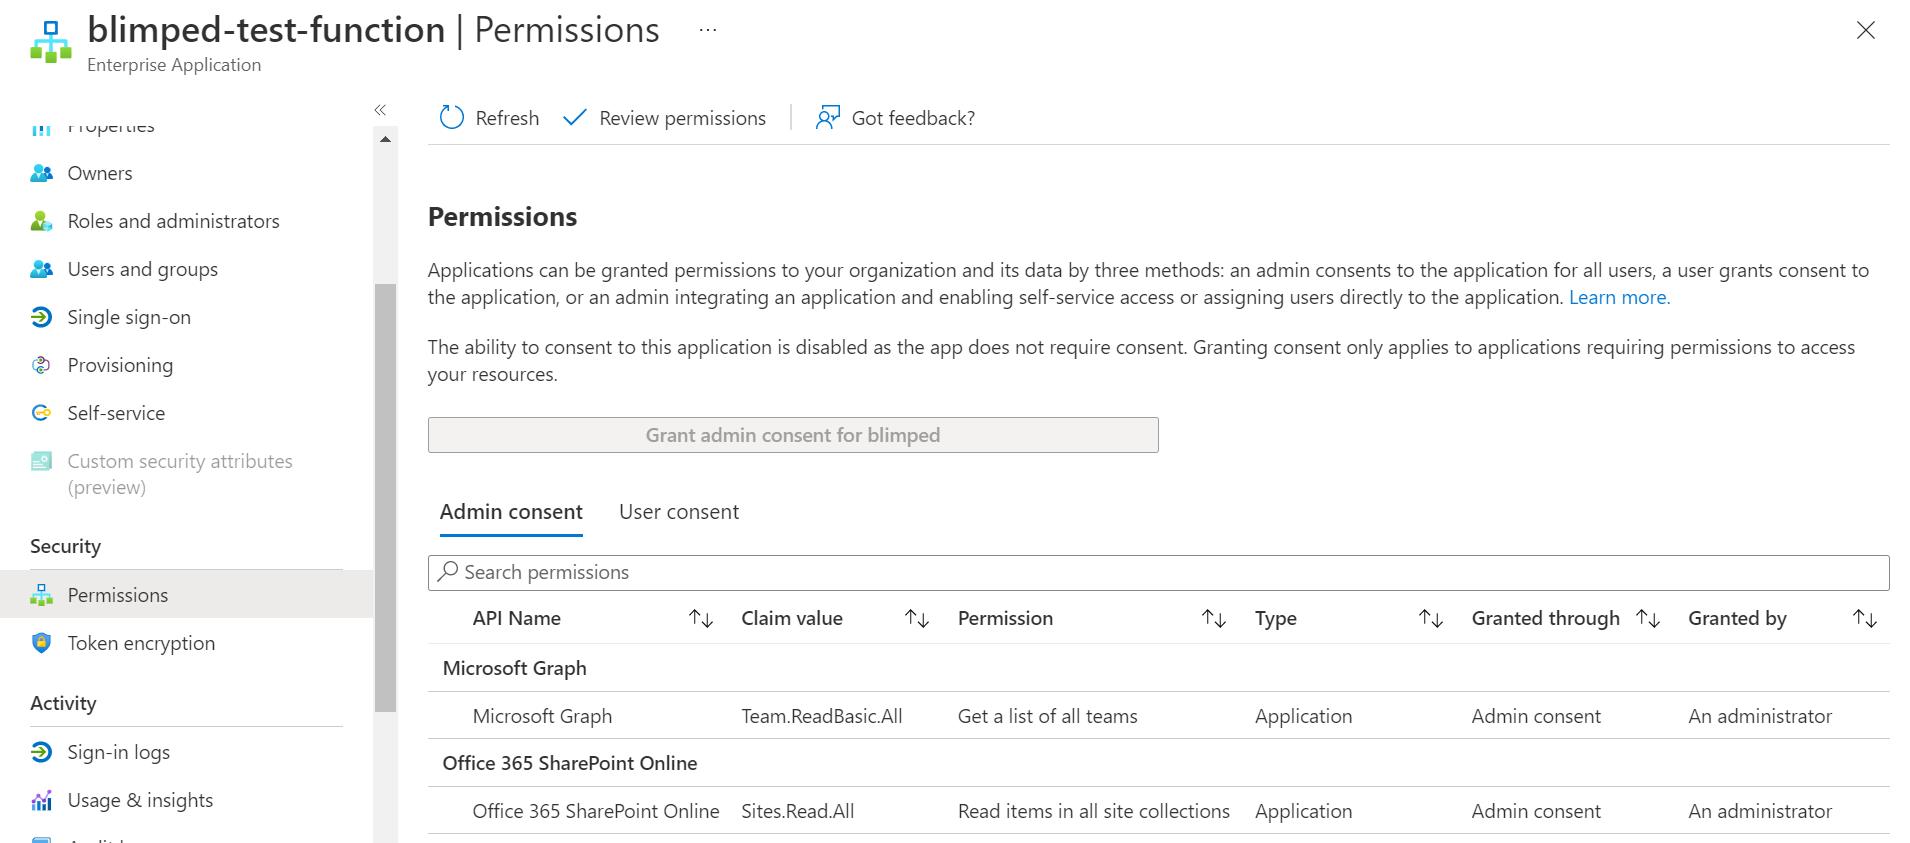
Step 2: Assigning permissions to your Entra ID service principal
Now that we have the Managed Identity, we can assign it permissions to SharePoint and the Graph. We cannot do this through the portal currently, so we’ll use the CLI for Microsoft 365. Execute the following script to grant the Managed Identity the necessary permissions on SharePoint and the Microsoft Graph:
# Sign in with an account with the Global Administrator or Cloud Application Administrator role.
m365 login

# Add permissions to your managed identity.
m365 entra approleassignment add --appObjectId "60521000-829e-49f0-9c14-817521eb8527" --resource "Microsoft Graph" --scopes "Team.ReadBasic.All"
m365 entra approleassignment add --appObjectId "60521000-829e-49f0-9c14-817521eb8527" --resource "SharePoint" --scopes "Sites.Read.All"
As you can see I’m using the objectId of the service principal that Azure created for me. After running these commands, try lookup your service principal in Entra ID. You should see that it has the necessary permissions assigned to it.
Note:
This Azure Function App will be able to query my entire tenant. If possible, you should prefer using Resource Specific Consent to limit the reach of your permissions to a single site, which is the topic of another blog post I wrote some time ago. You can find it here if you want to read more.
Step 3: Creating a certificate for local development
For local development purposes, we’ll not be able to use the Managed Identity, so we’ll take the Client Credentials flow with a certificate for that. We’ll first create a self signed certificate. The Microsoft Documentation contains a ready-made PowerShell script to do this. But Stephan van Rooij pointed me to an even simpler way to do it:
$cert = New-SelfSignedCertificate -NotAfter $(Get-Date).AddYears(1) -FriendlyName "MyDevServerCertificate" -CertStoreLocation cert:\CurrentUser\My -Subject "CN=MyDevServerCertificate" -KeyAlgorithm RSA -KeyLength 2048 -KeyExportPolicy NonExportable
Export-Certificate -Cert $cert -Type cer -FilePath "$PWD/certificate.cer" -Force
$cert | Format-list
This script will generate a certificate in your Windows user certificate store. It will leave the private key in there and mark it as non-exportable, which is very secure. It will also export the public key as a CER file. Your development server will be able to use the certificate from the store to sign communications with Entra ID, while the CER file (The public key) will be used by Entra ID to verify these signatures.
The script will also output the thumbprint of the certificate to the terminal. Note this, as you’ll need the value later.
Step 4: Creating an Entra ID application for local development
Next, we’ll create an Entra application registration to use for the development flow. We only need this temporarily, while debugging. After deploying the application to Azure, this can safely be removed. It’s not a part of the solution in that sense. Creating an Entra application registration is easy, you can do it through the Azure Portal, but using the CLI for Microsoft 365 we can do it a lot faster. The following one-liner creates the App Registration, adds the certificate that we created and exported. It also adds the necessary permissions and grants admin consent to the application.
m365 entra app add --name "Blimped-test-function (debug)" --certificateFile "./certificate.cer" --apisApplication "https://graph.microsoft.com/Team.ReadBasic.All,https://microsoft.sharepoint-df.com/Sites.Read.All" --grantAdminConsent
The script will return the appId, objectId and tenantId of the App Registration. Note the values, cause you need some of them later. You can also find in the Azure Portal, but you may need to wait a few seconds before it’s available there.
Step 5: Building the application
Creating an Azure Function App project in VS Code
Now that we have all the necessary resources and permissions in place, we can create a new Azure Function App project in VS Code. I’m using the Azure Functions extension for this. Just hit Ctrl + Shift + P to open the command palette and use the ‘Azure Functions: Create new project’ command. Select the .NET 6 runtime and the Timer trigger template.
Open your VS Code Terminal and use the dotnet CLI to add the necessary Nuget packages:
dotnet add package Azure.Identity
dotnet add package PnP.Framework
dotnet add package Microsoft.Graph
This will add everything you need to use CSOM, the Graph SDK and Entra ID authentication.
Setting up Authentication
Now, open your TimerTrigger1.cs file, or however it is named and add the following code in the Trigger function:
#if DEBUG
    var certificate = CertificateHelper.FindByThumbprint("<thumbprint>", StoreName.My, StoreLocation.CurrentUser);
    var credential = new ClientCertificateCredential("<tenantId>", "<appId>", certificate);
#else
    var credential = new ManagedIdentityCredential();
#endif
The #if DEBUG statement is a preprocessor directive for controlling conditional compilation. It will compile the right lines based on the project being built in debug or release mode. This will make sure that the code will use the Managed Identity credential when deployed to Azure, but will use the certificate credential when running locally. You should replace <thumbprint>, <appId> and <tenantId> with the values from previous steps.
The CertificateHelper is a small helper class that gets the Certificate from the local store. The implementation you can find in the GitHub repository I’ve created as part of this blog.
You can now use these credentials in various ways to call SharePoint or the Microsoft Graph.
Calling SharePoint using CSOM
To communicate with SharePoint, add the following code in the trigger function:
var sharePointToken = await credential.GetTokenAsync(new TokenRequestContext(new[] { "https://contoso.sharepoint.com/.default" }), new System.Threading.CancellationToken());

var authManager = new PnP.Framework.AuthenticationManager();

using(var clientContext = authManager.GetAccessTokenContext("https://contoso.sharepoint.com/sites/sales", sharePointToken.Token))
{
    clientContext.Load(clientContext.Web, w => w.Title);
    clientContext.ExecuteQuery();

    log.LogInformation("Web title = " + clientContext.Web.Title);
}
The above code uses the credential (whether it’s the Managed Identity or the Client Certificate credential) to get an Access Token for SharePoint. This token is then used to create a CSOM ClientContext. You can use the ClientContext to call SharePoint.
You can now press F5 to see how this works. You should see the title of your SharePoint site as output in the terminal.
Note:
To run the project, you'll need to get the value of the `AzureWebJobsStorage` app setting from your Function App and add it in the `local.settings.json` file, the TimerTrigger will not run without it.
Calling the Microsoft Graph
To communicate with the Microsoft Graph, add the following code in the trigger function:
var graphClient = new GraphServiceClient(credential, new string[] { "https://graph.microsoft.com/.default"});

var teams = await graphClient.Users["alexw@contoso.com"].JoinedTeams.Request().GetAsync();

foreach (var team in teams)
    log.LogInformation($"Team: {team.DisplayName}");
This code uses the credential (again, whatever credential it is) to create a GraphServiceClient. This client can then be used to call the Graph API. In this example, we’re calling the joinedTeams endpoint to get a list of teams a specific user is a member of. An operation we can do with the consented Team.ReadBasic.All permission scope.
And that’s basically it! That’s really all there is to it. Press F5 again to see how it works. You should see a list of teams the specified user is a member of.
Step 6: Deploying the application
Now that we have a working application, we can deploy it to Azure. You can use the Azure Functions extension for this. Just hit Ctrl + Shift + P to open the command palette and use the ‘Azure Functions: Deploy to Function App’ command. Select the subscription and the Function App you created earlier. The extension will take care of the rest.
Running the application in Azure should render the same results, due to the Managed Identity credential.
Conclusion
In this article, we’ve created a simple Azure Function that can be used to call SharePoint and the Microsoft Graph. We’ve used Managed Identity to authenticate to Entra ID and get an Access Token. We’ve also used a Client Certificate credential to authenticate to Entra ID in debug mode.
As said: once your app is deployed, you can safely discard the certificate and the App Registration. The Managed Identity will take care of auth now. But of course: if you need to debug the application again, you can always create a new certificate and App Registration and start hacking away again.
For App Services the steps are the same, although you’ll need to do some extra work to setup WebJobs.
Sources
- A GitHub repository with the Azure Function App
- Creating a self-signed certificate - Microsoft docs
- Creating a self-signed certificate - simpler version
- The On Behalf of Authentication flow
- The CLI for Microsoft 365
- Azure Functions for Visual Studio Code
sharepoint microsoftgraph entraid azurefunction cli-microsoft365 security
More
More blogs

Resource Specific Consent - Using delegated Sites.Selected
Sites.Selected has been made available in delegated mode! What does it mean and how does it work?
Read more
Running applications with limited SharePoint permissions
Securing application access to SharePoint through Entra ID is easy, but how to access SharePoint using the principle of least privilege?
Read more
Working with Purview event-based retention using code
Do you want to retain data for a period of time after a certain event has happened? It is called event-based retention and this is how you use it from code.
Read moreThanks
Thanks for reading

Thanks for reading my blog, I hope you got what you came for. Blogs of others have been super important during my work. This site is me returning the favor. If you read anything you do not understand because I failed to clarify it enough, please drop me a post using my socials.
Warm regards,
Martin
Microsoft MVP | Microsoft 365 Architect