
When you use the on-behalf-of (OBO) flow, you can allow a web API to use an identity other than its own to call another web API. This is referred to as delegation in OAuth, the intent is to pass a user’s identity and permissions to that API. So how can you use that in practice, when working with an Azure PowerShell Function? That’s the topic of this blog post. The idea is to be able to use a simple PowerShell script, instead of a full fledged developed .NET or Node.JS solution, to request information from or post information to Microsoft 365 services such as SharePoint or the Graph.
Table of contents
- Scenario
- Prerequisites
- Step 1: Creating a self-signed certificate
- Step 2: Configuring Entra ID
- Step 3: Configuring the Azure Function
- Step 4: Writing the PowerShell script
- Step 5: Calling the Azure Function from SPFx
- Conclusion
Scenario
As a scenario to demonstrate this approach, let’s think of a SharePoint Framework webpart that can be deployed to SharePoint. If a user interacts with this webpart, an access token is requested. This access token is then used to call an HTTP triggered Azure Function running a PowerShell script. The Azure Function uses the on-behalf-of flow to request another token for the Microsoft Graph, and then uses that token to request information from the Graph. The result is then returned to the webpart, which can then display the information.
The following is a visual representation of this scenario:

So what we need in this scenario is:
- An SPFx solution that can call an Entra ID secured endpoint.
- An Entra app that has (delegated) permissions on the Graph and exposes an API itself.
- The SharePoint Online Client Extensibility Web Application Principal having access to that exposed API.
- An Azure Function with a PowerShell script.
Prerequisites
You can follow along with this tutorial by if you have:
- VS code with a default SharePoint Framework HelloWorld webpart.
- The CLI for Microsoft 365 installed on your machine.
- An Azure Function App based on the PowerShell stack. You can create one without leaving the Azure Portal, no need for VS Code here.
Step 1: Creating a self-signed certificate
To use the on-behalf-of flow you’ll need a client secret or a client certificate to swap the access tokens. Certificates are considered more secure, as it’s a combination of a private and public key and you won’t have to find a place to store the secret securely. In this post I’ll demonstrate both routes, so you’ll need a self-signed certificate as well. If you’re on windows, you can create one using the following PowerShell script. It will store the certificate files (PFX + CER) in the current directory and delete them from your certificate store after creating them, but feel free to use your own route to create the certificate.
$password = ConvertTo-SecureString -String "1234" -Force -AsPlainText
$cert = New-SelfSignedCertificate -NotBefore $(Get-Date).AddDays(-1) -NotAfter $(Get-Date).AddYears(1) -FriendlyName "OBO-Certificate" -CertStoreLocation cert:\CurrentUser\My -Subject "CN=OBOCertificate" -KeyAlgorithm RSA -KeyLength 2048 -KeyExportPolicy Exportable
$cert | Export-Certificate -Type cer -FilePath "$PWD/OBO-Certificate.cer" -Force
$cert | Export-PfxCertificate -FilePath "$PWD/OBO-Certificate.pfx" -Password $password
$cert | Remove-Item
Step 2: Configuring Entra ID
The next step is to configure Entra ID. What we need is an application registration with a specific permission on the Graph. We’ll need it to expose it’s own API and we’ll need to add a certificate and a secret to be able to demonstrate both variants of retrieving an on-behalf-of access token. After creating the Application Registration and giving it admin consent, we’ll also want to give the SharePoint Online Client Extensibility Web Application Principal permissions on this application. This will allow SPFx to request a token for our application.
I’m a big fan of using the CLI for Microsoft 365 for this. The following script does everything we need:
# Create the application registration with the necessary settings and grant it admin consent
$app = m365 entra app add `
    --name 'My Function Application' `
    --apisDelegated 'https://graph.microsoft.com/Group.Read.All' ` # The permission we'll need on the Graph
    --uri 'api://my-function-application' ` # The URI of the exposed application
    --scopeName user_impersonation ` # The scope to expose
    --scopeAdminConsentDescription 'Access groups on behalf of the logged in user' `
    --scopeAdminConsentDisplayName 'Access as a user' `
    --scopeConsentBy admins `
    --withSecret ` # Add a client secret
    --certificateFile ./OBO-Certificate.cer ` # Add the public key for our self-signed certificate
    --certificateDisplayName 'OBO Certificate' `
    --grantAdminConsent | ConvertFrom-Json

# Get the service principal of our created app registration
$appServicePrincipal = m365 entra sp get --appId $app.appId | ConvertFrom-Json

# Get the service principal of the 'SharePoint Online Client Extensibility Web Application Principal'
$spoServicePrincipal = m365 entra sp get --appDisplayName "SharePoint Online Client Extensibility Web Application Principal" | ConvertFrom-Json

# Grant the SPO service principal permissions to our service principal.
m365 entra oauth2grant add --clientId $spoServicePrincipal.id --resourceId $appServicePrincipal.id --scope "user_impersonation"

# Copy the created client secret to the clipboard and store it somewhere safe, to be used later
$app.secrets[0].value | set-clipboard
This script is executed in PowerShell, but you can also use it in bash or zsh with (almost) no changes.
Step 3: Configuring the Azure Function
The next step is to configure the Azure Function. The following steps are important to make sure the Azure Function can request an access token for the Graph on behalf of the user:
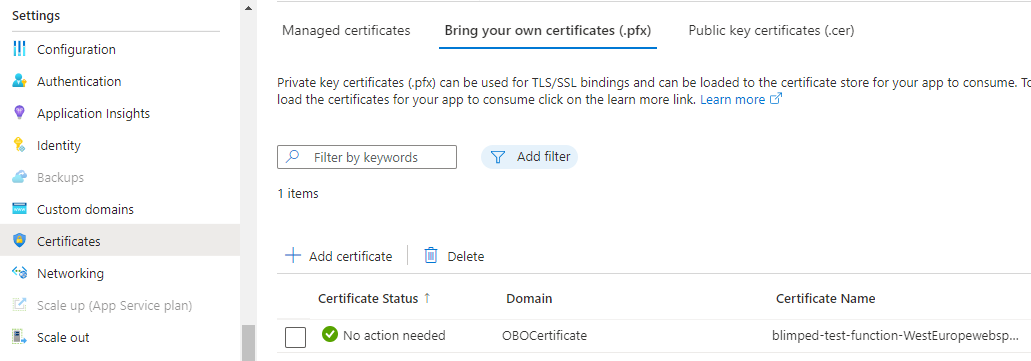
Adding the certificate
First, you need to add the PFX-file of your self-signed certificate to the Function App. This will make sure the Function App can use the certificate to sign a token request to Entra ID. Aside from adding the certificate, you’ll also need to make sure that the WEBSITE_LOAD_CERTIFICATES app setting is set to * (or to the thumbprint of the certificate).
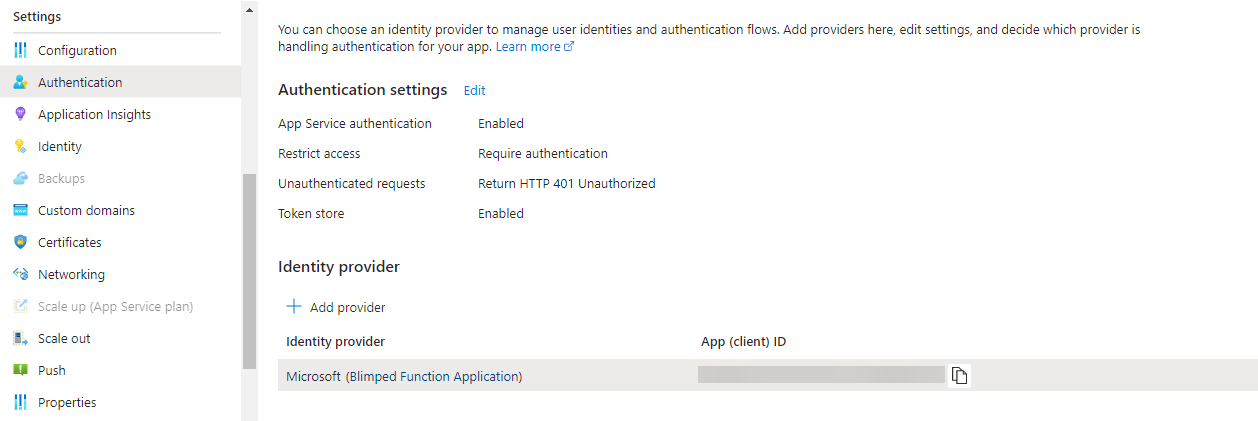
Configuring Authentication
Next, you can enable authentication, so your function will throw a 401 if an unauthenticated request is made. You’ll need to add the Microsoft provider, configure the Entra app that has been created earlier. You’ll also need to add the api://my-function-application as an allowed audience.
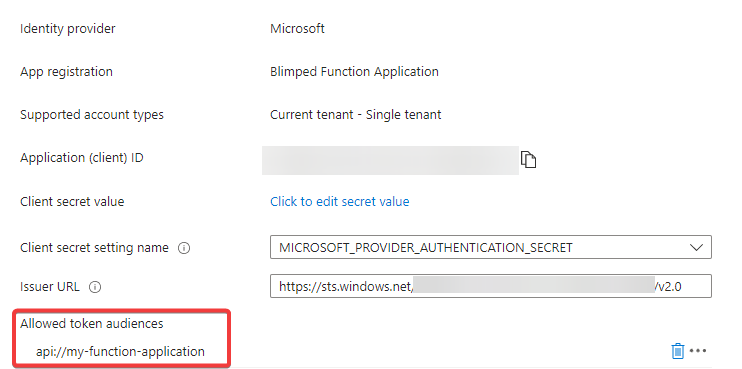
Azure will create a client secret for working with Entra ID, this is a different secret from the one we’ll be using later on, and you can safely ignore it for now. Of course, in a production scenario, you would need to replace that secret when it’s close to expiring.
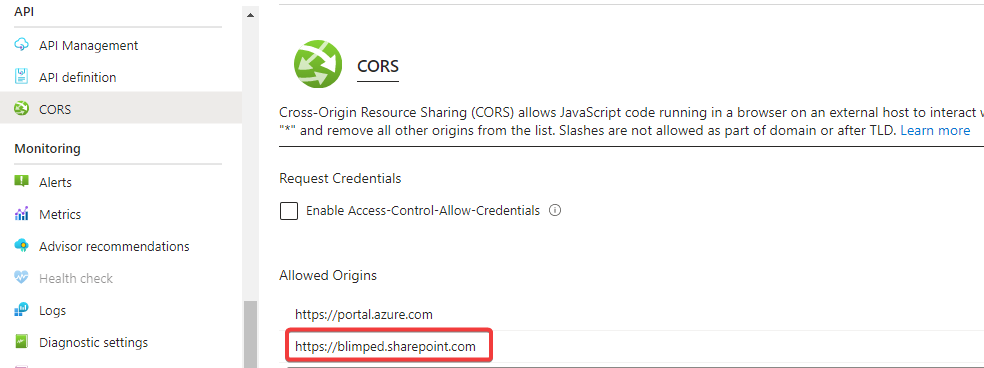
Configuring Cors
Lastly, you’ll need to configure CORS, so that SPFx can actually call the function and that these requests will not be blocked by the browser.
Step 4: Writing the PowerShell script
Now it’s time to write the PowerShell script. Create an HttpTriggered function and open the run.ps1 file. The next segments of code can be placed in there.
Using a Secret
If you will be using a secret, you can add the following helper function to the run.ps1 file. It will request an access token from Entra ID, following the Microsoft documentation on how to do this using the login.microsoftonline.com endpoint. Don’t forget to replace <some-secret> with the secret that you copied to the clipboard earlier. Or of course: be much safer and store the secret in a Key Vault, but that’s out of scope for this post.
function Get-AccessTokenForResource($resource, $oboAccessToken, $tenantId, $appId) {
    $postParams = @{
        grant_type="urn:ietf:params:oauth:grant-type:jwt-bearer"
        client_id=$appId
        client_secret="<some-secret>"
        assertion=$oboAccessToken;
        scope=$resource;
        requested_token_use="on_behalf_of";
    }
    $tokenResponse = Invoke-WebRequest -Uri "https://login.microsoftonline.com/$tenantId/oauth2/v2.0/token" -Method POST -Body $postParams -SkipHttpErrorCheck

    if ($tokenResponse.StatusCode -ne 200) {
        throw ($tokenResponse | ConvertFrom-Json)."error_description"
    }

    return ($tokenResponse | ConvertFrom-Json)."access_token"
}
Using a Certificate
When using a certificate, the way to request a token is slightly different from the secret-scenario. You’ll need to construct a JWT-token as a client_assertion, using the self-signed certificate that we uploaded earlier. The shape of the request can be found in the Microsoft documentation as well. But how to create that JWT-token? I’ve created a few helper functions for that as well, and I’m using a small PowerShell dependency: the JWT-module that can be found in the PowerShell Gallery. You can install this module by adding the following to the Requirements.psd1 file. (Find this file using the ‘App Service Editor’-blade.)
@{
    'JWT' = '1.9.1';
}
The following helper functions can be used to generate the JWT-token and to send the request to Entra ID to request a new Access token using the on-behalf-of flow:
function Get-ClientAssertion ($tenantId, $appId) {
    $thumbprint = "<some-thumbprint>"
    $certificate = Get-Item Cert:\CurrentUser\My\$thumbprint
    $certificateBase64Hash = [System.Convert]::ToBase64String($certificate.GetCertHash())
    $now = (Get-Date).ToUniversalTime()
    $createDate = [Math]::Floor([decimal](Get-Date($now) -UFormat "%s"))
    $expiryDate = [Math]::Floor([decimal](Get-Date($now.AddHours(1)) -UFormat "%s"))

    $header = @{
        "alg" = "RS256"
        "typ" = "JWT"
        "x5t" = "$certificateBase64Hash"
    } | ConvertTo-Json

    $rawClaims = [Ordered]@{
        iss = $appId
        sub = $appId
        iat = $createDate
        exp = $expiryDate
        aud = "https://login.microsoftonline.com/$tenantId/oauth2/v2.0/token"
    } | ConvertTo-Json

    return New-Jwt -Header $header -PayloadJson $rawClaims -Cert $certificate
}

function Get-AccessTokenForResource ($resource, $oboAccessToken, $tenantId, $appId) {
    $clientAssertion = Get-ClientAssertion -tenantId $tenantId -appId $appId

    $postParams = @{
        grant_type = "urn:ietf:params:oauth:grant-type:jwt-bearer"
        client_id = $appId
        client_assertion_type = "urn:ietf:params:oauth:client-assertion-type:jwt-bearer"
        client_assertion = $clientAssertion
        assertion = $oboAccessToken
        scope = $resource
        requested_token_use = "on_behalf_of"
    }

    $tokenResponse = Invoke-WebRequest -Uri "https://login.microsoftonline.com/$tenantId/oauth2/v2.0/token" -Method POST -Body $postParams -SkipHttpErrorCheck

    if ($tokenResponse.StatusCode -ne 200) {
        throw ($tokenResponse | ConvertFrom-Json)."error_description"
    }

    return ($tokenResponse | ConvertFrom-Json)."access_token"
}
Requesting the access token and calling the Graph
Having the helper functions in place, we can now request tokens from Entra ID. The following code will do this for you. It will get the original token from the request header and use the Helper functions to build and send a request to Entra ID. The returned token is then used in a basic request to the Microsoft Graph API and returned to the client.
$authHeader = $request.Headers["Authorization"].ToString();
$oboAccessToken = $authHeader.Replace("Bearer ", "");

$graphAccessToken = Get-AccessTokenForResource `
    -resource "https://graph.microsoft.com/Group.Read.All" `
    -oboAccessToken $oboAccessToken `
    -tenantId "<Tenant ID of Entra ID>"`
    -appId "<Application ID of App Registration>"

$graphResponse = Invoke-WebRequest -Uri "https://graph.microsoft.com/v1.0/groups?`$select=displayName" -Headers @{ "Authorization" = "Bearer $graphAccessToken" } -Method GET

Push-OutputBinding -Name Response -Value ([HttpResponseContext]@{
    StatusCode = [HttpStatusCode]::OK
    Body = $graphResponse.Content
})
Step 5: Calling the Azure Function from SPFx
Ok, so how can we call this from SPFx? It’s basically quite simple. If you’ve got a bare-bones SPFx HelloWorld webpart, just replace the onInit-method with the following code. This will request an access token from Entra ID and use it to call the Azure Function. The response is logged to the console, but you can do whatever you want with it.
protected async onInit(): Promise<void> {
    const client = await this.context.aadHttpClientFactory.getClient("api://my-function-application");
    const response = await client.get(`https://blimped-test-function.azurewebsites.net/api/HttpTrigger1`, AadHttpClient.configurations.v1);
    const groupList = await response.text();
    console.log(groupList);

    return super.onInit();
}
Conclusion
And that’s basically it! You can now use the on-behalf-of flow to request access tokens from Entra ID and use them to call other APIs. This is a very powerful concept, and it can be used in many different scenarios. I hope this post has helped you to get started with this flow. If you have any questions, feel free to reach out to me on Bluesky or LinkedIn, or by commenting below.
Happy coding 👏
Sources
- Microsoft Docs - Identity platform and OAuth 2.0 On-Behalf-Of flow
- Microsoft Docs - Identity platform application authentication certificate credentials
- PowerShell Gallery - JWT Module
- CLI for Microsoft 365 - Creating an App registration
- CLI for Microsoft 365 - Retrieving a Service Principal
- CLI for Microsoft 365 - Granting a Service Principal delegated permissions to a resource
auth azurefunction powershell spfx cli-microsoft365
More
More blogs
Don't trust $PWD in Azure PowerShell Functions
Note to self: do not trust $PWD in Azure PowerShell Functions.
Read more
Configuring the CLI for Microsoft 365 in Azure Functions
Additional tips on configuring and using CLI for Microsoft 365 scripts on Azure Functions based on the PowerShell stack!
Read more
Getting notified of changes in guests accessing SharePoint
Part 3 on how to use the CLI for Microsoft 365 and Azure Functions: How to get notified of updates in guests accessing SharePoint.
Read moreThanks
Thanks for reading

Thanks for reading my blog, I hope you got what you came for. Blogs of others have been super important during my work. This site is me returning the favor. If you read anything you do not understand because I failed to clarify it enough, please drop me a post using my socials.
Warm regards,
Martin
Microsoft MVP | Microsoft 365 Architect