Introduction
Microsoft 365 Purview allows you to create and publish retention labels that you can apply to data in SharePoint, OneDrive, Teams and Exchange. These labels ensure that data is retained for a required period of time. They define if content should be locked as a record in the meantime and if it should be deleted after the retention period has ended. This is especially useful for data that is not actively used, but still needs to be kept for legal or compliance reasons. In this blog post series I dive a little deeper into how to programmatically manage Purview retention labels and apply them to SharePoint content.
Series overview
- Part 1: Managing and applying Purview retention labels using code
- Part 2: Working with Purview event-based retention using code (This blog)
- Part 3: Finding and fixing incorrectly applied Purview retention labels
- Part 4: Implications of applying Purview retention labels to folders
- Part 5: Automating Purview data retention using Azure Functions
Table of contents
- Introduction
- What is event-based retention?
- Managing event-based labels
- Reasons to use scripting
- How to create an event-based retention label
- About applying event-based labels
- How to apply an event-based retention label
- How to create an event to trigger the retention period
- How to monitor distribution status
- Conclusion
What is event-based retention?
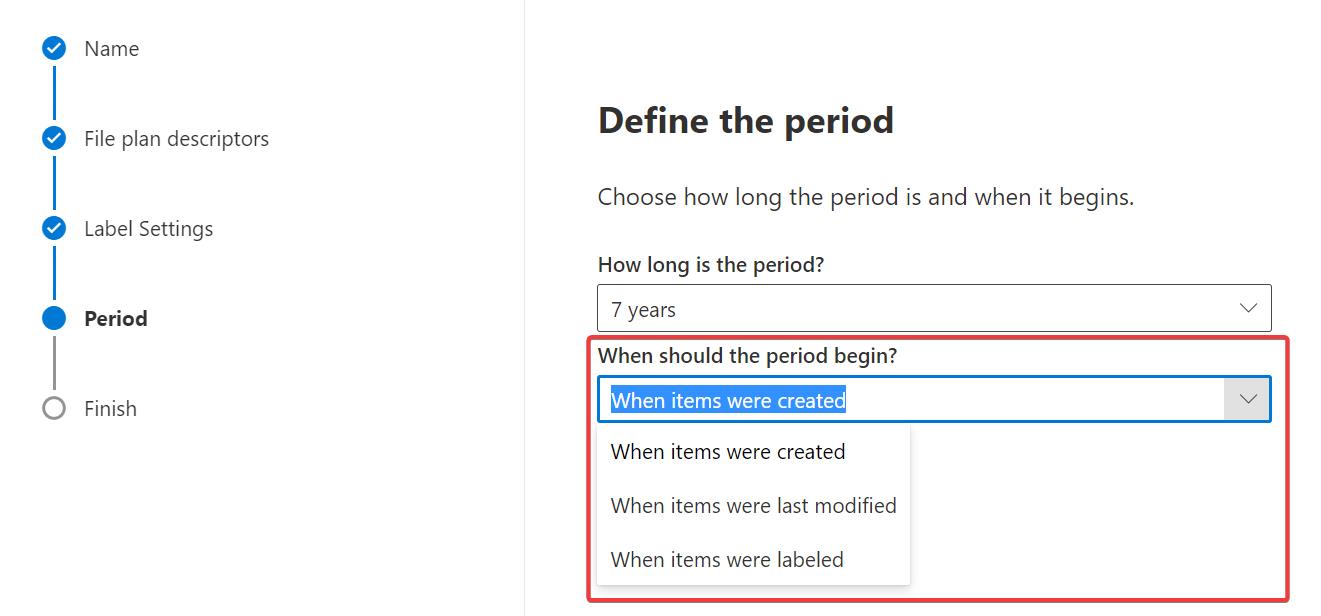
When creating retention labels in Microsoft 365 Purview that have a limited retention period, you can choose one of three moments to start the retention period: When the items where created, where last modified or where labeled.
Most of the time, this would be enough, but for some situations you may want to decide for yourself when to start the retention period. You want to retain data for a certain period of time after a certain event has happened. This is called event-based retention.
Examples of events that you typically use event-based retention for are:
- When an employee leaves the company and you must destroy all their data after an x amount of time due to regulations.
- When a contract expires and you want/need to destroy the data x years after that moment occurred.
But any business process may apply, depending of the needs of your organization.
Managing event-based labels
Event-based retention is typically a little more complex to set-up, and there are multiple things to keep in mind few when working with it. One important thing is that you cannot delete event-based labels after you’ve created them. You can choose to not publish them of course, but they’ll pollute your list of labels anyhow. So if you want to try out working with it, you’ll really want to setup a demo tenant for this, so you won’t ruin production.
Important:
You cannot delete event-based labels after you've created them, so use a demo environment for trying out stuff.
To start working with event-based retention you’ll need an event-type and a label based on the event-type. You can create these in the Purview dashboard, but in this blog post series, we’ll do everything using code.
Reasons to use scripting
Using the Purview dashboard to create labels is easy. So why would you use scripting for such an easy task? There are reasons why you may want to use scripting to create event-based labels:
Using scripting gives you the opportunity to follow a controlled, reviewable and repeatable process. It’s easy to make typo’s in the browser, and it’s easy to forget to do something. Using scripting, you can make sure that everything is done correctly and that you don’t forget anything. You can allow your coworkers to review the script and you can also test the script by deploying it to other test tenants. Thereby reducing the error margins and increasing the speed of your eventual production deployment.
For event-based retention, this is important, as you cannot delete the labels after creating them. So you want to make sure that you don’t make any mistakes.
Note:
Using scripting to create retention labels gives you the opportunity to follow a controlled, reviewable and repeatable process.
How to create an event-based retention label
1. Using Security & Compliance PowerShell
Let’s use Security & Compliance PowerShell, which is a part of the Exchange Online module, and which is the most complete way of working with Purview. Using the following script, we’ll create an event-type and a retention label based on that event-type. The label will determine the retention period for files of employees that have left the company, it will lock the files as records and destroy them after 2 years. The script will also create a policy to publish the label across your entire tenant.
# Install the module if you haven't already
Install-Module -Name ExchangeOnlineManagement

# Create a Security & Compliance PowerShell session by logging in.
Connect-IPPSSession

# Create an event-type for files of employees that are deleted after 2 years.
$eventType = New-ComplianceRetentionEventType -Name "When an employee offboarded"

# Create a retention label based on the event-type
$label = New-ComplianceTag -Name "Retain 2 years - employee files" -RetentionType "EventAgeInDays" -EventType $eventType.Guid -IsRecordLabel $true -IsRecordUnlockedAsDefault $false -Regulatory $false -RetentionDuration 730 -RetentionAction "KeepAndDelete" -Notes "Record - Destroy - 2 years - No review"

# Create a publishing policy
$policy = New-RetentionCompliancePolicy -Name "Event-based label policy" -ModernGroupLocation "All" -SharePointLocation "All" -ExchangeLocation "All" -OneDriveLocation "All"

# Connect the label to the policy
$policyRule = New-RetentionComplianceRule -Policy $policy.Guid -PublishComplianceTag $label.Id
Important to note here is the -RetentionType "EventAgeInDays" option that is used when creating an event-based label. Other retention types are “TaggedAgeInDays”, “CreationAgeInDays” and “ModificationAgeInDays” for the other default retention periods.
2. Using the Microsoft Graph API
The Microsoft Graph API contains a few new endpoints to manage Purview retention labels. But keep in mind that at the moment of writing, these endpoints are still in beta. You can use these endpoints as follows:
Creating an event-type
POST https://graph.microsoft.com/beta/security/triggerTypes/retentionEventTypes
Authorization: "Bearer <accessToken>"
Content-Type: "application/json"
{
  "displayName": "When an employee offboarded",
  "description": "Some additional information about this event type"
}
Creating an event-based label
POST https://graph.microsoft.com/beta/security/labels/retentionLabels
Authorization: "Bearer <accessToken>"
Content-Type: "application/json"
{
  "retentionEventType@odata.bind": "https://graph.microsoft.com/beta/security/triggerTypes/retentionEventTypes/<event-type-id-guid>",
  "displayName": "Retain 2 years - employee files",
  "behaviorDuringRetentionPeriod": "retainAsRecord",
  "actionAfterRetentionPeriod": "delete",
  "retentionTrigger": "dateOfEvent",
  "retentionDuration": {
    "@odata.type": "#microsoft.graph.security.retentionDurationInDays",
    "days": 730
  },
  "defaultRecordBehavior": "startLocked",
  "description": "Record - Destroy - 2 years - No review"
}
Note:
Publishing the label currently cannot be done using the Graph API. You'll need to do that manually.
3. Using the CLI for Microsoft 365
The CLI for Microsoft 365 can also be used to create an event-based label. This commandline tool is using the Graph endpoints, so what I’ve said about the Graph API also applies to the CLI. The following script creates an event-type and an event-based label based on that event-type. It will need to be published manually, because the Graph does not yet support doing that.
# Create an event-type for files of employees that are deleted after 2 years.
m365 purview retentioneventtype add --displayName 'When an employee offboarded' --description 'Some additional information about this event type'

# Create a retention label based on the event-type
m365 purview retentionlabel add --displayName 'Retain 2 years - employee files' --behaviorDuringRetentionPeriod retainAsRecord --actionAfterRetentionPeriod delete --retentionDuration 730 --retentionTrigger dateOfEvent --eventTypeName 'When an employee offboarded'
About applying event-based labels
Having created an event-based label it’s now time to see how we can apply it. That needs to be done in three steps:
- Applying the label to files
- Assigning an Asset Id
- Creating an event to trigger the retention
In general, employees (like HR workers) will be responsible for step 1 and 2, while IT (specifically a Compliance Administrator) will be responsible for Creating the event. But it’s also possible to automate a few or all of the steps. I’ll speak about automation in another post. For now we’ll just see what our options are to do all steps from code.
What is the Compliance Asset Id?
Let me first explain something about the Asset Id of step 2 though. The Asset Id or Comliance Asset Id is just an extra piece of metadata that you need to add to the file. This metadata field must be filled with a value (of your choosing) that is used to identify one or multiple files. It will also need be added to the event that you’ll trigger in step 3. The Asset Id can be any string, for example an employee number. Event-based retention uses asynchronous timer jobs that search for content in your Microsoft 365 Tenant. The Asset Id will be used to find all relevant files and enforce the retention period.
In the SharePoint UI, you’ll see the Asset Id text field become visible as soon as you apply an event-based label. Which is nice. As it’s just a metadata field on the list item, this will be easy to do programmatically as well.
One thing to keep in mind when updating the Asset Id
There’s one thing to keep in mind though. If your event-based label marks the files as records, that record status will block you from updating the Asset Id field. Because it’s metadata. This leads to a strange user experience in the UI:
You label the item, you see the field, you want to update it, but you cannot, because it’s a record.
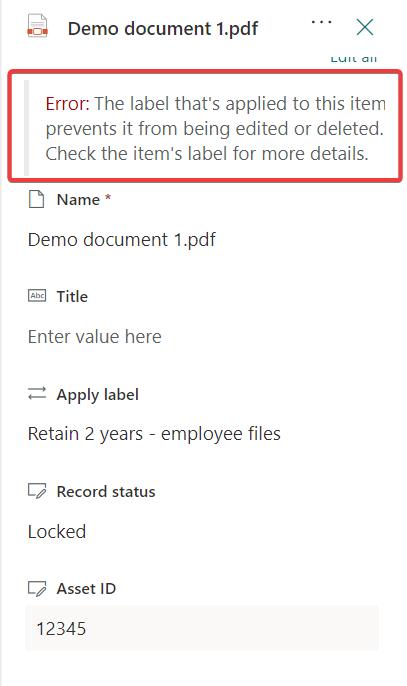
It might be that you don’t even notice the error, because it’s at the top of the details pane, possibly hidden because other form fields push it above the fold and you need to scroll up to see it. This is weird, isn’t it?
There are a few ways to deal with this:
You can manually unlock the item before updating the Asset ID field, and lock it again after.
But that’s a lot of steps, plus it’s questionable if people would find that desirable, because essentially you now have two recorded versions of the same document with the only difference being the Asset Id field, which was needed for labeling purposes in the first place.You can configure the record settings of the retention label to be ‘unlocked by default’.
This will allow you to update the field at once, and you can lock the record right after, using the toggle in the details pane. But that’s still an extra step for users and it may lead to people forgetting to lock a record.
This seems to me an odd user experience for those working with records. But it’s the way it is. 🤷 For our usecase we’re working from code and we’ll have to keep this in mind when we’re running this process from code as well. To solve the problem from code we have the choice to:
- Automatically unlock and lock the record and configuring the Asset Id field in between.
- Update the Asset Id field BEFORE applying the label.
For reasons mentioned above, I prefer the second option. It’s less code and it leads to a single record version.
Important:
Update the Compliance Asset ID field before applying the label, otherwise you'll need to unlock/lock the record.
How to apply an event-based retention label
Having said all that, let’s see how we can apply an event-based label from code. Applying a label has been dealt with extensively in the previous blog post of this series, but let’s take it from the top:
1. Using the SharePoint REST API
When using the SharePoint REST API directly, we’ll need to execute the following two HTTP requests:
First we update the list item, just like the official documentation says:
POST <site_url>/_api/web/lists(guid'<list_guid>')/items(<item_id>)
Authorization: "Bearer <accessToken>"
Accept: "application/json;odata=verbose"
Content-Type: "application/json"
If-Match: "*"
X-HTTP-Method: "MERGE"
X-RequestDigest: "<form_digest_value>"

{
    "__metadata": {
        "type": "SP.Data.SomeListItem"
    },
    "ComplianceAssetId": "12345"
}
…then we apply the label using the safe SetComplianceTagOnBulkItems bulk API:
POST <site_url>/_api/SP_CompliancePolicy_SPPolicyStoreProxy_SetComplianceTagOnBulkItems
Authorization: "Bearer <accessToken>"
Content-Type: "application/json"

{
    "listUrl": "<list_absolute_url>",
    "complianceTagValue": "Retain 2 years - employee files",
    "itemIds": [<item_id>]
}
Important:
If you want to use the other SetComplianceTag-endpoint, tread with caution! Read the previous blog post in this series to see why.
2. Using the CLI for Microsoft 365
Now let’s take the angle of scripting. The following CLI for Microsoft 365 script updates the Asset Id and applies the label to the file:
m365 spo listitem set --webUrl "<site_url>" --listId "<list_guid>" --id <item_id> --ComplianceAssetId "12345"

m365 spo listitem retentionlabel ensure --name "Retain 2 years - employee files" --webUrl "<site_url>" --listId "<list_guid>" --listItemId <item_id>
As you can see the Compliance Asset Id can be configured just like any other list field, and the rest of the labelling experience is also the same as when using a non-event-based label.
3. Using PnP.PowerShell
Using PnP.PowerShell we need to update the list item twice. First we need to update the Asset Id field, and then we need to apply the label. You could rewrite this into one line for non-record labels. for record labels: do not do this in one line, because setting the Compliance Asset Id will fail as the label is applied first. As we discovered above.
Set-PnPlistitem -List "<list_identifier>" -Identity <item_id> -Values @{ "ComplianceAssetId" = "12345" }

Set-PnPListItem -List "<list_identifier>" -Identity <item_id> -Label "Retain 2 years - employee files"
4. Using CSOM
You can also use the Client Side Object Model (CSOM), for labelling from .NET applications. I’m mentioning this one because it’s possible to use it, but I’d advise against labeling items using CSOM, because of the reason mentioned in the previous post of this series.
Important:
If you want to use the SetComplianceTag method, tread with caution! Read the previous blog post in this series to see why.
But just for the sake of progeny, this is how it would work:
// Find the list item and update the Compliance Asset Id
var list = clientContext.Web.GetListByTitle("Documents");
var listItem = list.GetItemById(1);
listItem["ComplianceAssetId"] = "12345";
listItem.Update();
clientContext.ExecuteQuery(); // <-- Execute the query before continuing with the label

// Find the label
var labels = SPPolicyStoreProxy.GetAvailableTagsForSite(clientContext, "https://contoso.sharepoint.com/sites/sales");
clientContext.ExecuteQuery();

var label = labels.FirstOrDefault(l => l.TagName == "Retain 2 years - employee files");

// Now apply it with the correct parameters
listItem.SetComplianceTag(label.TagName, label.BlockDelete, label.BlockEdit, label.IsEventTag, label.SuperLock, label.UnlockedAsDefault) ;
clientContext.ExecuteQuery();
How to create an event to trigger the retention period
The final step is to create an event that will trigger the retention period. Otherwise the labelled item will be retained indefinitely. This can be done by creating a new event in the Purview dashboard. The event will contain the Asset Id that you’ve assigned to the file(s) and also the custom date that you want to use as the retention period start date. The event will also need to be based on the event type you’ve created.
Of course, we’ll be doing this from code as well. As it is usually the task of a Compliance Administrator, you’ll need to make sure that the account or application that creates the event also has the Compliance Administrator role.
1. Using Security & Compliance PowerShell
For now, let’s just see how we can create the event. We have the usual suspect at our disposal, Security & Compliance PowerShell. This module is currently the most powerful for creating events, as it’s currently the only one that allows to create events using Application Permissions, which makes it the only choice to automate retention events.
# Get the event type
$eventType = Get-ComplianceRetentionEventType -Identity "When an employee offboarded"

# Create a new event
$eventDate = [DateTime]::new(2023,01,01)
New-ComplianceRetentionEvent -Name "01-01-2023 - Employee 12345" -SharePointAssetIdQuery "ComplianceAssetId:12345" -EventType $eventType.Guid -EventDateTime $eventDate -Comment "Employee offboarded"
2. Using the Microsoft Graph API
Using the Microsoft Graph API, this is how you create a new event. Keep in mind that this is a beta API and that it currently does not support using Application Permissions:
POST https://graph.microsoft.com/beta/security/triggers/retentionEvents
Authorization: "Bearer <accessToken>"
Content-Type: "application/json"
{
  "retentionEventType@odata.bind": "https://graph.microsoft.com/beta/security/triggerTypes/retentionEventTypes/<event-type-id-guid>",
  "displayName": "01-01-2023 - Employee 12345",
  "description": "Employee offboarded",
  "eventTriggerDateTime": "2023-01-01T00:00:00Z",
  "eventQueries": [
    {
      "queryType": "files",
      "query": "ComplianceAssetId:12345"
    }
  ]
}
3. Using the CLI for Microsoft 365
Using the CLI for Microsoft 365, the same can be achieved as follows. Keep in mind that the CLI uses the Graph API’s and that it therefore currently does not support using Application Permissions:
m365 purview retentionevent add --displayName '01-01-2023 - Employee 12345' --description 'Employee offboarded' --eventTypeName 'When an employee offboarded' --triggerDateTime '2023-01-01' --assetIds 'ComplianceAssetId:12345'
How to monitor distribution status
Now you have successfully created an event, all you can do is wait. The rest is up to Microsoft automatically fixing your retention period. This may take 5 or more days to kick in, due to search indexing, job timers, tenant load and other factors.
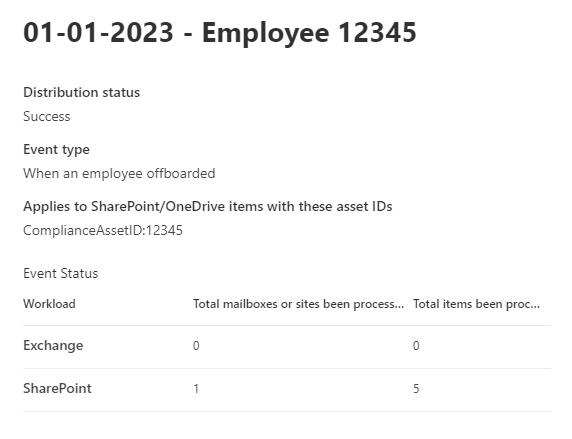
You can however monitor the status of your events using the Purview dashboard. The dashboard will show you the distribution status of your labels, both for SharePoint and Exchange, whether it was succesful and how many files have already been found by the processes. It may take days before these file counters are updated by the way. Event-based labels require a patient heart.
Using Security & Compliance PowerShell you can also get the status of your events from code:
# Get a list of events and their details
$events = Get-ComplianceRetentionEvent

# Get the status of a single event
$event = Get-ComplianceRetentionEvent -Identity "01-01-2023 - Employee 12345"
$eventStatus = $event.EventStatus | ConvertFrom-Json
$statusDetails = $eventStatus.StatusData | ConvertFrom-Json
The values from $statusDetails and $event.DistributionStatus will (eventually) reflect what’s visible in the Purview dashboard, when viewing an event. Again: This might take a week or sometimes even more.
Another way to see results is from SharePoint, where a new “Label Event Date” column will eventually show up with the date of the event. This column will be added by Microsoft to all lists and libraries that have an event-based label applied to it and an event triggered.
Conclusion
Event-based retention is a nice addition with it’s own use cases. In this post I’ve shown you how to create an event-based label, how to apply it and how to trigger an event. I’ve also shown you how to monitor the status of your labels and events. You need a more complex setup, a lot of patience for the automated processes to kick in and you need to be aware of the licensing requirements. I hope this post has served it’s purpose and helps you get started. If you have any questions, do drop me a post using this site or the socials.
Happy labelling!
Sources
- Microsoft Docs - Starting retention when an event occurs
- Microsoft Docs - New-ComplianceTag
- Microsoft Docs - Security & Compliance PowerShell
- Microsoft Docs - Working with list items
- Microsoft Docs - Creating an event type using the Graph
- Microsoft Docs - Creating an retention label using the Graph
- Joanne C Klein - Retention in SharePoint - The How
- Joanne C Klein - Back-dating retention
- Joanne C Klein - Custom metadata and event-based retention
- Joanne C Klein - Starting retention based on a date column
- CLI for Microsoft 365 - Creating an event type
- CLI for Microsoft 365 - Creating a retention label
- CLI for Microsoft 365 - Creating an event
purview retention sharepoint microsoftgraph powershell cli-microsoft365
More
More blogs
Managing and applying Purview retention labels using code
An overview of the different ways you can manage and apply Microsoft 365 Purview retention labels in SharePoint using code.
Read more
Automating Purview data retention using Azure Functions
An example of how to automatically apply Purview retention labels using Azure Functions.
Read more
Finding and fixing incorrectly applied Purview retention labels
In this blog post I will show you how you can find incorrectly applied retention labels.
Read moreThanks
Thanks for reading

Thanks for reading my blog, I hope you got what you came for. Blogs of others have been super important during my work. This site is me returning the favor. If you read anything you do not understand because I failed to clarify it enough, please drop me a post using my socials.
Warm regards,
Martin
Microsoft MVP | Microsoft 365 Architect